Django 基础


Django 基础使用

Django 官网下载页面

https://www.djangoproject.com/download/

安装方法

  1. 命令行安装

    1
    2
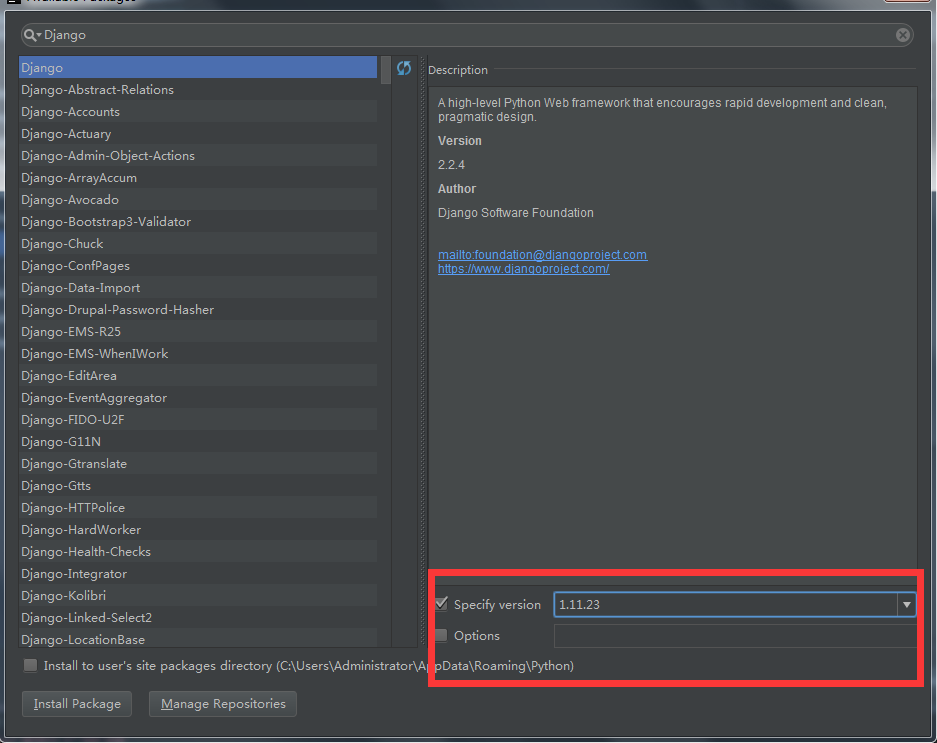
    1. pip3 install django==1.1.23
    2. pip3 install -i https://pypi.tuna.tsinghua.edu.cn/simple/ django==1.1.23 # -i 指定哪个库
  2. Pycharm安装

    1
    安装不要勾选将包安装到指定的地址目录,否则需要将该地址加到环境变量才能使用django-admin命令
创建 Django 项目

  1. 命令行:

    1
    2
    1. cd 要保存Django的目录
    2. python django-admin startproject 项目名
  2. Pycharm 创建

    1
    2
    3
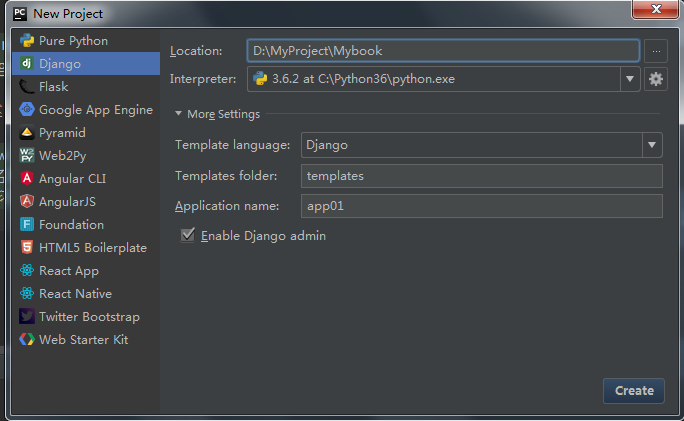
    1. File --> new project --> Django
    2. 可以配置app名称
    3. 不要勾选虚拟环境
配置 Django 项目

Django的配置文件为 project/settings.py文件,作为初学者要先记住4个需要配置的地方:

  1. templates (存放HTML文件的配置)

    1
    2
    3
    4
    5
    6
    7
    8
    TEMPLATES = [
    {
    'BACKEND': 'django.template.backends.django.DjangoTemplates',
    # 告诉Django 我用到的html文件都去这个目录找
    'DIRS': [os.path.join(BASE_DIR, 'templates'),]
    # ... 列表中多个目录会依次查找
    }
    ]
  2. 静态文件:

    1
    2
    3
    4
    5
    6
    7
    8
    9
    # 静态文件夹的别名(在HTML文件中使用)
    # 静态文件保存的文件别名,会依次的查找下面的static1和static2,一直到找不到
    STATIC_URL = '/static/'

    # 静态文件夹的真正路径
    # 所有静态文件(css/js/图片) 都放在下面配置文件目录中
    STATICFILES_DIRS = [
    os.path.join(BASE_DIR,'static')
    ]
  3. 注释掉 csrf 相关的中间件

    1
    2
    # CSRF verification failed. Request aborted. 问题需要注释:大概是:46行
    # 'django.middleware.csrf.CsrfViewMiddleware'
  4. Django项目连接数据库

    1
    2
    3
    4
    5
    6
    7
    8
    9
    10
    DATABASES = {
    'default': {
    'ENGINE': 'django.db.backends.mysql', # 连接的数据库类型
    'NAME': 'mybook',
    'HOST': '10.0.0.200',
    'PORT': 3306,
    'USER': 'root',
    'PASSWORD': '123456',
    }
    }

Django Web 请求流程

  1. 启动Django项目,等待用户连接
  2. 浏览器在地址栏输入URL,来连接我的Django项目
  3. 在urls.py中找到路径和函数的对应关系
  4. 执行对应的函数
  5. 返回响应

urls.py 的配置

  1. project/urls.py 负责保存路径和函数的对应关系
1
2
from .views import index,sport,login,baobao		--> 项目中的views 默认从项目使用相对路径找到
from app01 import views --> app中的views,从项目使用绝对路径导
1
2
3
4
5
from app01 import views	
urlpatterns = [
url(r'^admin/', admin.site.urls),
url(r'^publisher_list/', views.publisher_list),
]

views.py 的配置

  1. app/views.py 专门用来定义处理请求的函数
1
2
3
4
5
6
# 必备三件套 
# shortcuts(快捷键)
from django.shortcuts import HttpResponse,render,redirect
1. HttpResponse("要返回的字符串内容") --> 通常用于直接返回数据
2. render(request,"html文件",{"k1":v1}) --> 返回一个HTML页面或者打开文件进行字符串替换
3. redirect("URL") --> 告诉用户的浏览器去访问指定的UR
1
2
3
# request相关:
request.method --> 查看请求的方法
request.POST --> 获取POST请求的数
1
2
3
def publisher_list(request):
# 使用ORM获取所有出版社信息
return render(request,"publisher_list.html")

ORM 的使用

  1. 什么是ORM
1
2
1. 是一种编程的方法论(模型),和语言无关,其他的语言也有类似的实现
2. 按照规定的语法写,自动翻译成对应的SQL语
  1. ORM的本质
1
2
3
类      -->  数据表
对象 --> 数据行
属性 --> 字
  1. ORM的功能
1
2
ORM 操作数据表
ORM 操作数据行
  1. Django里的ORM使用
1
2
1. 手动创建数据库
CREATE DATABASE mybook CHARACTER SET utf8;
1
2
3
4
5
6
7
8
9
10
2. 在settings.py 里面配置数据库的链接信息
DATABASES = {
'default': {
'ENGINE': 'django.db.backends.mysql',
'NAME': 'mybook',
'HOST': '10.0.0.200',
'PORT': 3306,
'USER': 'root',
'PASSWORD': '123456',
}
1
2
3
# 3. 在project/__init__.py 文件中 告诉Django用pymysql模块代替MySQLDB来连接
import pymysql
pymysql.install_as_MySQLdb()
1
2
3
4
# 4. 在app下的models.py 里面定义类
class Publisher(models.Model):
id = models.AutoField(primary_key=True) # 自增主键
name = models.CharField(max_length=64,null=False,unique=True) # 出版社名称,不能为空,唯一
1
2
3
5. 执行两个命令:
1. python3 manage.py makemigrations # 记录我们对文件的改动,放到migrations目录下
2. python3 manage.py migrate # 把改动翻译成sql语句,再去数据库执行
1
2
3
4
5
6
7
8
9
10
11
12
13
14
15
16
17
18
19
20
21
22
23
24
6. 创建成功的输出结果
D:\MyProject\day03>python manage.py makemigrations
Migrations for 'app01':
app01\migrations\0001_initial.py
- Create model Publisher

D:\MyProject\day03>python manage.py migrate
Operations to perform:
Apply all migrations: admin, app01, auth, contenttypes, sessions
Running migrations:
Applying contenttypes.0001_initial... OK
Applying auth.0001_initial... OK
Applying admin.0001_initial... OK
Applying admin.0002_logentry_remove_auto_add... OK
Applying app01.0001_initial... OK
Applying contenttypes.0002_remove_content_type_name... OK
Applying auth.0002_alter_permission_name_max_length... OK
Applying auth.0003_alter_user_email_max_length... OK
Applying auth.0004_alter_user_username_opts... OK
Applying auth.0005_alter_user_last_login_null... OK
Applying auth.0006_require_contenttypes_0002... OK
Applying auth.0007_alter_validators_add_error_messages... OK
Applying auth.0008_alter_user_username_max_length... OK
Applying sessions.0001_initial... OK
1
2
3
4
5
6
7
8
9
10
11
12
13
14
15
16
17
18
19
20
21
22
23
24
7. 删除表
1. 注释掉在models.py下的类
# class Userinfo(models.Model):
# id = models.AutoField(primary_key=True) # 创建一个自增的主键字段
# name = models.CharField(null=False,max_length=20) # 创建varchar类型并且不能为空的字段

2. 执行命令:
1. python3 manage.py makemigrations # 记录我们对文件的改动,放到migrations目录下
2. python3 manage.py makemigrate # 把改动翻译成sql语句,再去数据库执行

D:\MyProject\app>python manage.py makemigrations
Migrations for 'app01':
app01\migrations\0002_delete_userinfo.py
- Delete model Userinfo


D:\MyProject\app>python manage.py migrate
Operations to perform:
Apply all migrations: admin, app01, auth, contenttypes, sessions
Running migrations:
Applying app01.0002_delete_userinfo... OK


3. migrations目录下的文件 会记录的改
1
2
3
4
5
6
7
8
9
10
11
12
13
14
15
16
17
18
19
8. 修改表
# 修改了name字段的长度 从20修改到32
class Userinfo(models.Model):
id = models.AutoField(primary_key=True) # 创建一个自增的主键字段
name = models.CharField(null=False,max_length=32) # 创建varchar类型并且不能为空的字段

1. python3 manage.py makemigrations # 记录我们对文件的改动,放到migrations目录下
2. python3 manage.py makemigrate # 把改动翻译成sql语句,再去数据库执行

D:\MyProject\app>python manage.py makemigrations
Migrations for 'app01':
app01\migrations\0004_auto_20190903_1054.py
- Alter field name on userinfo

D:\MyProject\app>python manage.py migrate
Operations to perform:
Apply all migrations: admin, app01, auth, contenttypes, sessions
Running migrations:
Applying app01.0004_auto_20190903_1054... O

刷新数据到展示页面

  1. 完善views中的publisher_list函数,将数据库表中刚建好的数据展示出来
1
2
3
4
5
6
from app01 import models
def publisher_list(request):
# 使用ORM去数据库查出所有的出版社,填充到HTML页面中,给用户返回
ret = models.Publisher.objects.all().order_by("id") # 排序
return render(request,"publisher_list.html",{"publisher_list":ret})
# http://127.0.0.1:8000/publisher_list/
  1. 在publisher_list.html中使用模板语言刷新出数据
1
2
3
4
5
6
7
8
9
10
11
12
13
14
15
16
17
18
19
20
21
22
23
24
25
26
27
28
29
<!DOCTYPE html>
<html lang="en">
<head>
<meta charset="UTF-8">
<title>出版社首页</title>
</head>
<body>
<table>
<thead>
<tr>
<th>序号</th>
<th>ID</th>
<th>出版社名称</th>
</tr>
</thead>
<tbody>
{% for publisher in publisher_list %}
<tr>
{#自动序号计数#}
<td>{{ forloop.counter }}</td>
<td>{{ publisher.id }}</td>
<td>{{ publisher.name }}</td>
</tr>
{% endfor %}

</tbody>
</table>
</body>
</html>

启动Django项

  1. 命令行启动:
    D:\MyProject\项目路径>python manage.py runserver 8099

  2. Pycharm启动
    点绿色的小三角,直接启动Django项目,选择项目名编辑可以修改端口

出版社信息 添加、删除、修改操作

添加出版社

  1. 首先在urls.py文件中增加函数与访问路径的对应关系
1
2
3
4
5
urlpatterns = [
url(r'^admin/', admin.site.urls),
url(r'^publisher_list/', views.publisher_list),
url(r'^add_publisher/', views.add_publisher),
]
  1. 在templates路径下添加add_publisher.html页面
1
2
3
4
5
6
7
8
9
10
11
12
13
14
15
16
<!--post提交指向当前页面-->
<!DOCTYPE html>
<html lang="en">
<head>
<meta charset="UTF-8">
<title>添加出版社</title>
</head>
<body>
<h1>添加出版社</h1>
<form action="/add_publisher/" method="POST">
<input type="text" name="publisher_name">
<input type="submit" value="提交">
</form>
<p style="color: red">{{ error_msg }}</p>
</body>
</html>
1
2
3
<!-- 在原有的展示页面上添加一个a标签作为入口指向add_publisher.html-->
<a href="/add_publisher/">添加出版社</a>
<hr>
  1. 在views.py文件写 编写add_publisher函数方法
1
2
3
4
5
6
7
8
9
10
11
12
13
14
15
16
17
18
19
20
# 添加出版社
def add_publisher(request):
error_msg = ""
# 如果是POST请求 就取到用户提交的数据
if request.method == "POST":
# 拿到用户提交的数据
new_name = request.POST.get("publisher_name",None)
print(new_name )
if new_name:
# 通过ORM 将数据入库
models.Publisher.objects.create(name=new_name)
# 添加完成后 跳转回展示页面 查看结果
return redirect("/publisher_list/")
else:
# 如果添加的字符为空,那么久直接返回添加页面,并给提示
error_msg = "您填写的数据为空"
return render(request, "add_publisher.html",{"error_msg":error_msg})

# GET请求放回添加页面
return render(request,"add_publisher.html")

删除出版社

  1. 在urls.py文件中添加对应关系
1
2
3
4
5
6
urlpatterns = [
url(r'^admin/', admin.site.urls),
url(r'^publisher_list/', views.publisher_list),
url(r'^add_publisher/', views.add_publisher),
url(r'^del_publisher/', views.del_publisher),
]
  1. 定义删除按钮
1
2
3
4
5
6
7
8
9
10
11
12
<tbody>
{% for publisher in publisher_list %}
<tr>
{#自动序号计数#}
<td>{{ forloop.counter }}</td>
<td>{{ publisher.id }}</td>
<td>{{ publisher.name }}</td>
<td><a href="/del_publisher/?id={{ publisher.id }}">删除</a></td>
</tr>
{% endfor %}

</tbody>
  1. 编写del_publisher函数方法
1
2
3
4
5
6
7
8
9
10
11
12
13
14
# 删除出版社
def del_publisher(request):
# 当在页面上点击删除的时候,首先应该通过ID获取用户想删除那条数据
# 页面上会通过/del_publisher/?id={{ publisher.id }} 在get的时候传过来id

# 从GET请求的参数里面拿到将要删除的数据的ID值
del_id = request.GET.get("id",None)
if del_id:
# 通过ORM删除指定数据
del_obj = models.Publisher.objects.get(id=del_id).delete()
# 删除后返回出版社页面,查看是否成功
return redirect("/publisher_list/")
else:
HttpResponse("您要删除的数据不存在")

编辑出版社

  1. 在urls.py文件中添加对应关系
1
2
3
4
5
6
7
urlpatterns = [
url(r'^admin/', admin.site.urls),
url(r'^publisher_list/', views.publisher_list),
url(r'^add_publisher/', views.add_publisher),
url(r'^del_publisher/', views.del_publisher),
url(r'^edit_publisher/', views.edit_publisher),
]
  1. 定义编辑按钮
1
2
3
4
5
6
7
8
9
10
11
12
13
14
15
<tbody>
{% for publisher in publisher_list %}
<tr>
{#自动序号计数#}
<td>{{ forloop.counter }}</td>
<td>{{ publisher.id }}</td>
<td>{{ publisher.name }}</td>
<td>
<a href="/del_publisher/?id={{ publisher.id }}">删除</a>
<a href="/edit_publisher/?id={{ publisher.id }}">编辑</a>
</td>
</tr>
{% endfor %}

</tbody>
  1. 创建edit_publisher.html页面
1
2
3
4
5
6
7
8
9
10
11
12
13
14
15
16
17
18
<!--1. id 将要编辑的数据id放在页面中,但是不显示-->
<!--2. 将查询出来的要编辑的数据对象的名字刷新到编辑页面中-->
<!DOCTYPE html>
<html lang="en">
<head>
<meta charset="UTF-8">
<title>编辑出版社</title>
</head>
<body>
<h1>编辑出版社</h1>
<form action="/edit_publisher/" method="POST">
<input type="text" name="id" value="{{ publisher_obj.id }}" style="display: none">
<input type="text" name="publisher_name" value="{{ publisher_obj.name }}">
<input type="submit" value="提交">
</form>
<p style="color: red">{{ error_msg }}</p>
</body>
</html>
  1. 编写edit_publisher函数方法
    1
    2
    3
    4
    5
    6
    7
    8
    9
    10
    11
    12
    13
    14
    15
    16
    17
    18
    19
    20
    21
    22
    23
    24
    25
    26
    # 编辑出版社
    def edit_publisher(request):

    # 如果是POST提交,将用户从编辑页面修改的数据刷新到数据库中
    if request.method == "POST":
    edit_id = request.POST.get("id",None)
    new_name = request.POST.get("publisher_name",None)

    # 更新出版社
    # 根据ID取到编辑的是哪个出版社
    edit_publisher_obj = models.Publisher.objects.get(id=edit_id)
    edit_publisher_obj.name = new_name
    # 把修改后的数据提交到数据
    edit_publisher_obj.save()
    # 去出版社列表页面展示,查看是否更新成功
    return redirect("/publisher_list/")

    # 返回编辑的是哪个出版社对象
    # 从GET请求中取到要编辑的ID
    # 当用户从展示页点击编辑按钮,需要获取用户点击的数据ID,然后得到数据对象传给编辑页面
    edit_id = request.GET.get("id",None)
    if edit_id:
    publisher_obj = models.Publisher.objects.get(id=edit_id)
    return render(request,"edit_publisher.html",{"publisher_obj":publisher_obj})
    else:
    return HttpResponse("您要编辑的数据不存在")

图书信息 添加、删除、修改

一对多关系表的建立
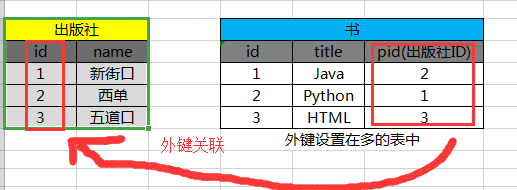
ORM添加外键关联 models.ForeignKey

1
2
3
4
5
class Book(models.Model):
id = models.AutoField(primary_key=True) # 自增主键
title = models.CharField(max_length=64, null=False, unique=True) # 书籍名称,不能为空,唯一
# ForeignKey会自动加_id , 在数据库就叫做publisher_id_id, 所以只要写publisher就可以
publisher = models.ForeignKey(to=Publisher) # ForeignKey外键

展示所有书籍

  1. 在urls.py文件中添加对应关系

    1
    2
    # 书籍所有相关
    url(r'^book_list/', views.book_list),
  2. 在book_list.html中使用模板语言刷新出数据

    1
    2
    3
    4
    5
    6
    7
    8
    9
    10
    11
    12
    13
    14
    15
    16
    17
    18
    19
    20
    21
    22
    23
    24
    25
    26
    27
    28
    29
    30
    31
    32
    33
    34
    35
    36
    <!DOCTYPE html>
    <html lang="en">
    <head>
    <meta charset="UTF-8">
    <title>书籍列表</title>
    </head>
    <h1>书籍列表</h1>
    <a href="/add_book/">添加书籍</a>
    <body>
    <table border="1">
    <thead>
    <tr>
    <th>序号</th>
    <th>ID</th>
    <th>书名</th>
    <th>出版社</th>
    </tr>
    </thead>
    <tbody>
    {% for book in book_list %}
    <tr>
    <td>{{ forloop.counter }}</td>
    <td>{{ book.id }}</td>
    <td>{{ book.title }}</td>
    <td>{{ book.publisher.name }}</td>
    </tr>
    {% endfor %}
    {#book.publisher 得到的是出版社对象,继续.出属性#}
    {#book --> 书对象#}
    {#book.publisher --> book对应的出版社对象#}
    {#book.publisher_id --> 数据库表中实际保存的外键值#}
    {#book.publisher.name --> book对应的出版社对象的属性#}
    </tbody>
    </table>
    </body>
    </html>
  3. views.py文件中添加展示书籍函数 book_list

1
2
3
4
5
def book_list(request):
# ORM去数据库中查询所有的数据
all_book = models.Book.objects.all().order_by("id")
# 去HTMK页面渲染数据
return render(request,"book_list.html",{"book_list":all_book})

添加书籍

  1. 在urls.py文件中添加对应关系
1
2
3
# 书籍所有相关
url(r'^book_list/', views.book_list),
url(r'^add_book/', views.add_book),
  1. 别忘记添加入口
1
<a href="/add_book/">添加书籍</a>
  1. 编写add_book函数
1
2
3
4
5
6
7
8
9
10
11
12
13
14
15
16
17
18
19
20
# 添加书籍
def add_book(request):

if request.method == "POST":
# {"book_title":"css","publisher":1}
new_book_title = request.POST.get("book_title",None)
new_publisher = request.POST.get("publusher",None)
print(new_book_title)
print(new_publisher)
# 创建新书,添加新数据
models.Book.objects.create(
title=new_book_title,
publisher_id = new_publisher
)
# 返回书籍列表页面
return redirect("/book_list/")

# 取到所有的出版社,给添加页面的select
all_publisher = models.Publisher.objects.all()
return render(request,"add_book.html",{"all_publisher":all_publisher})
  1. 添加add_book.html页面
1
2
3
4
5
6
7
8
9
10
11
12
13
14
15
16
17
18
19
20
21
<!DOCTYPE html>
<html lang="en">
<head>
<meta charset="UTF-8">
<title>添加书籍</title>
</head>
<body>
<h1>添加书籍</h1>
<hr>
<form action="/add_book/" method="post">
<input type="text" name="book_title">
{#{"publisher":pid}#}
<select name="publusher" id="">
{% for publisher in all_publisher %}
<option value="{{ publisher.id }}">{{ publisher.name }}</option>
{% endfor %}
</select>
<input type="submit" value="提交">
</form>
</body>
</html>

删除书籍

  1. 在urls.py文件中添加对应关系

    1
    2
    3
    4
    # 书籍所有相关
    url(r'^book_list/', views.book_list),
    url(r'^add_book/', views.add_book),
    url(r'^del_book/', views.del_book),
  2. 定义删除按钮

1
2
3
4
5
6
7
8
9
10
11
12
13
14
15
<tbody>
{% for book in book_list %}
<tr>
<td>{{ forloop.counter }}</td>
<td>{{ book.id }}</td>
<td>{{ book.title }}</td>
<td>{{ book.publisher.name }}</td>
<td>
<a href="/del_book/?id={{ book.id }}">删除</a>
<a href="/edit_book/?id={{ book.id }}">编辑</a>
</td>
</tr>
{% endfor %}

</tbody>
  1. 编写del_book方法
1
2
3
4
5
6
7
def del_book(request):
# 获取要删除的书籍的ID
del_id = request.GET.get("id")
# 去数据库根据del_id查找要删除的书籍对象,然后直接删除
models.Book.objects.get(id=del_id).delete()
# 返回书籍展示页面
return redirect("/book_list/")

编辑书籍

  1. 在urls.py文件中添加对应关系

    1
    2
    3
    4
    5
    # 书籍所有相关
    url(r'^book_list/', views.book_list),
    url(r'^add_book/', views.add_book),
    url(r'^del_book/', views.del_book),
    url(r'^edit_book/', views.edit_book)
  2. 编写edit_book方法

1
2
3
4
5
6
7
8
9
10
11
12
13
14
15
16
17
18
19
20
21
22
def edit_book(request):
# 从POST提交的数据中取出id、书名和书关联的出版社
if request.method == "POST":
edit_id = request.POST.get("id")
edit_book_title = request.POST.get("book_title")
edit_publusher_id = request.POST.get("publusher")

# 根据edit_id得到要修改的书籍对象,然后更新数据并提交
edit_obj = models.Book.objects.get(id=edit_id)
edit_obj.title = edit_book_title
edit_obj.publisher_id = edit_publusher_id
# 将修改提交到数据
edit_obj.save()
# 返回书籍列表页面
return redirect("/book_list/")

# 通过Get获取ID 将要修改的书籍对象传给页面
edit_id = request.GET.get("id",None)
edit_obj = models.Book.objects.get(id=edit_id)
# 获取所有出版社对象,传给页面的select
all_publisher = models.Publisher.objects.all()
return render(request,"edit_book.html",{"all_publisher":all_publisher,"edit_obj":edit_obj})
  1. 编写edit_book.html页面
1
2
3
4
5
6
7
8
9
10
11
12
13
14
15
16
17
18
19
20
21
22
23
24
25
26
27
28
29
30
<!DOCTYPE html>
<html lang="en">
<head>
<meta charset="UTF-8">
<title>编辑书籍</title>
</head>
<body>
<h1>编辑书籍</h1>
<hr>
<form action="/edit_book/" method="post">
{#提交数据的时候拿到书籍的ID#}
<input type="text" name="id" value="{{ edit_obj.id }}" style="display: none">
<input type="text" name="book_title" value="{{ edit_obj.title }}">
{#select默认选中编辑书籍的出版社#}
<select name="publusher">
{# 当前书籍关联的出版社才默认选中,其他的出版社不选中 #}
{# 如果书的出版社的id值 {{ book_obj.publisher.id }} 等于 publisher.id#}
{% for publisher in all_publisher %}
{% if edit_obj.publisher.id == publisher.id %}
<option selected value="{{ publisher.id }}">{{ publisher.name }}</option>
{#否则不选中#}
{% else %}
<option value="{{ publisher.id }}">{{ publisher.name }}</option>
{% endif %}
{% endfor %}
</select>
<input type="submit" value="提交">
</form>
</body>
</html>

作者信息 添加、删除、修改

多对多关系表的建立


ORM添加多对多的关联关系 models.ManyToManyField

1
2
3
4
5
6
7
8
class Author(models.Model):
id = models.AutoField(primary_key=True) # 自增主键
name = models.CharField(max_length=64,null=False,unique=True) # 作者名字,不能为空,唯一
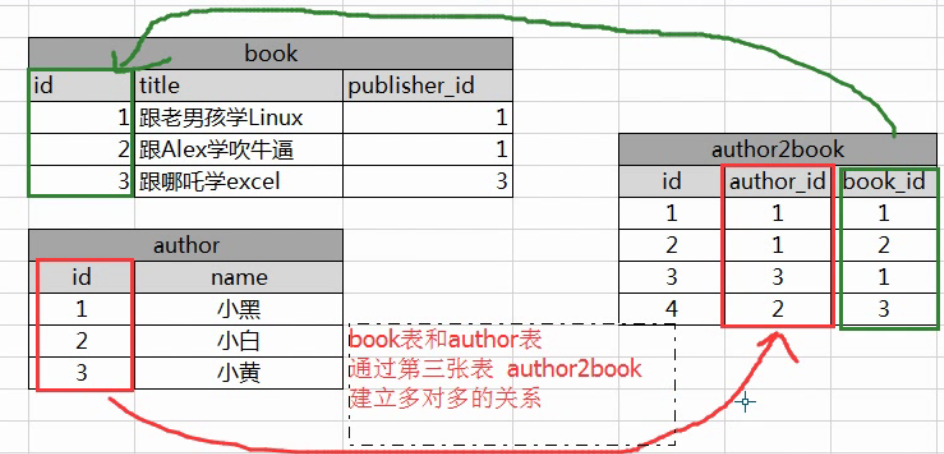
# 告诉ORM 这张表与book表是多对多的关联关系,ORM自动帮我们生成第三张关联表 名字是author_book
book = models.ManyToManyField(to='Book') # ManyToManyField 关联Book表 会创建第三张关联表

def __str__(self):
return '<Author 名字{}>'.format(self.name)

urls.py预先定义所有方法函数和路径的对应关系

1
2
3
4
5
# 作者所有相关
url(r'^author_list/', views.author_list),
url(r'^add_author/', views.add_author),
url(r'^del_author/', views.del_author),
url(r'^edit_author/', views.edit_author),

展示所有作者

  1. author_list函数
1
2
3
4
5
6
7
8
9
10
11
12
13
def author_list(request):

# 查询出所有作家信息
all_author = models.Author.objects.all().order_by("id")

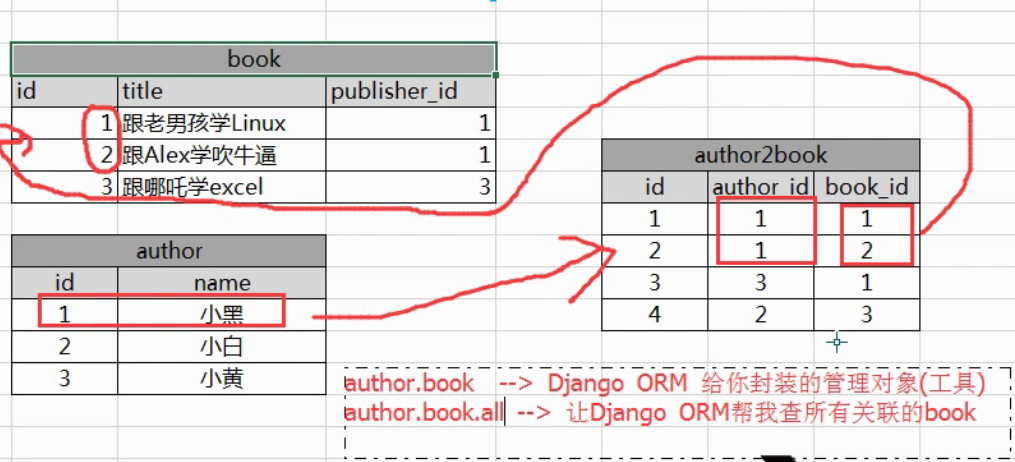
# 单取一个作者对象,查看他的book属性
# 作者对象里的book
# author_obj = all_author[0]
author_obj = models.Author.objects.get(id=1)
print(author_obj.book.all()) # <QuerySet [<Book: Java>, <Book: Python>]> 当前作者.所有的书籍对象
print("=" * 120)

return render(request,"author_list.html",{"author_list":all_author})
  1. 展示作者页面 author_list.html
1
2
3
4
5
6
7
8
9
10
11
12
13
14
15
16
17
18
19
20
21
22
23
24
25
26
27
28
29
30
31
32
33
34
35
36
37
38
39
40
41
42
43
44
45
46
47
48
<!DOCTYPE html>
<html lang="en">
<head>
<meta charset="UTF-8">
<title>作家信息</title>
</head>
<body>
<h1>作家信息</h1>
<hr>
<a href="/add_author/">添加新作者</a>
<table border="1">
<thead>
<tr>
<th>序号</th>
<th>ID</th>
<th>作家姓名</th>
<th>书籍</th>
<th>操作</th>
</tr>
</thead>
<tbody>
{% for author in author_list %}
<tr>
<td>{{ forloop.counter }}</td>
<td>{{ author.id }}</td>
<td>{{ author.name }}</td>
<td>
{#循环作者所有书籍对象 判断最后一个加上|分割#}
{% for book in author.book.all %}
{% if forloop.last %}
{{ book.title }} &nbsp;
{% else %}
{{ book.title }} |
{% endif %}
{% endfor %}
</td>
<td>
<a href="/del_author/?id={{ author.id }}">删除</a>
<a href="/edit_author/?id={{ author.id }}">编辑</a>
</td>
</tr>

{% endfor %}

</tbody>
</table>
</body>
</html>

添加作者

  1. add_author函数
1
2
* 要将所有书籍传给添加页面的select
* 先创建新作者,使用set添加新作者与书的对应关系
1
2
3
4
5
6
7
8
9
10
11
12
13
14
15
16
17
18
19
# 添加作者
def add_author(request):
# 取到提交数据
if request.method == "POST":
new_name = request.POST.get("author_name")
# POST 提交的数据是多个值的时候,要用getlist,如多选的checkbox和多选的select
new_author_book = request.POST.getlist("author_book")
print(new_name,new_author_book)
print("*" * 150)
# 创建新作者
new_author_obj = models.Author.objects.create(name=new_name)
# 使用set添加新作者与书的对应关系
new_author_obj.book.set(new_author_book)
# 返回作者列表页面
return redirect("/author_list/")

# 要将所有书籍传给添加页面的select
all_book = models.Book.objects.all().order_by("id")
return render(request,"add_author.html",{"book_list":all_book})
  1. 添加add_author.html页面
1
2
3
4
5
6
7
8
9
10
11
12
13
14
15
16
17
18
19
20
21
22
23
24
25
26
27
<!DOCTYPE html>
<html lang="en">
<head>
<meta charset="UTF-8">
<title>添加作者</title>
</head>
<body>
<h1>添加作者</h1>
<hr>
<form action="/add_author/" method="post">
<p>作者姓名:
<input type="text" name="author_name">
</p>

<p>选择作品:
{#多选,将所有图书放入多选框中#}
<select multiple name="author_book">
{% for book in book_list %}
<option value="{{ book.id }}">{{ book.title }}</option>
{% endfor %}
</select>
</p>

<input type="submit" value="提交">
</form>
</body>
</html>

删除作者

  1. del_author函数:
1
2
3
4
5
6
7
# 删除作者
def del_author(request):
# 从GET里获取要删除的作者ID,然后直接删除
del_id = request.GET.get("id",None)
models.Author.objects.get(id=del_id).delete()
# 返回作者列表页面
return redirect("/author_list/")

编辑作者

  1. edit_author函数
1
2
3
4
5
1. 注意获取页面上的select或者checkbox多个值需要使用getlist接收
2. 页面条件判断 当书在作者对象.book.all里时,才默认选中该书,否则不选中
3. edit_obj.book.all()在函数中得到对象所有的书籍对象,但是在页面中无法使用()方法
4. 更新数据需要使用对象.save()方法
5. 更新作者对象的书籍,edit_obj.book.set(edit_books)
1
2
3
4
5
6
7
8
9
10
11
12
13
14
15
16
17
18
19
20
21
22
23
24
25
26
27
28
29
30
def edit_author(request):

if request.method == "POST":
# 从POST里取得编辑作者的id、姓名、作品
edit_id = request.POST.get("id")
edit_name = request.POST.get("author_name")
edit_books = request.POST.getlist("author_books")
print(edit_books)
print(edit_name)
print("*" * 100)

# 根据ID找到编辑的是哪个作者对象, 最后提交更新数据
edit_obj = models.Author.objects.get(id=edit_id)
# 更新数据
edit_obj.name = edit_name
# 更新作者关联书籍的对应关系
edit_obj.book.set(edit_books)
# 将所有的修改提交
edit_obj.save()

# 返回作者列表页面
return redirect("/author_list/")

# 通过GET获取用户编辑的作者ID,找到要编辑的作者对象,返回给edit_author.html
edit_id = request.GET.get("id",None)
edit_obj = models.Author.objects.get(id=edit_id)
print(edit_obj.book.all()) # <QuerySet [<Book: <object book_title=Python>>, <Book: <object book_title=GO>>]>
# 返回所有书籍返回给页面的select
all_book = models.Book.objects.all()
return render(request,'edit_author.html',{"book_list":all_book,"edit_obj":edit_obj})
  1. 添加edit_author.html页面
1
2
3
4
5
6
7
8
9
10
11
12
13
14
15
16
17
18
19
20
21
22
23
24
25
26
27
28
29
30
31
32
33
<!DOCTYPE html>
<html lang="en">
<head>
<meta charset="UTF-8">
<title>编辑作者</title>
</head>
<body>
<h1>编辑作者</h1>
<hr>
<form action="/edit_author/" method="post">
<input type="text" name="id" value="{{ edit_obj.id }}" style="display: none">

<p>作者姓名:
<input type="text" name="author_name" value="{{ edit_obj.name }}">
</p>
<p>作者作品:
<select name="author_books" multiple>
{% for book in book_list %}
{#判断,如果当前这本书 在 当前作者关联的书列表里 edit_id_obj.book.all #}
{% if book in edit_obj.book.all %}
<option selected value="{{ book.id }}">{{ book.title }}</option>
{#否则,不选中#}
{% else %}
<option value="{{ book.id }}">{{ book.title }}</option>
{% endif %}
{% endfor %}
</select>
</p>

<input type="submit" value="提交">
</form>
</body>
</html>

使用 Bootstrap模板 和 Font Awesome图标字体库

去Bootstrap下载想要的模板

  1. 选择控制台模板https://v3.bootcss.com/examples/dashboard/
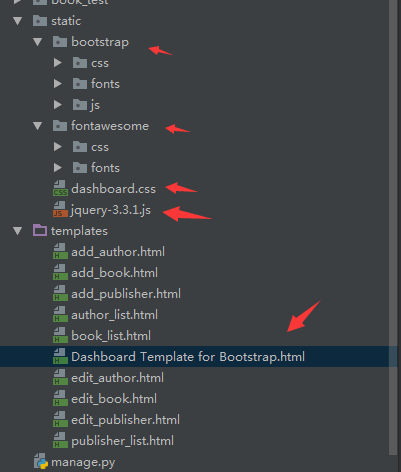
  2. 右键另存为桌面,会下载两个文件:
    Dashboard Template for Bootstrap_files 目录:只保留dashboard.css即可
    Dashboard Template for Bootstrap.html html文件

去Font Awesome官网下载图标字体库和CSS框架

  1. http://fontawesome.dashgame.com

将下载好的文件放入static目录

套用首页模板

  1. 修改publisher_list 为old_publisher_list
  2. 修改Dashboard Template for Bootstrap.html 为publisher_list
  3. 替换首页的css引入:
1
2
3
4
5
6
7
8
9
10
11
12
13
14
15
16
17
18
19
20
<!DOCTYPE html>
<!-- saved from url=(0042)https://v3.bootcss.com/examples/dashboard/ -->
<html lang="zh-CN">
<head><meta http-equiv="Content-Type" content="text/html; charset=UTF-8">

<meta http-equiv="X-UA-Compatible" content="IE=edge">
<meta name="viewport" content="width=device-width, initial-scale=1">
<!-- 上述3个meta标签*必须*放在最前面,任何其他内容都*必须*跟随其后! -->
<meta name="description" content="">
<meta name="author" content="">
<link rel="icon" href="https://v3.bootcss.com/favicon.ico">

<title>添加作者</title>
<!-- Bootstrap core CSS -->
<link href="/static/bootstrap/css/bootstrap.min.css" rel="stylesheet">
<!-- Custom styles for this template -->
<link href="/static/dashboard.css" rel="stylesheet">
<link href="/static/fontawesome/css/font-awesome.min.css" rel="stylesheet">

</head>
  1. 替换首页的jQuery引入:
1
2
<script src="/static/jquery-3.3.1.js"></script>
<script src="/static/bootstrap/js/bootstrap.min.js"></script>
  1. Bootstrap和fontawesome的使用
1
2
3
4
5
6
7
8
9
10
11
12
13
14
15
16
17
18
19
20
21
22
23
24
25
26
27
28
29
30
31
32
33
34
35
36
37
38
39
40
41
42
43
44
45
46
47
48
49
50
51
52
53
54
55
56
57
58
59
<div class="container-fluid">
<div class="row">
<div class="col-sm-3 col-md-2 sidebar">
<ul class="nav nav-sidebar">
<li class="active"><a href="/publisher_list/">出版社列表</a></li>
<li><a href="/book_list/">书籍列表</a></li>
<li><a href="/author_list/">作者列表</a></li>
</ul>
</div>
<div class="col-sm-9 col-sm-offset-3 col-md-10 col-md-offset-2 main">
<h1 class="page-header">出版社管理页面</h1>
{#面板#}
<div class="panel panel-primary">
<div class="panel-heading">书籍列表</div>
<div class="panel-body">
<div class="row" style="margin-bottom: 20px">
<div class="col-md-4">
<div class="input-group">
<input type="text" class="form-control" placeholder="Search for...">
<span class="input-group-btn">
<button class="btn btn-default" type="button">搜索</button>
</span>
</div><!-- /input-group -->
</div><!-- /.col-md-4 -->

<div class="col-md-2 pull-right">
<a href="/add_publisher/" class="btn btn-success">新页面添加</a>
<button class="btn btn-success" data-toggle="modal" data-target="#myModal">新增</button>
</div>

</div><!-- /.row -->
<table class="table table-bordered " >
<thead >
<tr>
<th class="text-center">序号</th>
<th class="text-center">ID</th>
<th class="text-center">出版社</th>
<th class="text-center">操作</th>
</tr>
</thead>
<tbody class="text-center">
{% for publisher in all_publisher %}
<tr>
<td>{{ forloop.counter }}</td>
<td>{{ publisher.id }}</td>
<td>{{ publisher.name }}</td>
<td>
<a class="btn btn-danger" href="/del_publisher/?id={{ publisher.id }}"><i class="fa fa-trash-o fa-fw"></i>删除</a>
<a class="btn btn-primary" href="/edit_publisher/?id={{ publisher.id }}"><i class="fa fa-pencil fa-fw"></i>编辑</a>
</td>
</tr>
{% endfor %}
</tbody>
</table>
</div>
</div>
</div>
</div>
</div>
  1. 简单的写一个add_book.html
1
2
3
4
5
6
7
8
9
10
11
12
13
14
15
16
17
18
19
20
21
22
23
24
25
26
27
28
29
30
31
32
33
34
35
36
37
38
39
40
41
42
43
44
45
46
47
48
49
50
51
52
53
54
55
56
57
<!DOCTYPE html>
<!-- saved from url=(0042)https://v3.bootcss.com/examples/dashboard/ -->
<html lang="zh-CN">
<head>
<meta http-equiv="Content-Type" content="text/html; charset=UTF-8">

<meta http-equiv="X-UA-Compatible" content="IE=edge">
<meta name="viewport" content="width=device-width, initial-scale=1">
<!-- 上述3个meta标签*必须*放在最前面,任何其他内容都*必须*跟随其后! -->
<meta name="description" content="">
<meta name="author" content="">
<link rel="icon" href="https://v3.bootcss.com/favicon.ico">

<title>添加作者</title>
<!-- Bootstrap core CSS -->
<link href="/static/bootstrap/css/bootstrap.min.css" rel="stylesheet">
<!-- Custom styles for this template -->
<link href="/static/dashboard.css" rel="stylesheet">
<link href="/static/fontawesome/css/font-awesome.min.css" rel="stylesheet">

</head>
<body>
<div class="container">
<div class="row">
<div class="col-md-6 col-md-offset-3">
{#页头#}
<div class="page-header">
<h1>添加页面</h1>
</div>

<div class="panel panel-primary">
<div class="panel-heading">添加出版社</div>
<div class="panel-body">
<form class="form-horizontal" action="/add_publisher/" method="post">
<div class="form-group">
<label for="publisher_name" class="col-sm-3 control-label">出版社名称</label>
<div class="col-sm-9">
<input type="text" name="publisher_name" class="form-control" id="publisher_name" placeholder="出版社名称">
</div>
</div>

<div class="form-group">
<div class="col-sm-offset-3 col-sm-9">
<button type="submit" class="btn btn-default">提交</button>
</div>
</div>
</form>
</div>
</div>
</div>
</div>
</div>

</body>
<script src="/static/jquery-3.3.1.js"></script>
<script src="/static/bootstrap/js/bootstrap.min.js"></script>
</html>
  1. 简单的写一个edit_book.html
1
2
3
4
5
6
7
8
9
10
11
12
13
14
15
16
17
18
19
20
21
22
23
24
25
26
27
28
29
30
31
32
33
34
35
36
37
38
39
40
41
42
43
44
45
46
47
48
49
50
51
52
53
54
55
56
57
58
59
60
<!DOCTYPE html>
<!-- saved from url=(0042)https://v3.bootcss.com/examples/dashboard/ -->
<html lang="zh-CN">
<head>
<meta http-equiv="Content-Type" content="text/html; charset=UTF-8">

<meta http-equiv="X-UA-Compatible" content="IE=edge">
<meta name="viewport" content="width=device-width, initial-scale=1">
<!-- 上述3个meta标签*必须*放在最前面,任何其他内容都*必须*跟随其后! -->
<meta name="description" content="">
<meta name="author" content="">
<link rel="icon" href="https://v3.bootcss.com/favicon.ico">

<title>编辑出版社</title>
<!-- Bootstrap core CSS -->
<link href="/static/bootstrap/css/bootstrap.min.css" rel="stylesheet">
<!-- Custom styles for this template -->
<link href="/static/dashboard.css" rel="stylesheet">
<link href="/static/fontawesome/css/font-awesome.min.css" rel="stylesheet">

</head>
<body>
<div class="container">
<div class="row">
<div class="col-md-6 col-md-offset-3">
{#页头#}
<div class="page-header">
<h1>编辑页面</h1>
</div>

<div class="panel panel-primary">
<div class="panel-heading">编辑出版社</div>
<div class="panel-body">
<form class="form-horizontal" action="/edit_publisher/" method="post">
<input type="text" name="edit_id" value="{{ edit_obj.id }}" style="display: none" >
<div class="form-group">
<label for="publisher_name" class="col-sm-3 control-label">出版社名称</label>
<div class="col-sm-9">
<input type="text" name="publisher_name" class="form-control" id="publisher_name" value="{{ edit_obj.name }}">
</div>
</div>

<div class="form-group">
<div class="col-sm-offset-3 col-sm-9">
<button type="submit" class="btn btn-default">提交</button>
</div>
</div>
</form>
</div>
</div>
</div>
</div>


</div>

</body>
<script src="/static/jquery-3.3.1.js"></script>
<script src="/static/bootstrap/js/bootstrap.min.js"></script>
</html>