08 Dockerfile 构建镜像


Dockerfile

Dockerfile 是一个文本文件,记录了镜像构建的所有步骤。

构建镜像

  1. 由于官方提供的centos镜像有很多基础命令没有安装,所有我们自己来构建一个基础base

  2. 生产环境也可参照这种分层目录

1
2
3
4
5
6
7
8
9
[root@linux-node1 opt]# mkdir -p /opt/Game/{system,app,runtime}
[root@linux-node1 opt]# mkdir -p /opt/Game/system/centos

[root@linux-node1 opt]# tree Game/
Game/ # 项目目录
├── app # 程序
├── runtime # 运行环境
└── system # 基础环境
└── centos # centos的基础环境
  1. 使用Dockerfile 创建自定义基础环境镜像
1
2
3
4
5
6
7
8
9
10
11
12
13
14
15
16
17
18
[root@linux-node1 centos]# vim Dockerfile 

# BASE
FROM centos:7

# WHO
MAINTAINER leo 365042337@qq.com

# EPEL
ADD epel.repo /etc/yum.repos.d/

# PKG
RUN yum install -y wget supervisor tree net-tools sudo vim && yum clean all

[root@linux-node1 centos]# ls -l
total 8
-rw-r--r--. 1 root root 183 Oct 12 10:30 Dockerfile
-rw-r--r--. 1 root root 664 Oct 12 10:30 epel.repo
  1. docker build 构建镜像
1
[root@linux-node1 centos]# docker build -t game/centos:7 .
  1. 镜像生成分析:
1
2
3
4
5
6
7
8
9
10
11
12
13
14
15
16
17
18
19
20
21
22
23
[root@linux-node1 centos]# docker build -t game/centos:7 .
Sending build context to Docker daemon 3.584kB
Step 1/4 : FROM centos:7
---> 67fa590cfc1c
Step 2/4 : MAINTAINER leo 365042337@qq.com
---> Running in c7cd314eb180
Removing intermediate container c7cd314eb180
---> 9023eddfd98c
Step 3/4 : ADD epel.repo /etc/yum.repos.d/
---> fffbe0882202
Step 4/4 : RUN yum install -y wget supervisor tree net-tools sudo vim && yum clean all
---> Running in 17e580d1346d

...

Complete!
Loaded plugins: fastestmirror, ovl
Cleaning repos: base epel extras updates
Cleaning up list of fastest mirrors
Removing intermediate container 17e580d1346d
---> ea065b022d5b
Successfully built ea065b022d5b
Successfully tagged game/centos:7
1
2
3
4
5
6
7
8
9
10
11
12
13
14
15
16
17
18
19
20
21
22
23
24
25
1. 运行 docker build 命令,-t 将新镜像命名为 game/centos:7,
命令末尾的 . 指明 build context 为当前目录。
Docker 默认会从 build context 中查找 Dockerfile 文件,我们也可以通过 -f 参数指定 Dockerfile 的位置。

2. 首先 Docker 将 build context 中的所有文件发送给 Docker daemon。
build context 为镜像构建提供所需要的文件或目录
Dockerfile 中的 ADD、COPY 等命令可以将 build context 中的文件添加到镜像。
build context 为当前目录,该目录下的所有文件和子目录都会被发送给 Docker daemon
不要将多余文件放到 build context,特别不要把 /、/usr 作为 build context,否则构建过程会相当缓慢甚至失败。

3. Step 1:执行 FROM,将 centos:7 作为 base 镜像,镜像 ID 为 67fa590cfc1c。

4. Step 2-4 一直执行各种配置, 包括配置文件传送,安装

5. 安装成功后,将容器保存为镜像,其 ID 为 ea065b022d5b。这一步底层使用的是类似 docker commit 的命令

6. 删除临时容器 17e580d1346d。

7. 镜像构建成功。

# 查看镜像ID 最后的镜像ID一致
[root@linux-node1 centos]# docker images
REPOSITORY TAG IMAGE ID CREATED SIZE
game/centos 7 ea065b022d5b 12 minutes ago 287MB
centos 7 67fa590cfc1c 7 weeks ago 202MB

查看镜像分层结构

  1. docker history 会显示镜像的构建历史,也就是 Dockerfile 的执行过程,每一层由上至下排列
  2. game/centos:7 镜像 是经过一层层形成的,他的最初层就是centos:7
  3. 注: 表示无法获取 IMAGE ID,通常从 Docker Hub 下载的镜像会有这个问题。
1
2
3
4
5
6
7
8
[root@linux-node1 centos]#  docker history  game/centos:7
IMAGE CREATED CREATED BY SIZE COMMENT
ea065b022d5b 15 minutes ago /bin/sh -c yum install -y wget supervisor tr… 84.7MB
fffbe0882202 15 minutes ago /bin/sh -c #(nop) ADD file:4dab183e1e0e545b2… 664B
9023eddfd98c 15 minutes ago /bin/sh -c #(nop) MAINTAINER leo 365042337@… 0B
67fa590cfc1c 7 weeks ago /bin/sh -c #(nop) CMD ["/bin/bash"] 0B
<missing> 7 weeks ago /bin/sh -c #(nop) LABEL org.label-schema.sc… 0B
<missing> 7 weeks ago /bin/sh -c #(nop) ADD file:4e7247c06de9ad117… 202MB

Dockerfile 常用指令

1
2
3
4
5
6
7
8
9
10
11
12
FROM                    # 指定基础镜像FROM centos
MAINTAINER # 指定维护者信息,可以没有
RUN # 在命令前面加上RUN即可 RUN yum install httpd -y
ADD # 复制文件,与COPY不同的是,如果 src 是归档文件(tar, zip, tgz, xz 等),文件会被自动解压到 dest
WORKDIR # 设置当前工作目录
VOLUME # 设置卷,挂载主机目录
EXPOSE # 指定对外的端口
CMD # 容器启动时执行的命令CMD [“/bin/bash”],只有最后一个生效。CMD 可以被 docker run 之后的参数替换。

COPY # 将文件从 build context 复制到镜像。COPY src dest
ENV # 环境变量
ENTRYPOINT # 容器启动后执行的命令,只有最后一个生效(无法被替换,CMD 或 docker run 之后的参数会被当做参数传递给 ENTRYPOINT)

运行更多的指令

1
2
3
4
5
6
7
8
9
10
11
12
13
14
15
16
17
[root@linux-node1 test]# vim Dockerfile 

# Mybusybox images

FROM busybox

MAINTAINER leo 365042337@qq.com

WORKDIR /data/test

RUN touch tmpfile1

COPY ["tmpfile2","/data/test/"]

ADD ["test_add.tar.gz","/data/test/"]

ENV WELCOME "hello,welcome!"
1
2
3
4
5
6
7
# 构建前确保 build context 中存在需要的文件。
[root@linux-node1 test]# echo "test2" >>tmpfile2
[root@linux-node1 test]# ls -l
total 12
-rw-r--r--. 1 root root 211 Oct 12 11:14 Dockerfile
-rw-r--r--. 1 root root 113 Oct 12 11:09 test_add.tar.gz
-rw-r--r--. 1 root root 6 Oct 12 11:15 tmpfile2
1
2
3
4
5
6
7
8
9
10
11
12
13
14
15
16
17
18
19
20
21
22
23
24
25
26
27
28
# 构建镜像
[root@linux-node1 test]# docker build -t test/mybusybox:v1 .

Sending build context to Docker daemon 4.096kB
Step 1/7 : FROM busybox
---> 19485c79a9bb
Step 2/7 : MAINTAINER leo 365042337@qq.com
---> Running in 59c22052d1fd
Removing intermediate container 59c22052d1fd
---> 2346b2c44a91
Step 3/7 : WORKDIR /data/test
---> Running in c5c969afa0fb
Removing intermediate container c5c969afa0fb
---> 594b22c7a7ec
Step 4/7 : RUN touch tmpfile1
---> Running in a074aa6c9484
Removing intermediate container a074aa6c9484
---> d127444b2188
Step 5/7 : COPY ["tmpfile2","/data/test/"]
---> 69e842587b9f
Step 6/7 : ADD ["test_add.tar.gz","/data/test/"]
---> 5d0318483d64
Step 7/7 : ENV WELCOME "hello,welcome!"
---> Running in 86c30e33c390
Removing intermediate container 86c30e33c390
---> 9c531ea5e5d5
Successfully built 9c531ea5e5d5
Successfully tagged test/mybusybox:v1
1
2
3
4
5
6
7
8
9
10
11
12
13
14
# 运行容器,验证镜像内容:
[root@linux-node1 test]# docker run -it --rm test/mybusybox:v1

/data/test # ls
test_add tmpfile1 tmpfile2
/data/test # echo $WELCOME
hello,welcome!

1. 进入容器,当前目录即为 WORKDIR。如果 WORKDIR 不存在,Docker 会自动为我们创建。
2. WORKDIR 中保存了我们希望的文件和目录:
- 目录 test_add:由 ADD 指令从 build context 复制的归档文件 test_add.tar.gz,已经自动解压。
- 文件 tmpfile1:由 RUN 指令创建。
- 文件 tmpfile2:由 COPY 指令从 build context 复制。
3. ENV 指令定义的环境变量已经生效。

镜像命名的最佳实践

  1. 如何在多个 Docker Host 上使用镜像?
1
2
3
4
5
1. 用相同的 Dockerfile 在其他 host 构建镜像。

2. 将镜像上传到公共 Registry(比如 Docker Hub),Host 直接下载使用。

3. 搭建私有的 Registry 供本地 Host 使用。

为镜像命名

  1. REPOSITORY
  2. TAG
  3. 实际上一个特定镜像的名字由两部分组成:repository 和 tag , [image name] = [repository]:[tag]
  4. 如果执行 docker build 时没有指定 tag,会使用默认值 latest
  5. tag 常用于描述镜像的版本信息,可以是任意字符串
  6. latest 其实并没有什么特殊的含义。当没指明镜像 tag 时,Docker 会使用默认值 latest,仅此而已。
    • 虽然 Docker Hub 上很多 repository 将 latest 作为最新稳定版本的别名,但这只是一种约定,而不是强制规定。
    • 所以我们在使用镜像时最好还是避免使用 latest,明确指定某个 tag,比如 httpd:2.3,ubuntu:xenial。
1
2
3
4
5
[root@linux-node1 test]# docker images
REPOSITORY TAG IMAGE ID CREATED SIZE
test/mybusybox v1 9c531ea5e5d5 7 minutes ago 1.22MB
game/centos 7 ea065b022d5b 51 minutes ago 287MB
nginx latest f949e7d76d63 2 weeks ago 126MB

多个 tag 可能对应的是同一个镜像

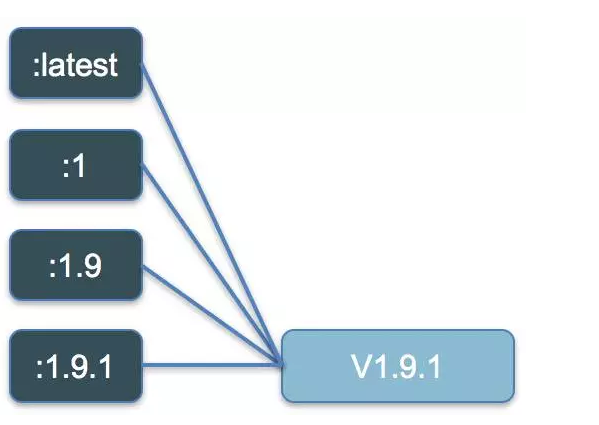
  1. 多个 tag 可能对应的是同一个镜像
  2. 假设我们现在发布了一个镜像 myimage,版本为 v1.9.1。那么我们可以给镜像打上四个 tag:1.9.1、1.9、1 和 latest。
1
2
3
4
5
6
7
8
# 通过 docker tag 命令方便地给镜像打 tag
docker tag myimage-v1.9.1 myimage:1

docker tag myimage-v1.9.1 myimage:1.9

docker tag myimage-v1.9.1 myimage:1.9.1

docker tag myimage-v1.9.1 myimage:latest
  1. 过了一段时间,我们发布了 v1.9.2。这时可以打上 1.9.2 的 tag,并将 1.9、1 和 latest 从 v1.9.1 移到 v1.9.2。
1
2
3
4
5
6
7
docker tag myimage-v1.9.2 myimage:1

docker tag myimage-v1.9.2 myimage:1.9

docker tag myimage-v1.9.2 myimage:1.9.2

docker tag myimage-v1.9.2 myimage:latest
  1. 这种 tag 方案使镜像的版本很直观,用户在选择非常灵活:
1
2
3
4
5
6
7
myimage:1 始终指向 1 这个分支中最新的镜像。

myimage:1.9 始终指向 1.9.x 中最新的镜像。

myimage:latest 始终指向所有版本中最新的镜像。

如果想使用特定版本,可以选择 myimage:1.9.1、myimage:1.9.2 或 myimage:2.0.0。

Dockerfile 的生产实践

使用 game/centos:7 镜像为base镜像 搭建 python 运行环境镜像

1
2
3
4
5
6
7
8
9
10
11
12
13
14
15
[root@linux-node1 runtime]# mkdir -p /opt/Game/runtime/python-ssh

[root@linux-node1 runtime]# tree /opt/Game/
/opt/Game/
├── app
├── runtime
│   └── python-ssh
└── system
├── centos
│   ├── Dockerfile
│   └── epel.repo
└── test
├── Dockerfile
├── test_add.tar.gz
└── tmpfile2
1
2
3
4
5
6
7
8
9
10
11
12
13
14
15
16
17
18
# python + ssh
# python运行环境镜像需要安装 python-devel python-pip openssh-clients openssl-devel openssh-server

[root@linux-node1 python-ssh]# vim Dockerfile

# BASE
FROM game/centos:7

# WHO
MAINTAINER leo 365042337@qq.com

# PKG
RUN yum install -y python-devel python-pip openssh-clients openssl-devel openssh-server && yum clean all

# FOR SSHD
RUN ssh-keygen -t rsa -f /etc/ssh/ssh_host_rsa_key
RUN ssh-keygen -t ecdsa -f /etc/ssh/ssh_host_ecdsa_key
RUN echo "root:222222" | chpasswd
1
2
3
4
5
6
7
8
# 构建
[root@linux-node1 python-ssh]# docker build -t game/centos7-python-ssh .

[root@linux-node1 python-ssh]# docker images
REPOSITORY TAG IMAGE ID CREATED SIZE
game/centos7-python-ssh latest 9b0a64f83274 14 seconds ago 357MB
game/centos 7 ea065b022d5b 2 hours ago 287MB
...

在本地测试 python

1
2
3
4
5
6
7
8
9
10
11
12
13
14
15
16
17
18
19
20
21
# 测试程序 flask
[root@linux-node1 python-ssh]# mkdir -p /opt/Game/app/shop-api
[root@linux-node1 python-ssh]# cd /opt/Game/app/shop-api
[root@linux-node1 shop-api]# vim app.py

from flask import Flask

app = Flask(__name__)

@app.route('/')
def hello():
return 'Hello World!'

if __name__ == "__main__":
app.run(host="0.0.0.0", debug=True)

# 安装python,运行测试程序
yum install python-pip -y
pip install flask
python app.py
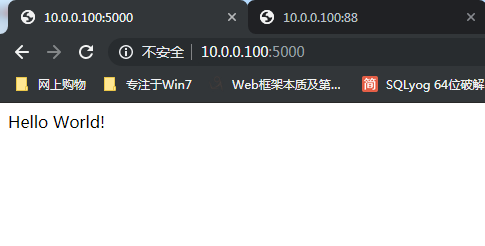
访问:http://10.0.0.100:5000/

添加python 服务的依赖文件

1
2
3
4
# python pip 将会去安装包
[root@linux-node1 shop-api]# vim requirements.txt
flask
requests

supervisor 管理进程文件

1
2
3
4
5
6
7
8
9
10
11
12
13
14
15
16
17
18
19
20
21
22
23
24
25
26
27
28
29
30
31
32
33
34
35
36
37
38
注意:
1. 照着案例文件写 案例文件:
2. 在配置文件中的 必须配置为前台启动 ***** supervisorctl 必须要在前提启动
nodaemon=true ; (start in foreground if true;default false)

# 本地测试
[root@linux-node1 shop-api]# yum install supervisor

# 定义了两个服务 启动/opt/app.py 和 sshd
[root@linux-node1 shop-api]# vim app-supervisor.ini

[program:shop-api]
command=/usr/bin/python2.7 /opt/app.py
process_name=%(program_name)s
autostart=true
user=www
stdout_logfile=/tmp/app.log
stderr_logfile=/tmp/app.error


[program:sshd]
command=/usr/sbin/sshd -D
process_name=%(program_name)s
autostart=true

# 将配置文件放到本地去测试执行
# 添加本地www账户
[root@linux-node1 shop-api]# cp app-supervisor.ini /etc/supervisord.d/
[root@linux-node1 shop-api]# cp app.py /opt/
[root@linux-node1 shop-api]# useradd -s /sbin/nologin -M www

# 测试执行
[root@linux-node1 shop-api]# supervisord -c /etc/supervisord.conf
[root@linux-node1 ~]# supervisorctl status
shop-api RUNNING pid 3975, uptime 0:00:43
sshd FATAL Exited too quickly (process log may have details)

# 本地的sshd是存在的,shop-api正常即可,后续还需要继续学习supervisor的配置

shop-api 的Dockerfile

1
2
3
4
1. 添加启动用户
2. pip安装依赖
3. supervisord.conf 如果有变更也要传
4. CMD 需要启动supervisord服务
1
2
3
4
5
6
7
8
9
10
11
12
13
14
15
16
17
18
19
20
21
22
23
24
25
[root@linux-node1 shop-api]# vim Dockerfile

# BASE IMAGES
FROM game/centos7-python-ssh

# WHO
MAINTAINER leo 365042337@qq.com

# USER ADD
RUN useradd -s /sbin/nologin -M www

# ADD FILE
ADD app.py /opt/app.py
ADD app-supervisor.ini /etc/supervisord.d/
ADD requirements.txt /opt/
ADD supervisord.conf /etc/supervisord.conf

# PIP
RUN /usr/bin/pip2.7 install -r /opt/requirements.txt

# PORT
EXPOSE 22 5000

# CMD
CMD ["/usr/bin/supervisord","-c","/etc/supervisord.conf"]
1
2
3
4
5
6
7
8
[root@linux-node1 shop-api]# docker build -t game/shop-api .

[root@linux-node1 shop-api]# docker images
REPOSITORY TAG IMAGE ID CREATED SIZE
game/shop-api latest 950dfdaa7360 23 seconds ago 365MB
game/centos7-python-ssh latest 9b0a64f83274 3 hours ago 357MB
game/centos 7 ea065b022d5b 4 hours ago 287MB
...
1
2
3
4
[root@linux-node1 shop-api]# docker run -d -p 80:5000 -p 8022:22 --name myshop-ssh game/shop-api 

[root@linux-node1 .ssh]# ssh 10.0.0.100 -p8022
浏览器访问: http://10.0.0.100/

需要理解

1
2
3
4
5
6
7
8
9
10
11
12
13
14
15
16
17
18
19
20
21
22
23
24
25
26
27
28
29
30
31
32
33
34
1. 如果没有起来的测试步骤
- 在构建一个镜像 不要执行CMD
[root@linux-node1 shop-api]# pwd
/opt/docker/app/shop-api
# CMD
# CMD ["/usr/bin/supervisord","-c","/etc/supervisord.conf"]

- 进到容器里查看服务
[root@linux-node1 shop-api]# docker build -t oldboy/shop-api:v2 .
[root@linux-node1 shop-api]# docker run -it --name shop-api-v2 -p 88:5000 -p 8022:22 oldboy/shop-api:v2 /bin/bash
[root@3f1e55eb826d /]# supervisord -c /etc/supervisord.conf
[root@3f1e55eb826d /]# supervisorctl status
shop-api RUNNING pid 19, uptime 0:00:03
sshd RUNNING pid 18, uptime 0:00:03


2. 在配置文件中的 必须配置为前台启动 改好之后重新构建
nodaemon=true ; (start in foreground if true;default false)

3. 分层的好处
1. 更快速的构建
1. 系统
2. 运行环境
3. app

2. 使用supervisor启动和管理进程

3. python 的依赖requirements.txt

4. 先尝试 把应用 用docker跑起来 再去写Dockerfile

5. 去看开源项目的 Dockerfile

6. 生产 之前一定先到虚拟机或者物理机跑一遍,然后再去 把配置文件copy过来 再去写 dockerfile