02 Nginx 常用模块


Nginx 日志模块

  1. http 简单的请求过程
1
[root@nginx-node1 ~]# curl -v www.baidu.com

Nginx 日志配置规范

  1. 可自己编排,调换位置
  2. 全局配置,只能放在 http区域,不能配置在 server里
1
2
3
log_format  main  '[$time_local] ' '$remote_addr - $remote_user  "$request" '
'$status $body_bytes_sent "$http_referer" '
'"$http_user_agent" "$http_x_forwarded_for"';
1
2
3
4
5
6
7
8
9
10
11
# Nginx 日志变量

$remote_addr # 表示客户端地址
$remote_user # http 客户端请求nginx认证用户名
$time_local # Nginx 的时间
$request # Request 请求行, GET、POST方法、http协议版本
$status # respoence 返回状态码
$body_bytes_sent # 从服务端响应给客户端body信息大小
$http_referer # http 上一级页面,防盗链、用户行为分析
$http_user_agent # http 头部信息,客户端访问设备,安卓,苹果,pc 适配
$http_x_forwarded_for # http 请求携带的http信息,真实IP地址,用户可能是通过代理过来的

Nginx 状态监控

  1. –with-http_stub_status_module
  2. 记录 Nginx 客户端基本访问状态信息
  3. 重启ngxin服务 会重新计数
1
2
Syntax:	 stub_status;
Context: server, location
1
2
3
4
5
6
7
# 不是每个server一个,而是统计整个nginx

location /mystatus {
stub_status on;
allow 127.0.0.1; # 允许自己访问 监控时 脚本只自己访问自己
deny all;
}
1
2
3
4
5
6
7
8
9
10
11
12
13
14
15
16
17
18
19
20
21
22

# Nginx_status 概述

Active connections:2 # Nginx当前活跃连接数

server accepts handled requests
16 16 19

# server 表示 Nginx 处理接收握手总次数 -- 建立连接总数
# accepts 表示 Nginx 处理接收总连接数。 -- 成功连接总数
请求丢失数=(握手数-连接数)如果一致,说明没有丢失请求。
# handled requests 表示总共处理了19次请求。 -- 处理请求总数,连接打开网页,刷新一次为一个请求

# Reading Nginx读取数据
# Writing Nginx写的情况
# Waiting Nginx开启keep-alive长连接情况下,既没有读也没有写,建立连接情况

# 开启keep-alive的情况下,这个值等于 active – (reading + writing),
意思就是Nginx已经处理完成,正在等候下一次请求指令的驻留连接.

# 所以,在访问效率高,请求很快被处理完毕的情况下,Waiting数比较多是正常的.
如果reading +writing数较多,则说明并发访问量非常大,正在处理过程中.

Nginx 下载站点

  1. Nginx默认是不允许列出整个⽬录浏览下载。
1
2
3
4
Syntax: autoindex on|off;
Default:
autoindex off;
Context: http, server, location
1
2
3
4
5
6
7
8
9
10
11
12
# autoindex 常用参数

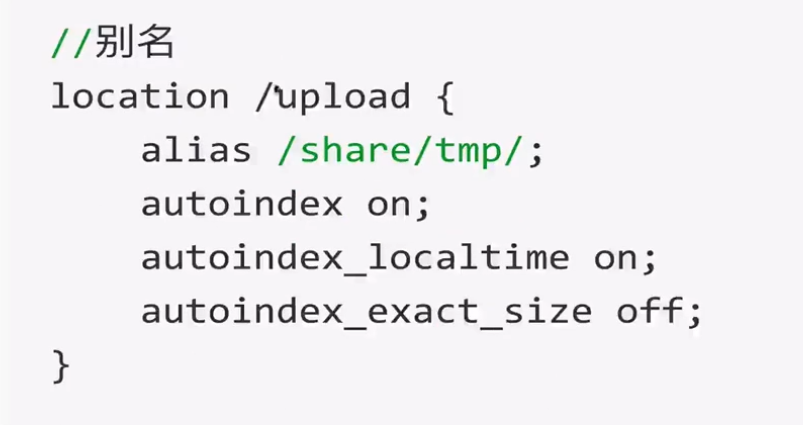
autoindex_exact_size off;
默认为on 显示文件的确切大小 单位是bytes。
修改为off 显示文件的大概大小 单位是kB或者MB或者GB。

autoindex_localtime on;
默认为off 显示文件时间为GMT时间。
修改为on 显示文件时间为文件的服务器时间。

charset utf-8,gbk;
默认中文目录乱码,添加上解决乱码。
1
2
3
4
5
6
7
8
# 配置目录浏览功能
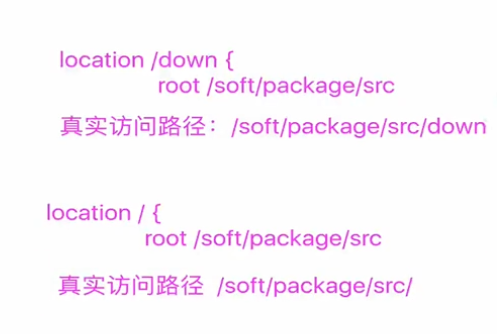
location /down {
root /soft/package/src;
autoindex on;
autoindex_exact_size off;
autoindex_localtime on;
charset utf-8,gbk;
}
1
2
3
4
cd /soft/package/src/down

[root@nginx-node1 down]# ls
2000.png sound1.mp3

Nginx 访问限制

1
2
连接频率限制 limit_conn_module        # 针对TCP
请求频率限制 limit_req_module
  • http协议的连接与请求
1
2
3
4
5
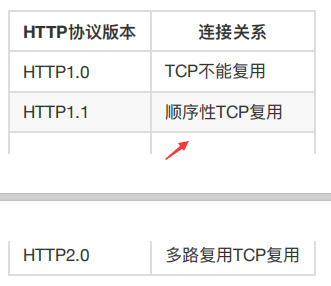
HTTP是建⽴在TCP, 在完成HTTP请求需要先建⽴TCP三次握⼿(称为TCP连接),在连接的基础
上在HTTP请求。

1. 连接限制是TCP,一个连接可以有多个请求
2. 请求是HTTP

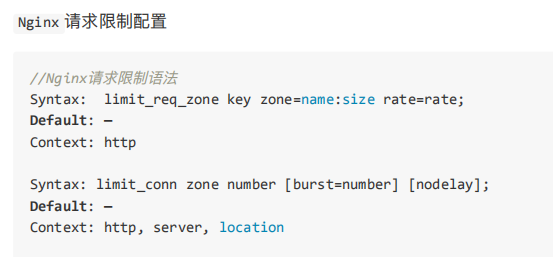
Nginx 请求限制配置

  1. 虚拟机只能测试出 请求的限制,公有用可以配置连接的设置
  2. limit_req zone=req_zone; 放在location 里面只针对location,如果放在location外面,针对整个server,放在http 所有的都会被限制
  3. 对请求比对连接的限制 更有效

1
2
3
4
5
6
7
8
9
10
# Nginx 请求限制配置
# http 段配置请求限制,rate限制速率,限制1秒钟最多1个IP请求
limit_req_zone $binary_remote_addr zone=req_zone:10m rate=1r/s;

# 1r/s 只接收1个请求,其余请求拒绝处理并返回错误码给客户端
limit_req zone=req_zone;

# 请求超过1r/s,剩下的将被延迟处理,请求数超过burst定义的数量,1+3=4个请求 多余的请求返回503
# 大量的并发攻击 可以控制
# limit_req zone=req_zone burst=3 nodelay;
1
2
3
4
5
6
7
8
9
10
11
12
13
14
[root@nginx-node1 ~]# vim /etc/nginx/conf.d/default.conf 

limit_req_zone $binary_remote_addr zone=req_zone:10m rate=1r/s; # http 段
server {
listen 80;
server_name localhost;

#charset koi8-r;
#access_log /var/log/nginx/host.access.log main;

location / {
root /usr/share/nginx/html;
index index.html index.htm;
limit_req zone=req_zone;
1
2
3
4
[root@nginx-node1 ~]# nginx -t
nginx: the configuration file /etc/nginx/nginx.conf syntax is ok
nginx: configuration file /etc/nginx/nginx.conf test is successful
[root@nginx-node1 ~]# nginx -s reload
1
2
3
4
5
6
7
8
9
10
11
12
13
14
15
16
17
18
19
20
21
22
23
24
25
26
27
28
29
30
31
32
33
34
35
36
37
38
39
40
41
42
43
44
45
46
47
48
49
50
51
# 安装ab 工具
yum install httpd-tools

# 50个连接 一次20个请求
[root@nginx-node1 down]# ab -n 50 -c 20 http://47.56.134.107/index.html

This is ApacheBench, Version 2.3 <$Revision: 1430300 $>
Copyright 1996 Adam Twiss, Zeus Technology Ltd, http://www.zeustech.net/
Licensed to The Apache Software Foundation, http://www.apache.org/

Benchmarking 47.56.134.107 (be patient).....done


Server Software: nginx/1.16.1
Server Hostname: 47.56.134.107
Server Port: 80

Document Path: /index.html
Document Length: 612 bytes

Concurrency Level: 20
Time taken for tests: 0.026 seconds
Complete requests: 50 # 请求次数
Failed requests: 49 # 失败次数
(Connect: 0, Receive: 0, Length: 49, Exceptions: 0)
Write errors: 0
Non-2xx responses: 49 # 不是200的 49个
Total transferred: 34557 bytes
HTML transferred: 24818 bytes
Requests per second: 1935.06 [#/sec] (mean) # rps 吞吐率 每秒1935
Time per request: 10.336 [ms] (mean)
Time per request: 0.517 [ms] (mean, across all concurrent requests)
Transfer rate: 1306.05 [Kbytes/sec] received

Connection Times (ms)
min mean[+/-sd] median max
Connect: 0 1 0.1 1 1
Processing: 0 9 10.5 1 22
Waiting: 0 8 10.2 1 22
Total: 1 10 10.5 1 23

Percentage of the requests served within a certain time (ms)
50% 1
66% 22
75% 22
80% 23
90% 23
95% 23
98% 23
99% 23
100% 23 (longest request)

Nginx 连接限制配置

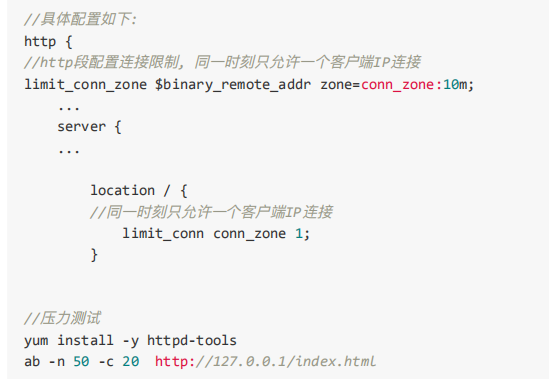
  1. http 段配置连接限制,同⼀时刻只允许1个客户端IP连接
1
limit_conn_zone $binary_remote_addr zone=conn_zone:10m;

1
2
3
4
5
6
7
8
9
10
11
12
13
14
15
# http段配置连接限制,	同1时刻只允许1个客户端IP连接
limit_conn_zone $binary_remote_addr zone=conn_zone:10m;
server {
listen 80;
server_name localhost;

#charset koi8-r;
#access_log /var/log/nginx/host.access.log main;

location / {
root /usr/share/nginx/html;
index index.html index.htm;
# 同⼀时刻只允许1个客户端IP连接
limit_conn conn_zone 1;
}

Nginx 访问控制

1
2
基于IP的访问控制 http_access_module
基于用户登陆认证 http_auth_basic_module

基于IP的访问控制

1
2
3
4
5
6
7
8
9
10
11
12
13
14
15
16
17
18
19
20
21
22
23
24
25
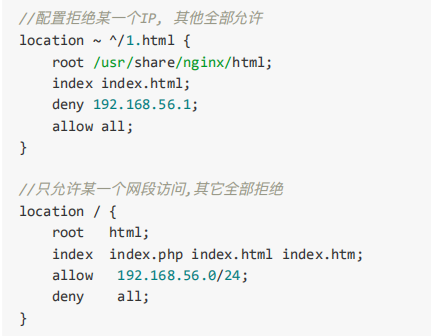
# 允许所有人访问 拒绝我自己的IP

location ~ ^/1.html {
root /soft/code;
index index.html;
deny 114.243.26.3;
allow all;

# allow 114.243.26.3; # 先允许 后拒绝 只允许一个IP 或者在配置一行其他IP:常用
# deny all; # 拒绝所有 自己本机也不行

}


[root@nginx-node1 ~]# echo "<h1>Access allow</h1>" >> /soft/code/1.html

[root@nginx-node1 ~]# nginx -t
nginx: the configuration file /etc/nginx/nginx.conf syntax is ok
nginx: configuration file /etc/nginx/nginx.conf test is successful
[root@nginx-node1 ~]# nginx -s reload ; tailf /var/log/nginx/error.log

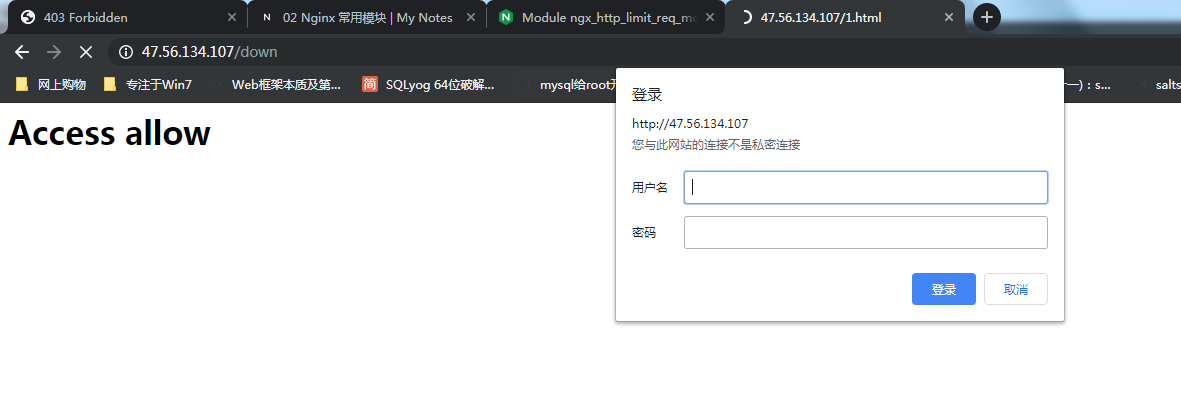
http://47.56.134.107/1.html

[root@nginx-node1 down]# curl 47.56.134.107/1.html
<h1>Access allow</h1>

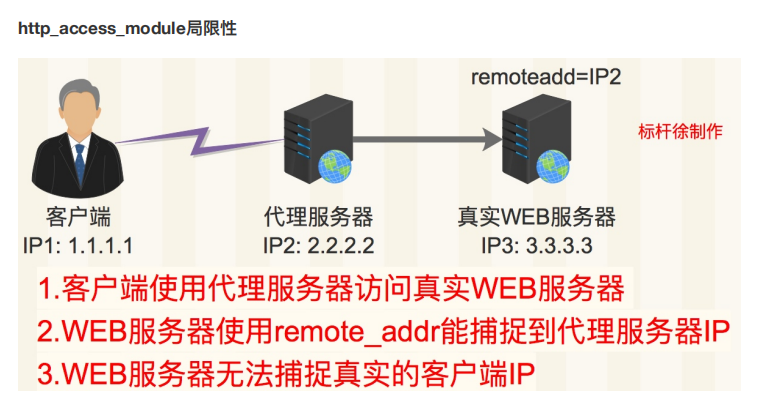
http_access_module 局限性

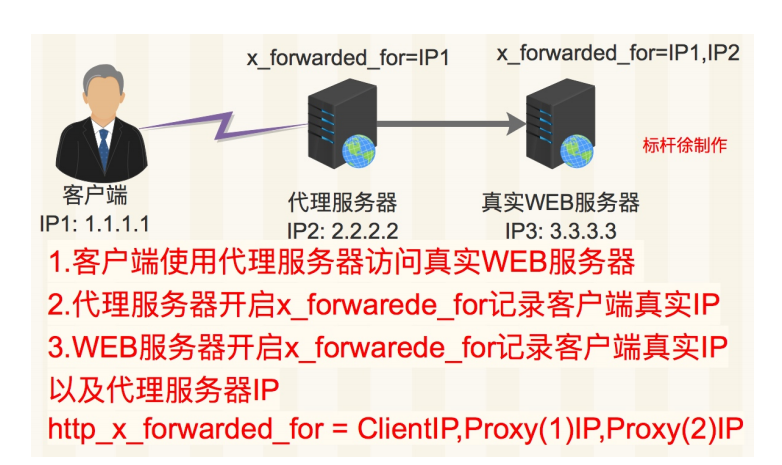
  1. 没有办法对真实IP 做任何限制
  2. 需要开启 http_x_forwarded_for 记录真实客户端IP地址以及代理服务器IP 再做限制
  3. 不开启的话 可能会看到自己的代理IP 访问 web服务器

基于用户登陆认证

1
2
3
4
5
6
7
8
9
10
# 需要安装依赖组件
[root@xuliangwei~]# yum install httpd-tools
[root@xuliangwei~]# htpasswd -c /etc/nginx/auth_conf leo

[root@nginx-node1 ~]# htpasswd -c /etc/nginx/auth_conf leo
New password:
Re-type new password:
Adding password for user leo
[root@nginx-node1 ~]# cat /etc/nginx/auth_conf
leo:$apr1$TYxX68qH$YV57jU1mR9JVYAIk9Msai1
1
2
3
4
5
6
7
8
9
10
11
12
13
14
15
16
17
18
19
20
# 必须登录才能下载

# 可在http,server,location 下添加如下信息

location /down {
root /soft/package/src;
autoindex on;
autoindex_exact_size off;
autoindex_localtime on;
#charset utf-8,gbk;
auth_basic " Down need login in ";
auth_basic_user_file /etc/nginx/auth_conf;
}


[root@nginx-node1 conf.d]# nginx -t
[root@nginx-node1 conf.d]# nginx -s reload ; tailf /var/log/nginx/error.log
[19/Oct/2019:23:54:08 +0800] 114.243.26.3 - leo "GET /down/ HTTP/1.1" 200 361 "-"
"Mozilla/5.0 (Windows NT 6.1; Win64; x64) AppleWebKit/537.36 (KHTML, like Gecko)
Chrome/74.0.3729.169 Safari/537.36" "-"

Nginx 虚拟主机

所谓虚拟主机,在web服务器里是1个独立的网站站点,这个站点对应独立的域名(也可能是IP或
端口),具有独立的程序及资源目录,可以独立地对外提供服务供用户访问。

1个server就是1个虚拟主机

1
2
3
4
# 常用顺序
1. 基于域名
2. 基于端口
3. 基于IP 不常用

基于域名

1
2
3
4
1. 创建web站点目录
[root@nginx-node1 src]# mkdir -p /soft/package/src/{www,blog}
[root@nginx-node1 src]# echo "<h1>www</h1>" >> /soft/package/src/www/index.html
[root@nginx-node1 src]# echo "<h1>blog</h1>" >> /soft/package/src/blog/index.html
1
2
3
4
5
6
7
8
9
10
11
12
13
14
15
16
17
18
19
20
21
22
23
24
25
26
27
28
29
30
2. 配置虚拟主机
[root@nginx-node1 conf.d]# cp xiaoniao.conf www.conf
[root@nginx-node1 conf.d]# cp xiaoniao.conf blog.conf

server {
listen 80;
server_name www.leo.com;

root /soft/package/src/www/;
index index.html index.htm;

error_page 500 502 503 504 /50x.html;
location = /50x.html {
root /usr/share/nginx/html;
}
}

server {
listen 80;
server_name blog.leo.com;

root /soft/package/src/blog/;
index index.html index.htm;

error_page 500 502 503 504 /50x.html;
location = /50x.html {
root /usr/share/nginx/html;
}

}
1
2
3
3. 修改hosts文件
47.56.134.107 www.leo.com
47.56.134.107 blog.leo.com

基于端口

  1. 配置不同端口访问不同虚拟主机

  2. 仅修改listen监听端口即可,但不能和系统端口发⽣冲突

1
2
3
4
5
6
7
8
9
10
11
12
13
14
15
16
17
18
1. 基于端口的虚拟主机

server {
listen 8002;
server_name localhost;

root /soft/package/src/www/;
index index.html index.htm;
}

server {
listen 8001;
server_name localhost;

root /soft/package/src/blog/;
index index.html index.htm;

}
1
2. aliyun打开安全组端口

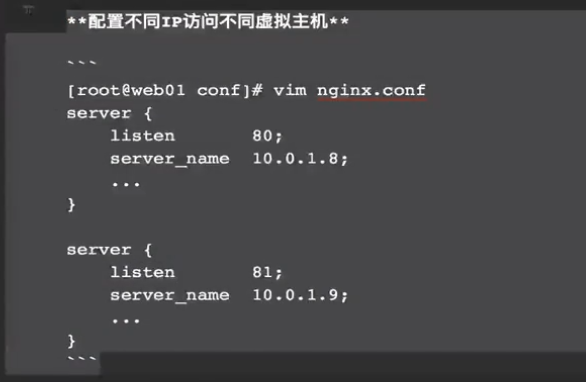
基于IP地址

配置虚拟主机别名

所谓虚拟主机别名,就是虚拟主机设置除了主域名以外的1个域名,实现用户访问的多个域名对应同1个
虚拟主机网站的功能。
www.xiaoniao.com域名的虚拟主机为例:
为其增加1个别名xiaoniao.com时,出现网站内容和访问www.xiaoniao.com是一样的,具体配置如下:

1
2
3
4
5
6
7
8
server {
listen 80;
server_name www.xiaoniao.com xiaoniao.com;

root /data/www/xiaoniao;
index index.html index.htm;
}
}

相同域名的优先级

  1. 相同的域名,相同的端口,谁的文件名在前,谁会被优先读取