05 Nginx 负载均衡


负载均衡的应用

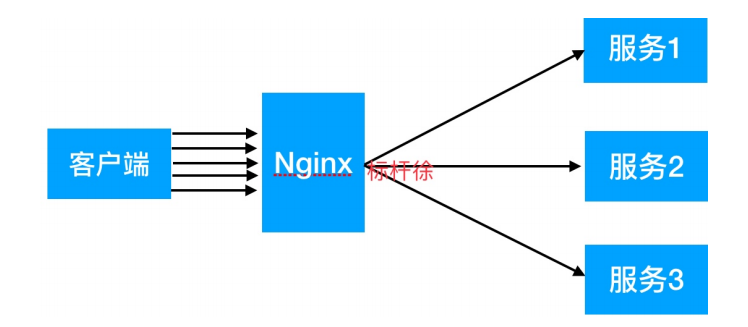
  1. 提升吞吐率, 提升请求性能, 提高容灾

  1. 负载均衡按范围划分:
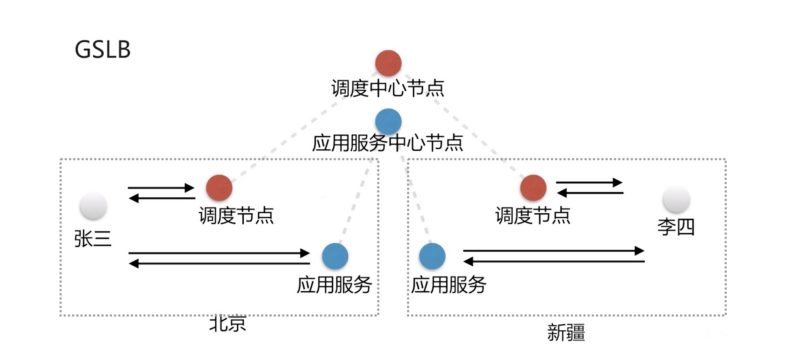
    GSLB全局负载均衡
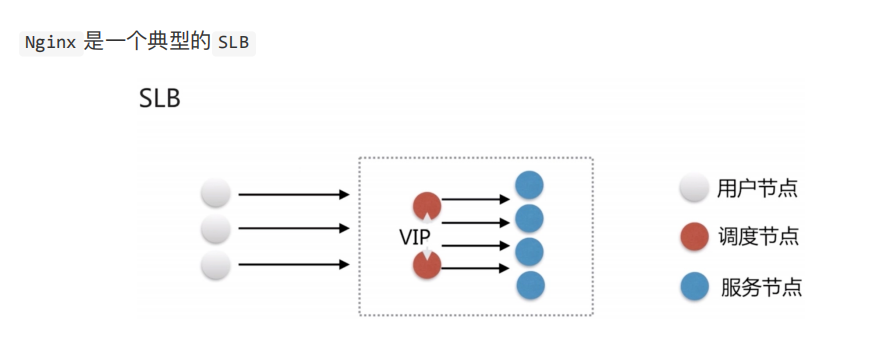
    SLB

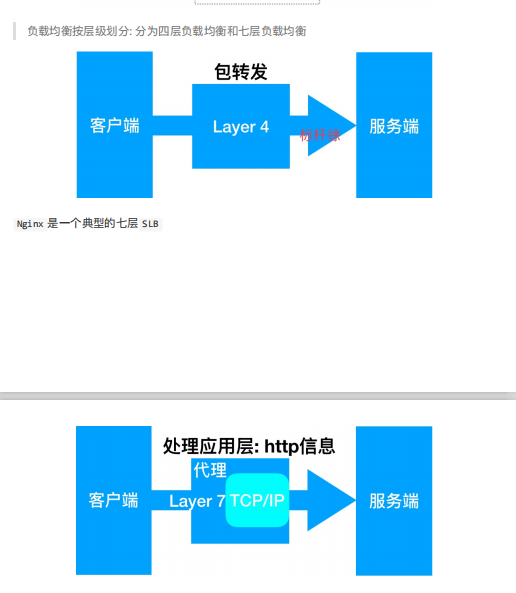
  2. 4层代理 端口转发 通过公网访问内部主机,访问公网 8080端口 转发 内网服务器 8080端口

  3. 4层代理 还有 haproxy lvs

Nginx 负载均衡配置

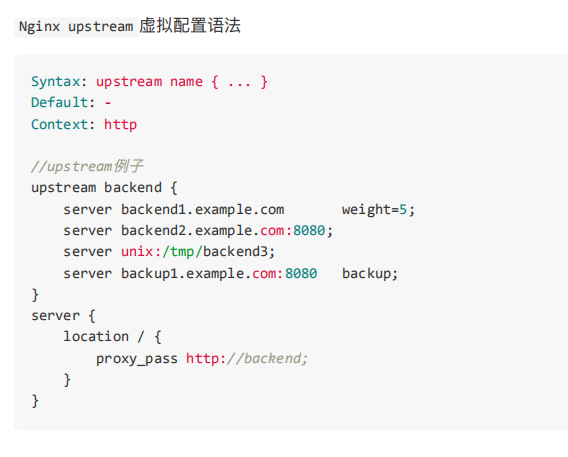
  1. Nginx 实现负载均衡用到了 proxy_pass 代理模块核心配置, 将客户端请求代理转发给一组 upstream 虚拟服务池

通过端口 实验负载均衡

创建对应 html文件

1
2
3
4
5
6
7
8
9
10
11
12
13
14
15
16
17
18
19
20
21
22
23
24
25
26
1. 创建对应 html 文件
[root@nginx soft]# mkdir /soft/{code1,code2,code3} -p

[root@nginx soft]# cat /soft/code1/index.html
<html>
<title>Coder1</title>
<body bgcolor="red">
<h1> Code1-8081 </h1>
</body>
</html>

[root@nginx soft]# cat /soft/code2/index.html
<html>
<title>Coder2</title>
<body bgcolor="blue">
<h1> Code1-8082 </h1>
</body>
</html>

[root@nginx soft]# cat /soft/code3/index.html
<html>
<title>Coder3</title>
<body bgcolor="green">
<h1> Code1-8083 </h1>
</body>
</html>

创建对应的 server文件

1
2
3
4
5
6
7
8
9
10
11
12
13
14
15
16
17
18
19
20
21
22
23
24
25
26
27
28
29
30
31
32
33
34
35
36
37
38
[root@nginx conf.d]# cat node1.conf 
server {
listen 8081;
server_name 172.17.70.224;
root /soft/code1;
index index.html;

}

[root@nginx conf.d]# cat node2.conf
server {
listen 8082;
server_name 172.17.70.224;
root /soft/code2;
index index.html;

}

[root@nginx conf.d]# cat node3.conf
server {
listen 8083;
server_name 172.17.70.224;
root /soft/code3;
index index.html;

}

[root@nginx conf.d]# nginx -t
[root@nginx conf.d]# nginx -s reload

[root@nginx conf.d]# netstat -tnlp
Proto Recv-Q Send-Q Local Address Foreign Address State PID/Program name
tcp 0 0 0.0.0.0:80 0.0.0.0:* LISTEN 10539/nginx: master
tcp 0 0 0.0.0.0:8081 0.0.0.0:* LISTEN 10539/nginx: master
tcp 0 0 0.0.0.0:8082 0.0.0.0:* LISTEN 10539/nginx: master
tcp 0 0 0.0.0.0:8083 0.0.0.0:* LISTEN 10539/nginx: master

[root@nginx conf.d]# curl -I 172.17.70.224:8081

配置负载均衡

1
2
3
4
5
6
7
8
9
10
11
12
13
14
15
16
17
18
19
20
21
22
23
24
25
26
27
# proxy 
[root@proxy ~]# vim /etc/nginx/conf.d/proxy.conf

upstream node {
server 172.17.70.224:8081;
server 172.17.70.224:8082;
server 172.17.70.224:8083;
}


server{
listen 80;
server_name localhost;

location / {
proxy_pass http://node;
include proxy_params;
}

}


[root@proxy ~]# nginx -t
[root@proxy ~]# nginx -s reload

# 会轮询访问 3个端口服务
http://47.95.120.246/

Nginx 负载均衡状态模块

1
2
3
4
5
6
7
8
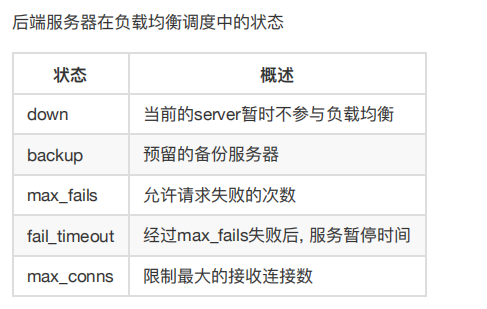
backup 预留的,只有其他的节点挂掉了 才能被访问
max_fails=3 fail_timeout=10s; 允许失败3次 失败后暂停10秒 3次后还不行会被踢掉

upstream node {
server 172.17.70.224:8081 backup;
server 172.17.70.224:8082 max_fails=3 fail_timeout=10s;
server 172.17.70.224:8083 max_fails=3 fail_timeout=10s;
}

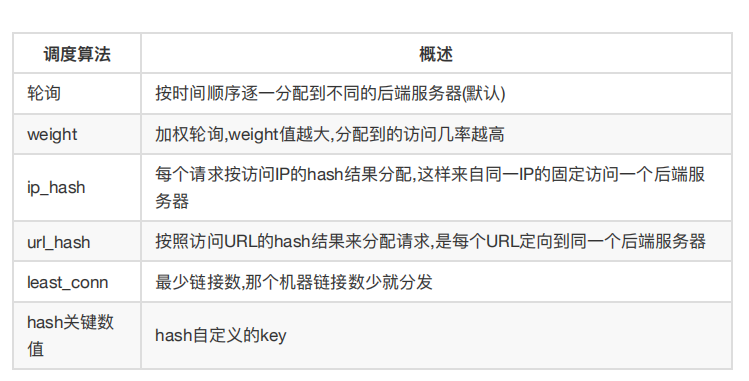
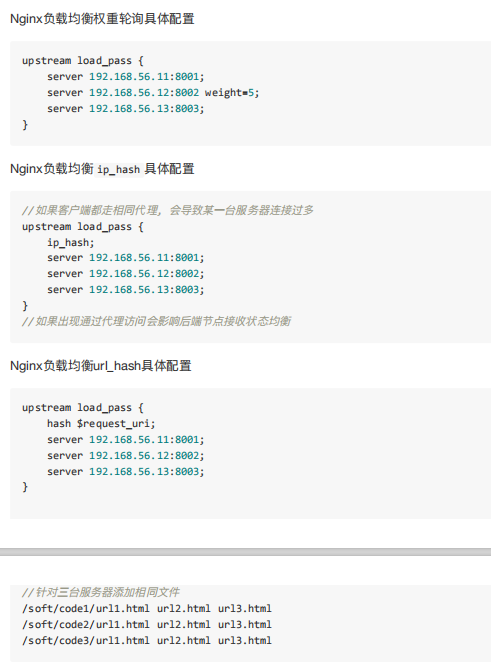
Nginx 负载均衡调度策略

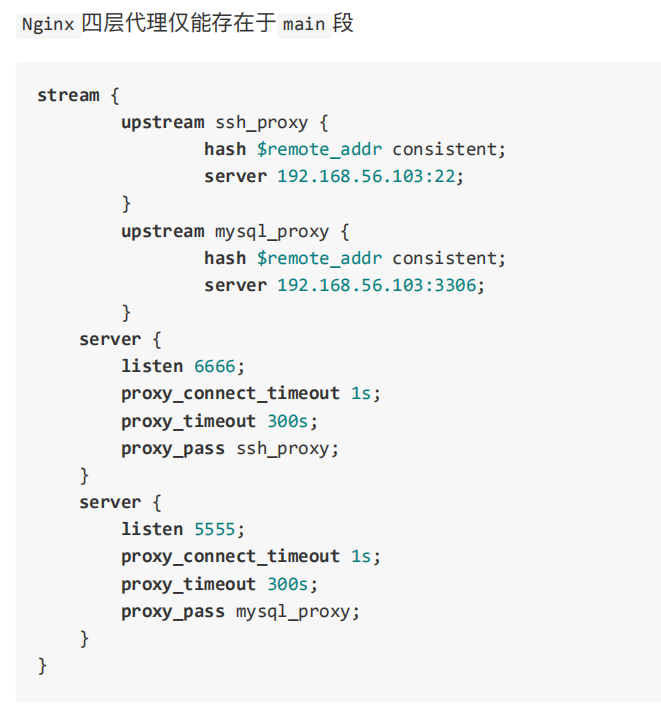
Nginx 4层负载均衡 TCP配置

1
2
3
4
5
6
7
8
9
10
11
12
13
14
15
16
17
18
19
20
21
22
23
24
25
26
27
28
29
30
31
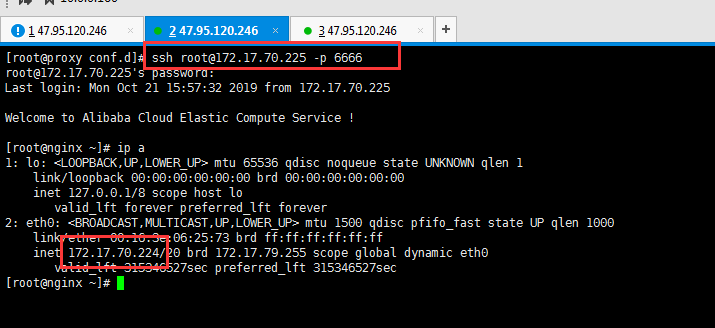
[root@proxy ~]# vim /etc/nginx/nginx.conf

# For more information on configuration, see:
# * Official English Documentation: http://nginx.org/en/docs/
# * Official Russian Documentation: http://nginx.org/ru/docs/

user nginx;
worker_processes auto;
error_log /var/log/nginx/error.log;
pid /run/nginx.pid;

# Load dynamic modules. See /usr/share/doc/nginx/README.dynamic.
include /usr/share/nginx/modules/*.conf;

events {
worker_connections 1024;
}

stream {
upstream ssh_proxy {
hash $remote_addr consistent;
server 172.17.70.224:22;
}

server {
listen 6666;
proxy_pass ssh_proxy;
proxy_connect_timeout 1s;
proxy_timeout 300s;
}
}

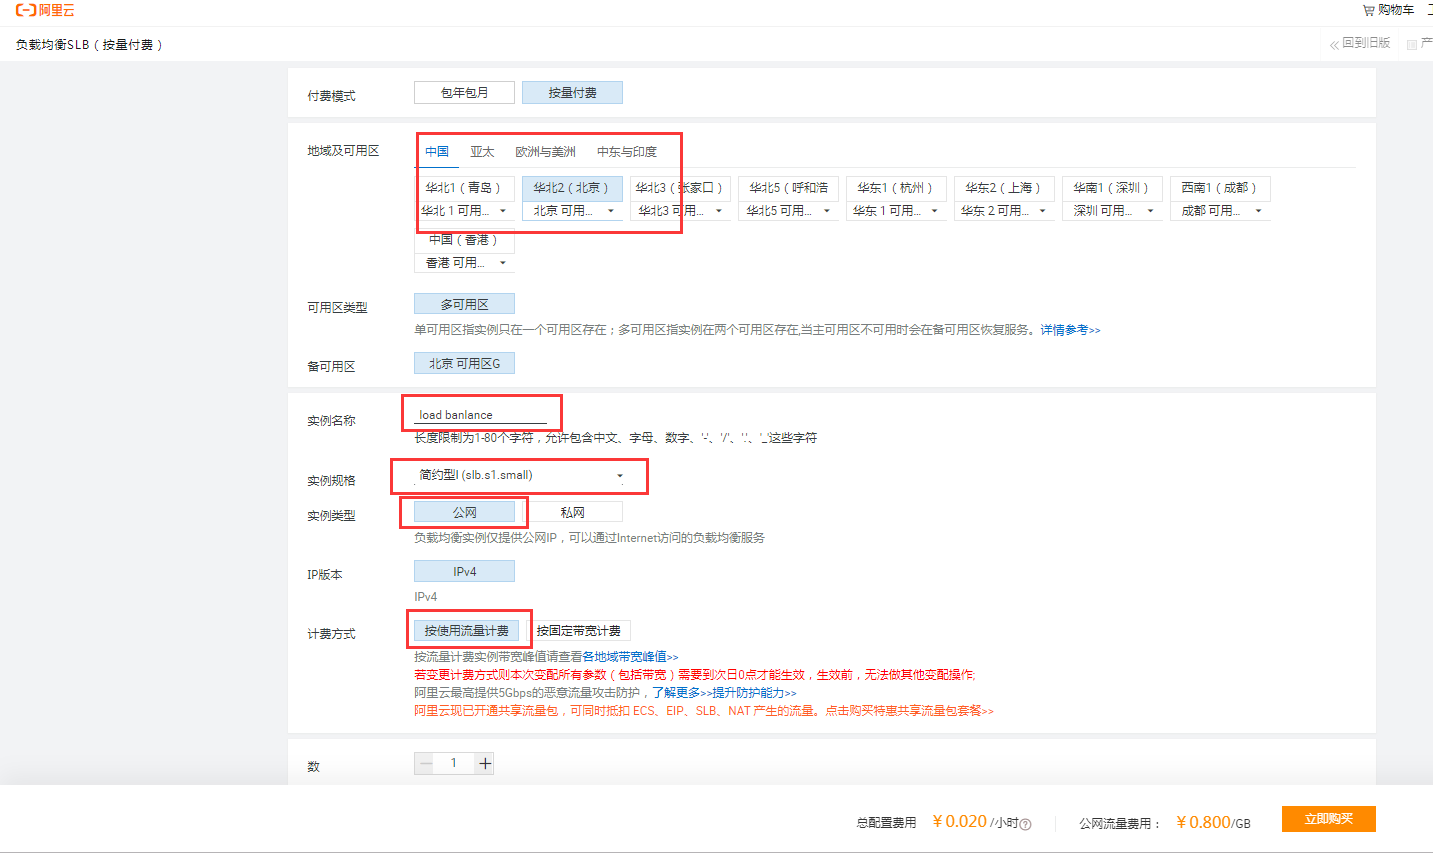
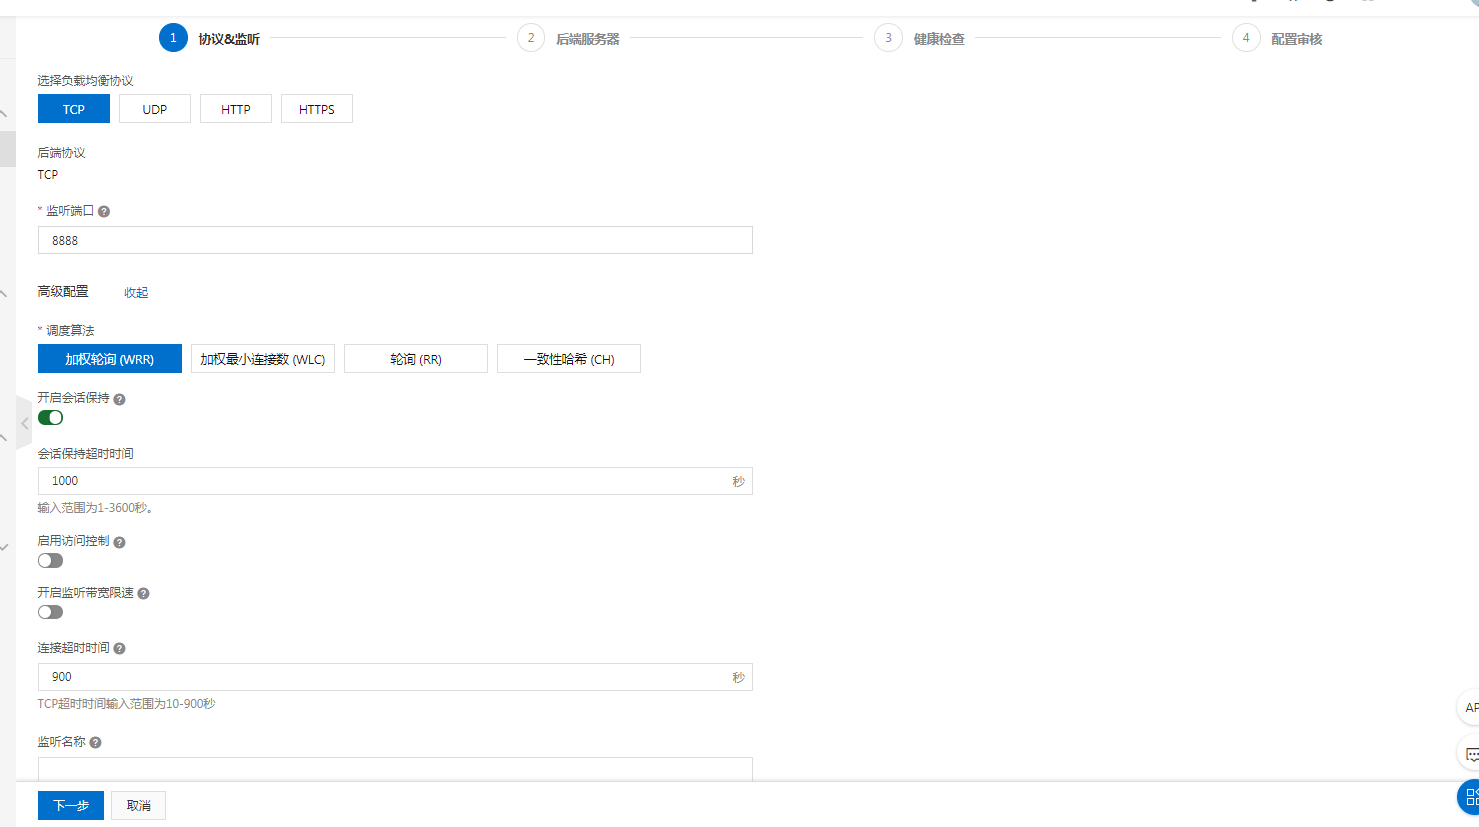
阿里云 SLB实践 HTTP与TCP场景

  1. 解绑弹性IP

  2. 够买负载均衡SLB 分区一定要和 实例在一起 华北2

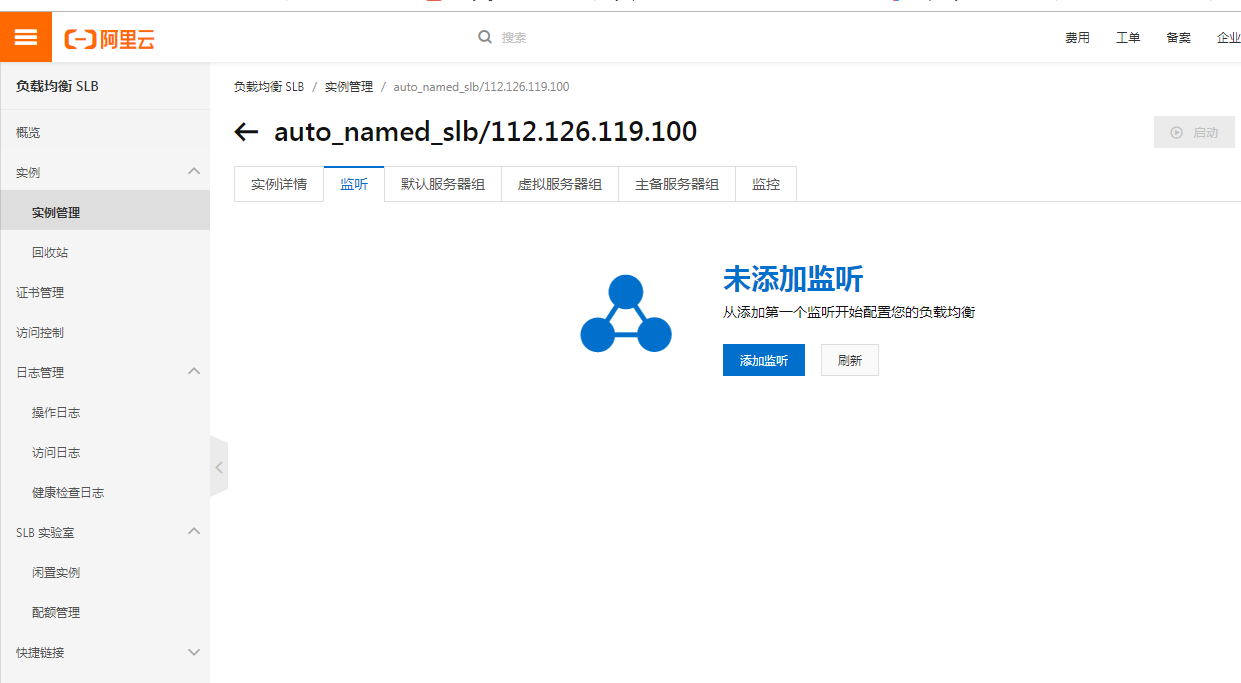
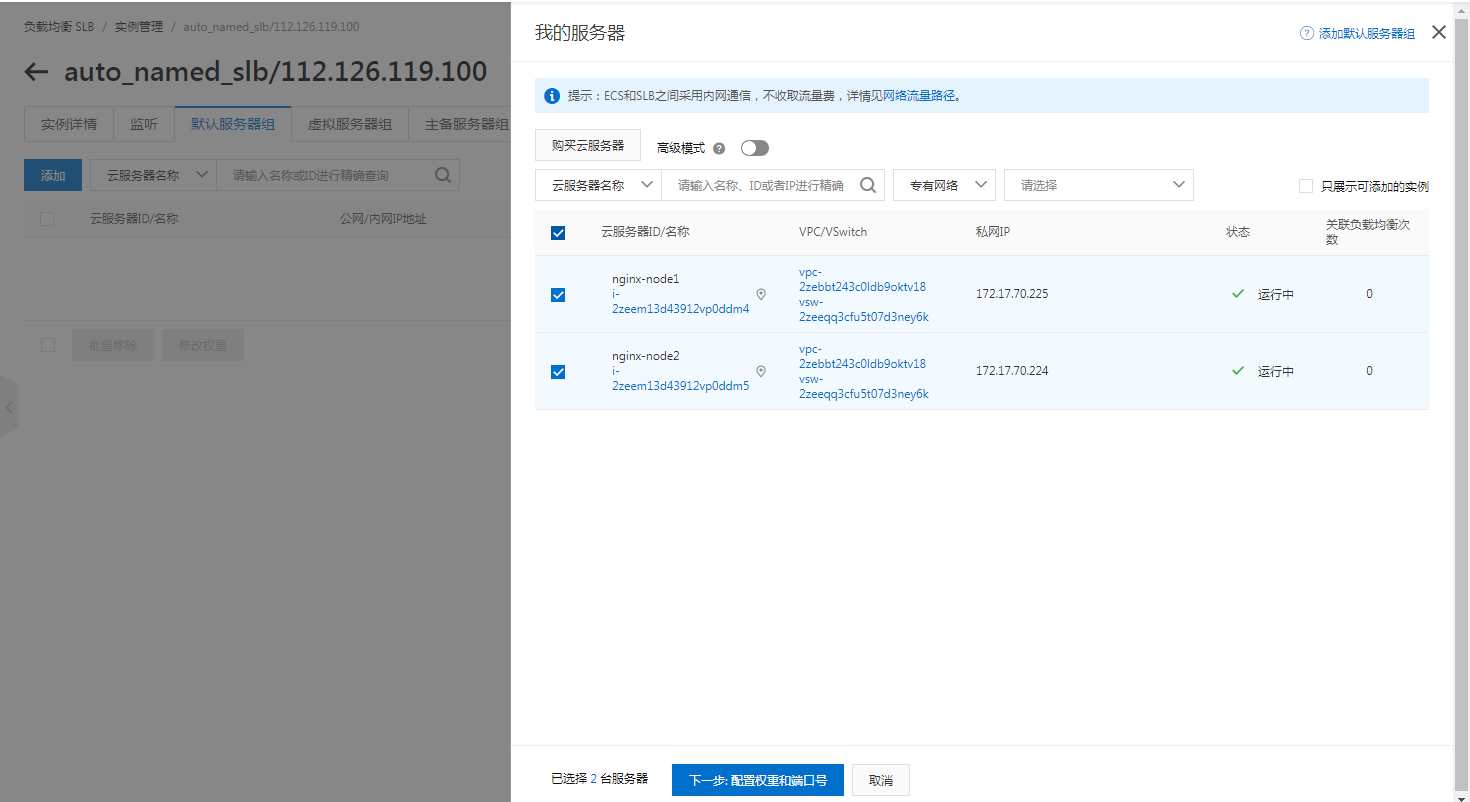
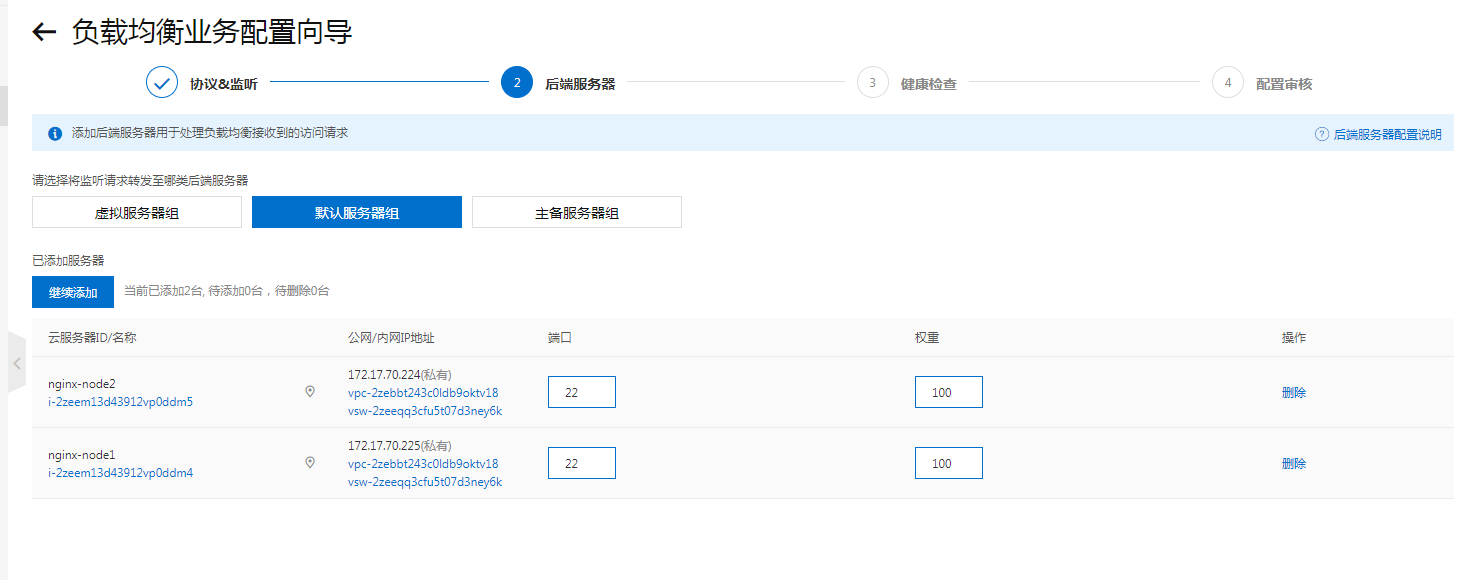
  3. 配置后端服务器

1
可以先测试一下 ping 112.126.119.100 / telnet 112.126.119.100 9999

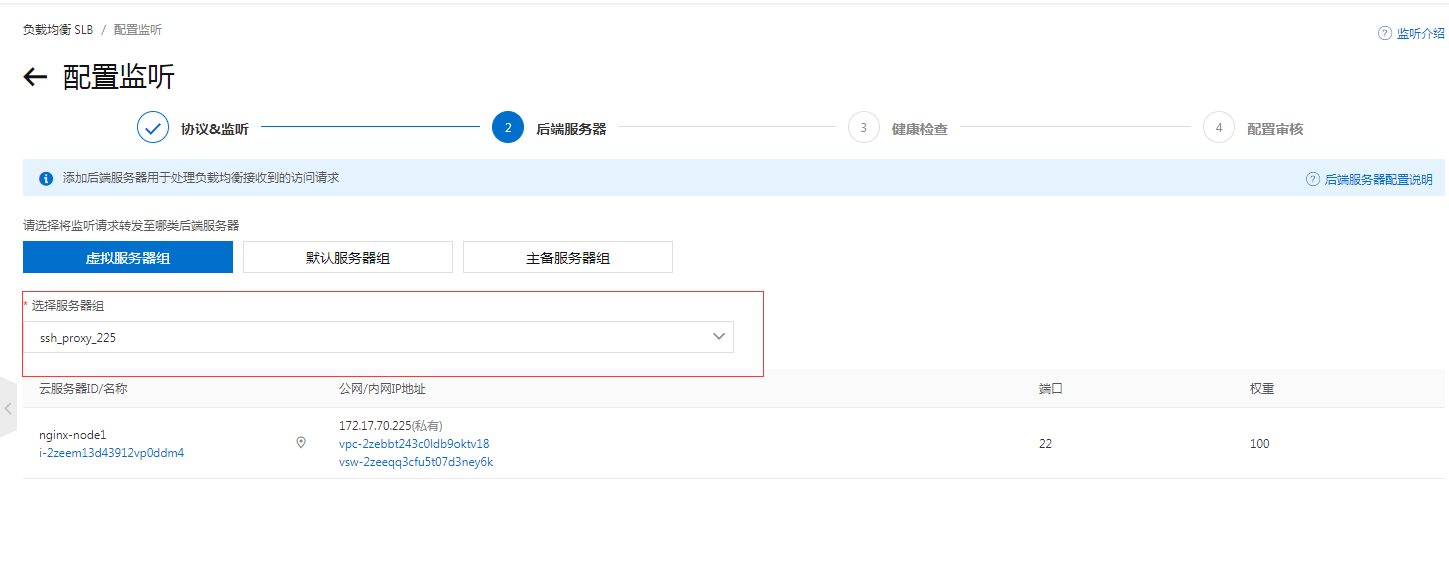
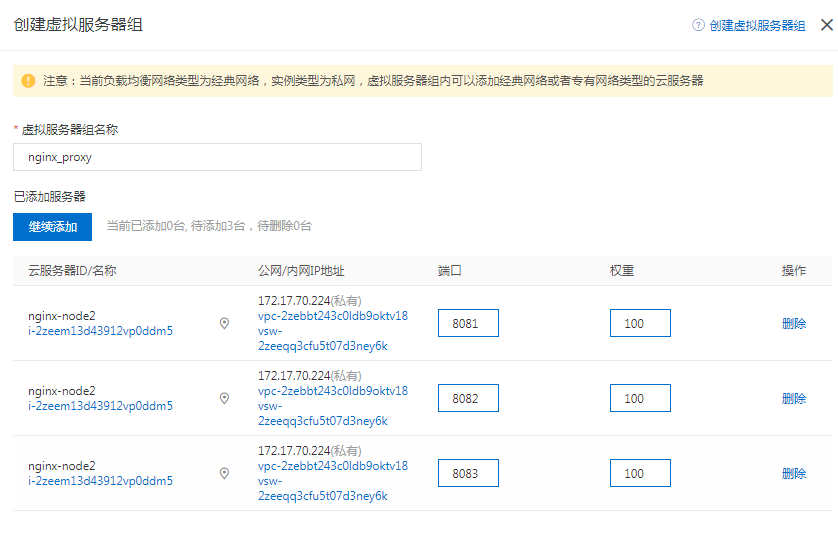
推荐使用 虚拟服务器组

1
虚拟机服务组 对应每台主机的 实际端口

7层负载

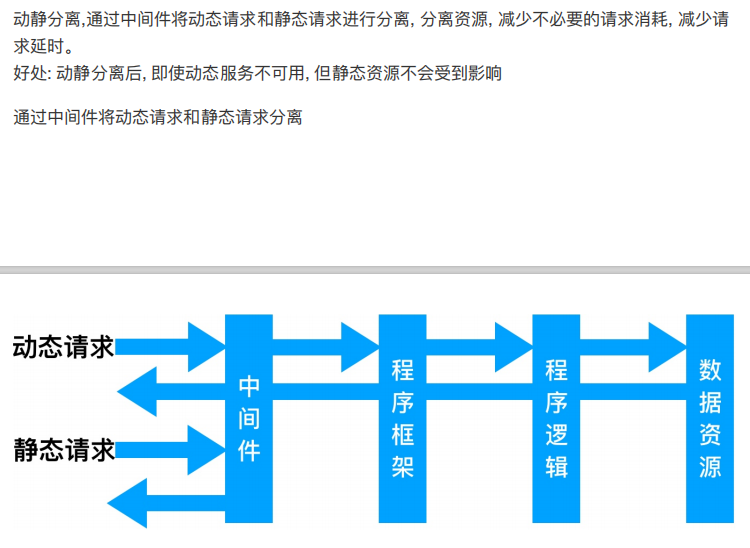
Nginx 动静分离

Nginx 动静分离应用案例

1
2
3
1. CentOS7.4 172.17.70.227 proxy
2. CentOS7.4 172.17.70.226 tomcat 动态jsp
3. CentOS7.4 172.17.70.226 nginx 静态图片
1
2
3
4
5
6
7
8
9
10
# 基本流程
1. 配置静态nginx 使用公网访问nginx.png
2. 配置动态nginx 本地验证是否打开
3. 定义负载均衡
4. 新增ajax文件 调度jsp文件 调度nginx静态图片
5. 验证 如果tomcat服务终止,jsp无法响应 但是静态图片还在

nginx+tomcat
静态 js css png -> nginx
动态 jsp -> tomcat

准备静态资源

1
2
3
4
5
6
# 准备静态图片
[root@nginx soft]# mkdir -p /soft/code/images

# 只有proxy有公网可以下载,下载好后传过去
[root@proxy ~]# wget -O /tmp/nginx.png http://nginx.org/nginx.png
[root@proxy tmp]# scp nginx.png root@172.17.70.226:/soft/code/images/
1
2
3
4
5
6
7
8
9
10
11
12
13
14
15
16
17
18
19
20
21
# nginx配置
[root@nginx soft]# yum install -y nginx

[root@nginx conf.d]# vim static.conf

[root@nginx conf.d]# cd /etc/nginx/conf.d/

server {
listen 80;
server_name 172.17.70.226;
root /soft/code;
index index.html;

location ~ .*\.(jpg|css|gif|png)$ {
gzip on;
root /soft/code/images;
}
}

[root@nginx conf.d]# nginx -t
[root@nginx conf.d]# nginx -s reload
1
2
# proxy 访问测试
curl 172.17.70.226/nginx.png

使用proxy 调度访问静态图片

1
2
3
4
5
6
7
8
9
10
11
12
13
14
15
16
17
18
19
20
21
22
# 配置 proxy
[root@proxy conf.d]# cd /etc/nginx/conf.d/
[root@proxy conf.d]# vim proxy.conf

upstream static {
server 172.17.70.226:80;
}

server {
listen 80;
server_name 60.205.217.112;

location / {
root /soft/code;
index index.html;
}

location ~ .*\.(png|jpg|gif)$ {
proxy_pass http://static;
include proxy_params;
}
}
1
2
3
4
5
6
7
8
9
10
11
12
13
14
15
16
17
18
# proxy_params

[root@proxy conf.d]# vim /etc/nginx/proxy_params

proxy_redirect default;
proxy_set_header Host $http_host;
proxy_set_header X-Real-IP $remote_addr;
proxy_set_header X-Forwarded-For $proxy_add_x_forwarded_for;

proxy_connect_timeout 60;
proxy_send_timeout 60;
proxy_read_timeout 60;

proxy_buffer_size 32k;
proxy_buffering on;
proxy_buffers 4 128k;
proxy_busy_buffers_size 256k;
proxy_max_temp_file_size 256k;
1
测试访问: http://60.205.217.112/nginx.png

准备动态资源

1
2
3
4
5
6
7
8
9
10
11
12
13
14
15
16
17
18
19
20
21
22
23
[root@nginx bin]# yum install java -y
[root@proxy tmp]# scp apache-tomcat-8.5.47.tar.gz root@172.17.70.226:/tmp

[root@nginx ~]# mkdir -p /soft/app
[root@nginx app]# cp /tmp/apache-tomcat-8.5.47.tar.gz ./
[root@nginx app]# tar -zxvf apache-tomcat-8.5.47.tar.gz

[root@nginx app]# cd apache-tomcat-8.5.47/webapps/ROOT/
[root@nginx ROOT]# vi java_test.jsp

<%@ page language="java" import="java.util.*" pageEncoding="utf-8"%>
<HTML>
<HEAD>
<TITLE>JSP Test Page</TITLE>
</HEAD>
<BODY>
<%
Random rand = new Random();
out.println("<h1>Random number:</h1>");
out.println(rand.nextInt(99)+100);
%>
</BODY>
</HTML>
1
2
3
# 解决tomcat8 在centos7 启动慢
yum install rng-tools
systemctl start rngd
1
2
3
# 启动tomcat服务
[root@nginx ROOT]# cd /soft/app/apache-tomcat-8.5.47/bin/
[root@nginx bin]# sh startup.sh
1
2
3
4
5
6
7
8
9
10
11
12
13
# 配置本地动态访问
[root@proxy code]# curl http://172.17.70.226:8080/java_test.jsp

<HTML>
<HEAD>
<TITLE>JSP Test Page</TITLE>
</HEAD>
<BODY>
<h1>Random number:</h1>
116

</BODY>
</HTML>

使用proxy 调度动态jsp页面

1
2
3
4
5
6
7
8
9
10
11
12
13
14
15
16
17
18
19
20
21
22
23
24
25
26
27
28
29
30
31
32
33
34
[root@proxy conf.d]# vim proxy.conf 

upstream static {
server 172.17.70.226:80;
}

upstream jsp {
server 172.17.70.226:8080;
}

server {
listen 80;
server_name 60.205.217.112;

location / {
root /soft/code;
index index.html;
}

location ~ .*\.(png|jpg|gif)$ {
proxy_pass http://static;
include proxy_params;
}

location ~ .*\.jsp$ {
proxy_pass http://jsp;
include proxy_params;
}
}

[root@proxy conf.d]# nginx -t
[root@proxy conf.d]# nginx -s reload

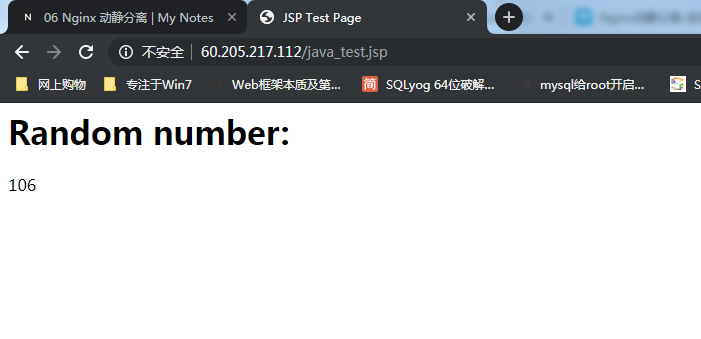
http://60.205.217.112/java_test.jsp

编写动静整合 html 文件

1
2
3
4
5
6
7
8
9
10
11
12
13
14
15
16
17
18
19
20
21
22
23
24
25
26
27
28
[root@proxy conf.d]# vim /soft/code/mysite.html

<html lang="en">
<head>
<meta charset="UTF-8" />
<title>测试ajax和跨域访问</title>
<script src="http://libs.baidu.com/jquery/2.1.4/jquery.min.js"></script>
</head>
<script type="text/javascript">
$(document).ready(function(){
$.ajax({
type: "GET",
url: "http://60.205.217.112/java_test.jsp",
success: function(data) {
$("#get_data").html(data)
},
error: function() {
alert("fail!!,请刷新再试!");
}
});
});
</script>
<body>
<h1>测试动静分离</h1>
<img src="http://60.205.217.112/nginx.png">
<div id="get_data"></div>
</body>
</html>
1
2
# 测试访问
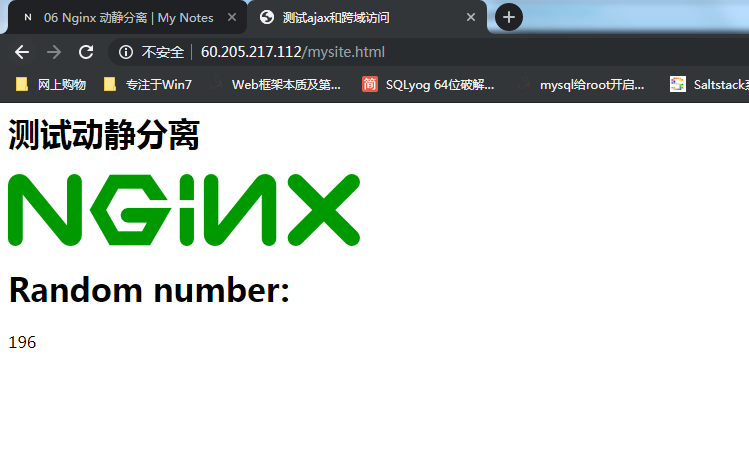
http://60.205.217.112/mysite.html

测试动静分离整合

1
2
当停止tomcat时,静态图片依旧可以访问到
[root@nginx bin]# sh shutdown.sh

1
2
# 恢复
[root@nginx bin]# sh startup.sh

按手机类型调度不同后端节点

  1. 根据user_agent判断

准备web站点

1
2
3
[root@nginx soft]# mkdir -p /soft/{android,iphone}
[root@nginx soft]# echo "<h1>Android</h1>" >> /soft/android/index.html
[root@nginx soft]# echo "<h1>Iphone</h1>" >> /soft/iphone/index.html

配置 nginx 站点

1
2
3
4
5
6
7
8
9
10
11
12
13
14
15
16
17
18
19
20
21
22
23
24
25
26
27
28
[root@nginx soft]# cd /etc/nginx/conf.d/
[root@nginx conf.d]# vim phone.conf

server {
listen 8081;
server_name 172.17.70.227;
index index.html;

location / {
root /soft/android;
index index.html;
}
}

server {
listen 8082;
server_name 172.17.70.227;
index index.html;

location / {
root /soft/iphone;
index index.html;
}
}


[root@nginx conf.d]# nginx -t
[root@nginx conf.d]# nginx -s reload
1
2
3
4
5
# 测试
[root@proxy conf.d]# curl 172.17.70.226:8081
<h1>Android</h1>
[root@proxy conf.d]# curl 172.17.70.226:8082
<h1>Iphone</h1>

根据 user_agent 分配页面

1
2
3
4
5
6
# = 开头表示精确匹配
# ^~ 开头表示uri以某个常规字符串开头,理解为匹配 url路径即可。nginx不对url做编码,因此请求为/static/20%/aa,可以被规则^~ /static/ /aa匹配到(注意是空格)。以xx开头
# ~ 开头表示区分大小写的正则匹配 以xx结尾
# ~* 开头表示不区分大小写的正则匹配 以xx结尾
#!~和!~*分别为区分大小写不匹配及不区分大小写不匹配 的正则
# / 通用匹配,任何请求都会匹配到。
1
2
3
4
5
6
7
8
9
10
11
12
13
14
15
16
17
18
19
20
21
22
23
24
25
26
27
28
29
[root@proxy conf.d]# vim proxy_phone.conf

upstream iphone {
server 172.17.70.226:8082;
}

upstream android {
server 172.17.70.226:8081;
}


server {
listen 80;
server_name 60.205.217.112;
index index.html;

location / {
if ($http_user_agent ~* "android"){
proxy_pass http://android;
}

if ($http_user_agent ~* "iphone"){
proxy_pass http://iphone;
}
}
}

[root@proxy conf.d]# nginx -t
[root@proxy conf.d]# nginx -s reload
1
2
3
4
# 发给测试一下
http://60.205.217.112/
# 可能专门为安卓 或者 iphone 专门提供了页面
# 手机不一样 型号不一样 样式不一样

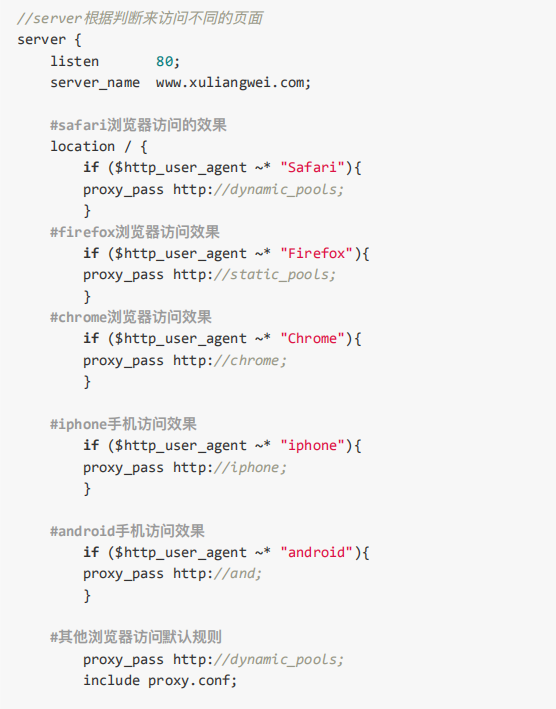
按浏览器调度不同后端节点

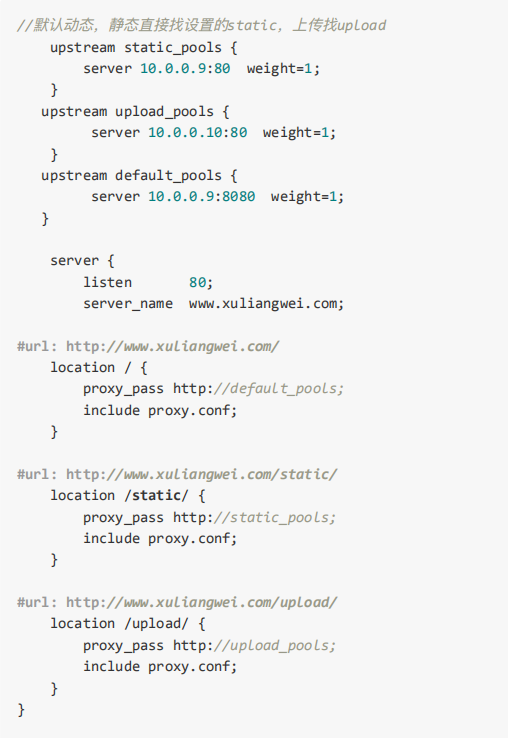
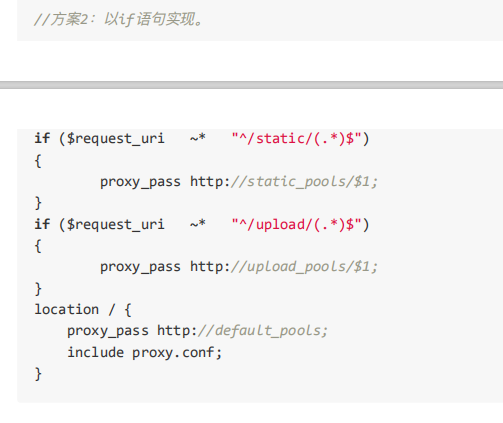
按不同目录路径 调度不同后端节点

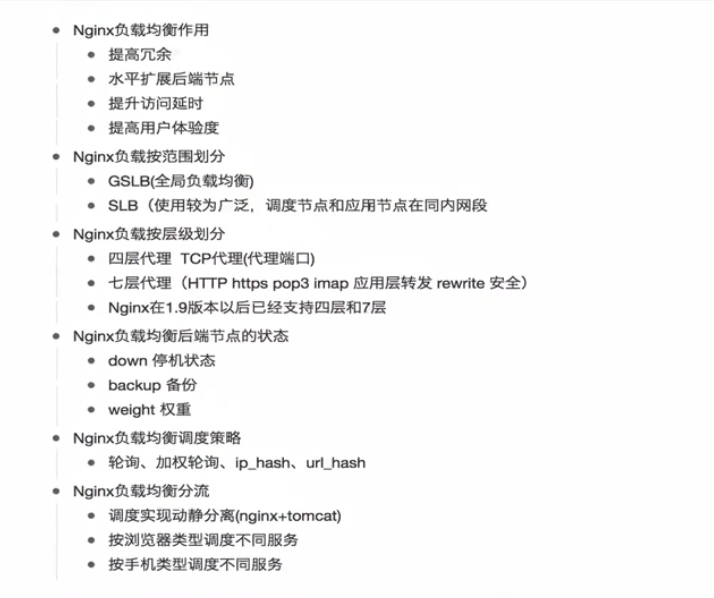
Nginx 负载知识总结