08 ELK 收集Apache访问日志实战案例


ELK 收集日志的几种方式

  1. ELK收集日志常用的有两种方式,分别是:
  2. 不修改源日志的格式,而是通过logstash的grok方式进行过滤、清洗,将原始无规则的日志转换为规则的日志。
  3. 修改源日志输出格式,按照需要的日志格式输出规则日志,logstash只负责日志的收集和传输,不对日志做任何的过滤清洗。
  4. 这两种方式各有优缺点,
  5. 第一种方式不用修改原始日志输出格式,直接通过logstash的grok方式进行过滤分析,
    • 好处是对线上业务系统无任何影响,缺点是logstash的grok方式在高压力情况下会成为性能瓶颈,如果要分析的日志量超大时,日志过滤分析可能阻塞正常的日志输出。
    • 因此,在使用logstash时,能不用grok的,尽量不使用grok过滤功能。
  6. 第二种方式缺点是需要事先定义好日志的输出格式,这可能有一定工作量,
    • 但优点更明显,因为已经定义好了需要的日志输出格式,logstash只负责日志的收集和传输,这样就大大减轻了logstash的负担,可以更高效的收集和传输日志。
    • 另外,目前常见的web服务器,例如apache、nginx等都支持自定义日志输出格式。因此,在企业实际应用中,第二种方式是首选方案。
1
2
主要看系统是否已上线,如果没有上线可与研发技术确认,使用定义好的日志输出格式,减少logstash压力,
如果已上线,先看看日志的输出格式,能不用的话尽量不用grok,用了就加大资源配置,尤其是cpu

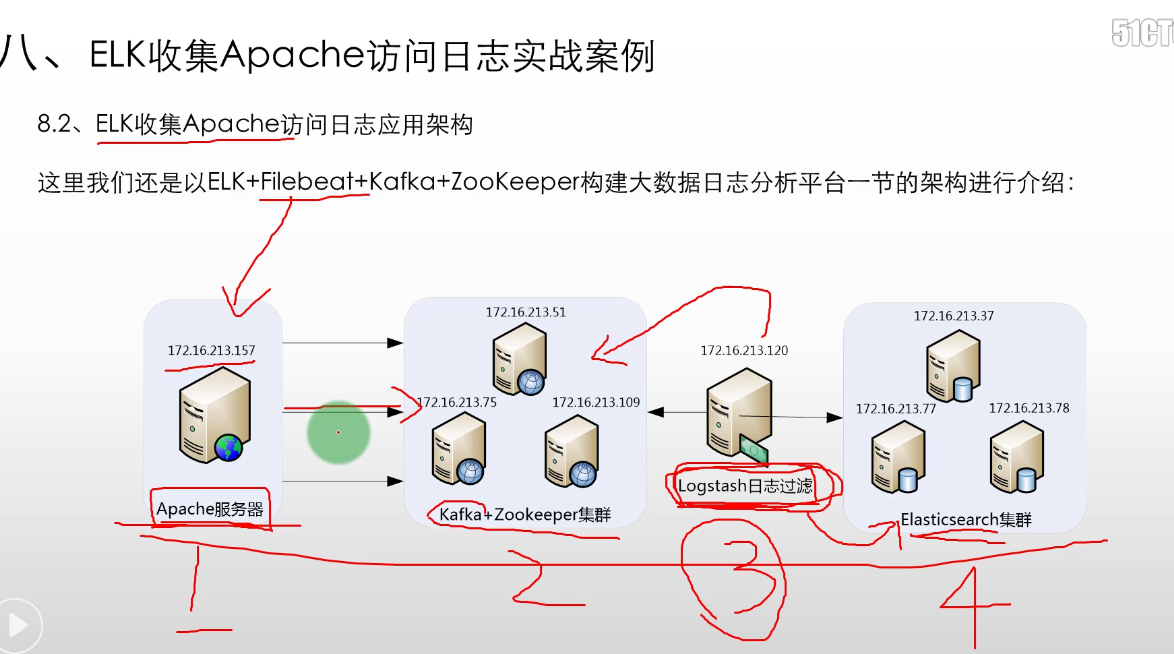
ELK 收集Apache访问日志应用架构

  1. ELK+Filebeat+Kafka+ZooKeeper构建大数据日志
  2. 前端是apache服务器

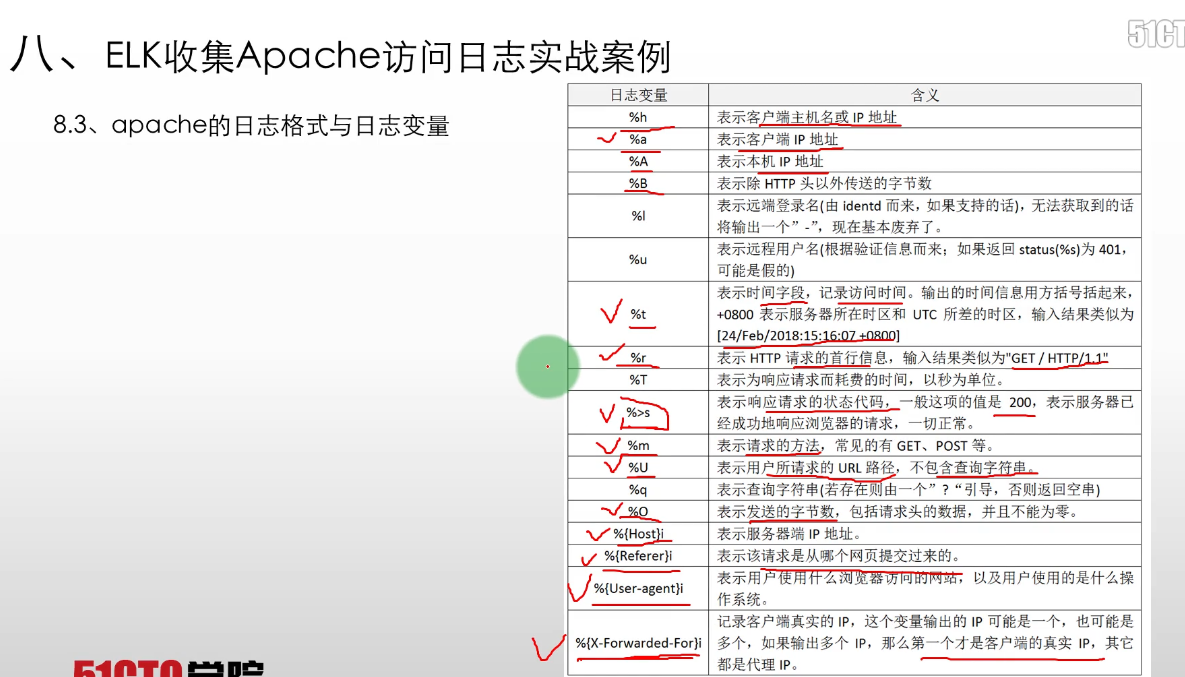
apache 的日志格式与日志变量

  1. apache支持自定义输出日志格式,但是,apache有很多日志变量字段,所以在收集日志前,需要首先确定哪些是我们需要的日志字段,然后将日志格式定下来。
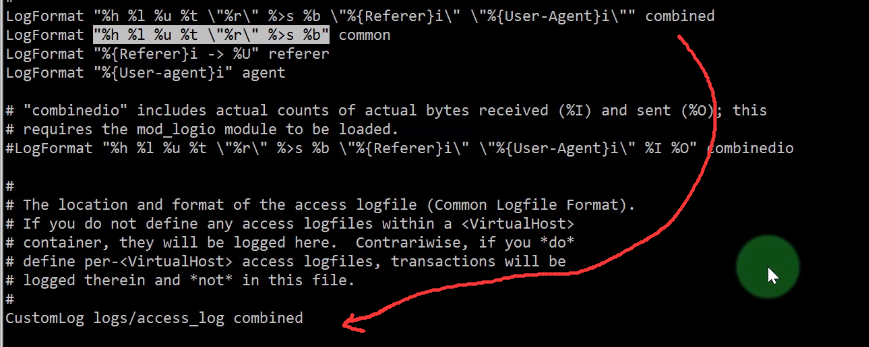
  2. 要完成这个工作,需要了解apache日志字段定义的方法和日志变量的含义,在apache配置文件httpd.conf中,对日志格式定义的配置项为LogFormat,
  3. 默认的日志字段定义为如下内容:
1
LogFormat "%h %l %u %t \"%r\" %>s %b \"%{Referer}i\" \"%{User-Agent}i\"" combined

apache 的日志格式

自定义apache日志格式

  1. 这里定义将apache日志输出为json格式,下面仅列出apache配置文件httpd.conf中日志格式和日志文件定义部分,定义好的日志格式与日志文件如下:
1
2
3
4
5
6
7
8
[root@filebeat1 ~]# vim /etc/httpd/conf/httpd.conf 
LogFormat "{\"@timestamp\":\"%{%Y-%m-%dT%H:%M:%S%z}t\",\"client_ip\":\"%{X-Forwarded-For}i\",\"direct_ip\": \"%a\",
\"request_time\":%T,\"status\":%>s,\"url\":\"%U%q\",\"method\":\"%m\",\"http_host\":\"%{Host}i\",
\"server_ip\":\"%A\",\"http_referer\":\"%{Referer}i\",\"http_user_agent\":\"%{User-agent}i\",
\"body_bytes_sent\":\"%B\",\"total_bytes_sent\":\"%O\"}" access_log_json


CustomLog logs/access.log access_log_json

  1. 这里通过LogFormat指令定义了日志输出格式,在这个自定义日志输出中,定义了13个字段,定义方式为:字段名称:字段内容,字段名称是随意指定的,
  2. 能代表其含义即可,字段名称和字段内容都通过双引号括起来,而双引号是特殊字符,需要转移,因此,使用了转移字符“\”,每个字段之间通过逗号分隔。
  3. 此外,还定义了一个时间字段 @timestamp,这个字段的时间格式也是自定义的,此字段记录日志的生成时间,非常有用。
  4. CustomLog指令用来指定日志文件的名称和路径。
  5. 需要注意的是,上面日志输出字段中用到了body_bytes_sent和total_bytes_sent发送字节数统计字段,这个功能需要apache加载mod_logio.so模块,
  6. 如果没有加载这个模块的话,需要安装此模块并在httpd.conf文件中加载一下即可。
1
2
3
4
5
6
7
8
9
10
11
12
13
14
15
16
17
18
19
20
21
22
23
# 重启服务
# 配置个访问页面
cd /var/www/html
echo "hello apache" >>index.html

# 重启服务
systemctl status httpd

# 到其他服务器curl测试
[root@server2 html]# curl 172.17.70.235
hello apache

# 查看日志
[root@filebeat1 httpd]# cd /etc/httpd/logs/
[root@filebeat1 logs]# cat access.log
{"@timestamp":"2019-10-28T08:21:21+0800","client_ip":"-","direct_ip": "172.17.70.230","request_time":0,"status":200,
"url":"/index.html","method":"GET","http_host":"172.17.70.235","server_ip":"172.17.70.235","http_referer":"-","http_user_agent":"curl/7.29.0","body_bytes_sent":"13","total_bytes_sent":"253"}

{"@timestamp":"2019-10-28T08:25:10+0800","client_ip":"-","direct_ip": "172.17.70.230","request_time":0,"status":200,
"url":"/index.html","method":"GET","http_host":"172.17.70.235","server_ip":"172.17.70.235","http_referer":"-","http_user_agent":"curl/7.29.0","body_bytes_sent":"13","total_bytes_sent":"253"}

# 日志生成格式已经改变好
# apache的简单反向代理

验证日志输出

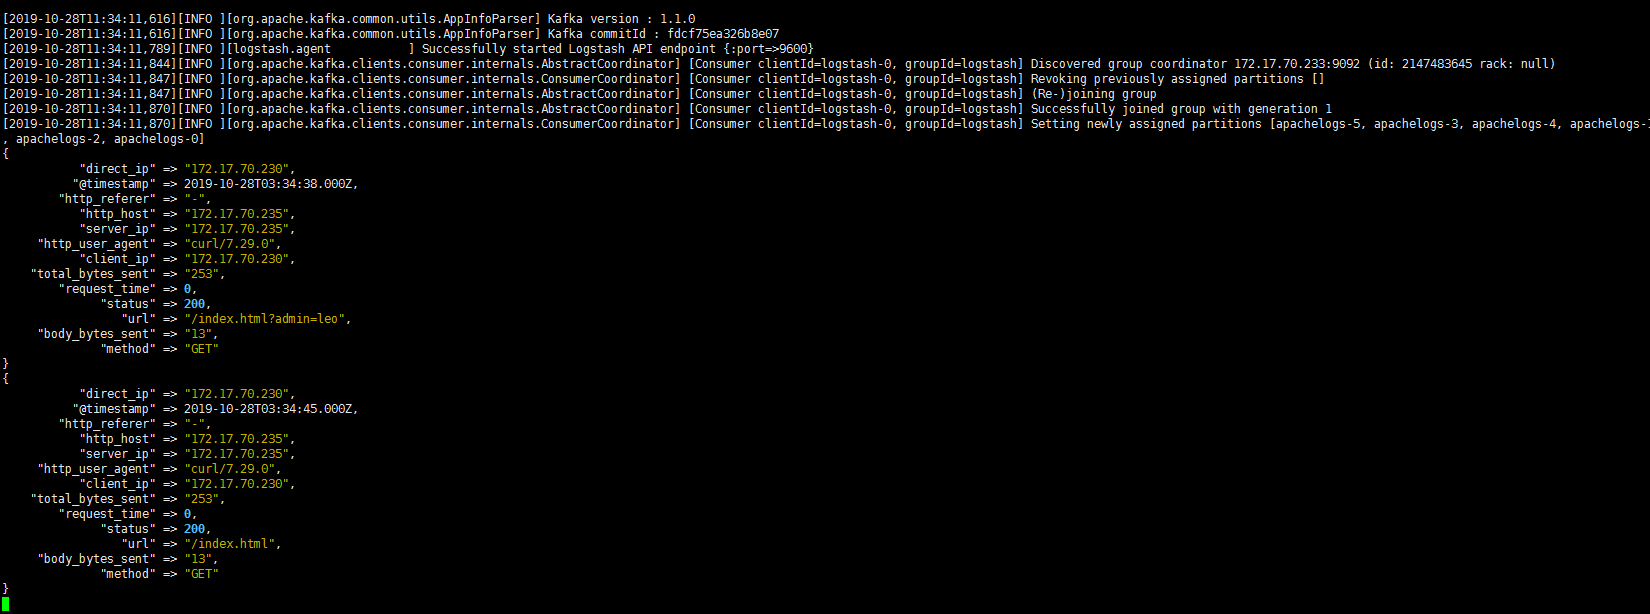
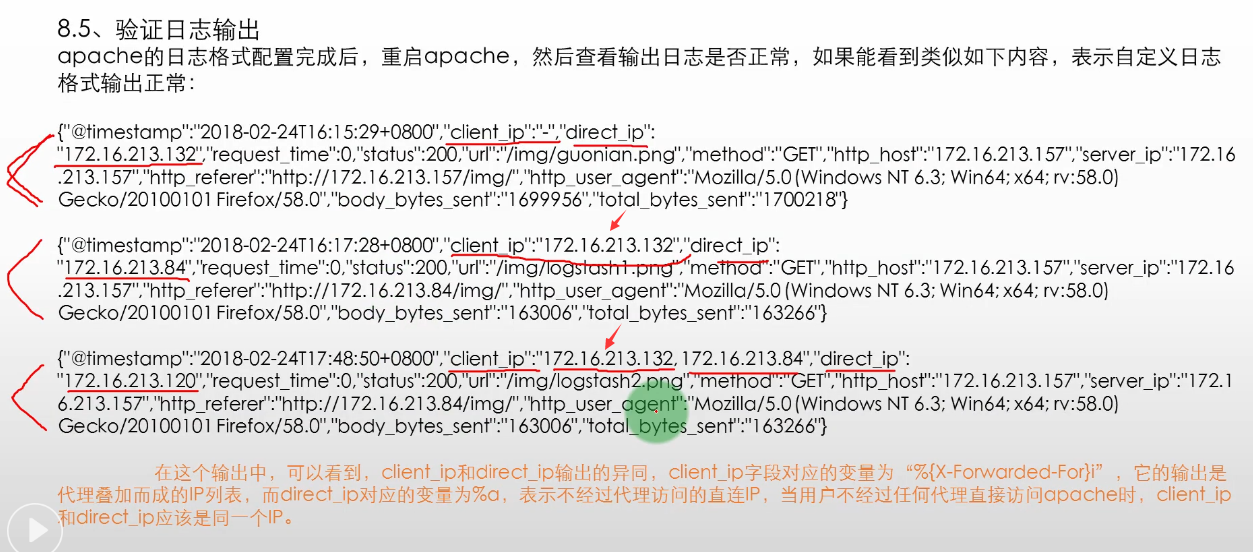
  1. apache的日志格式配置完成后,重启apache,然后查看输出日志是否正常,如果能看到类似如下内容,表示自定义日志格式输出正常:

  2. 在这个输出中,可以看到,client_ip和direct_ip输出的异同,

    • client_ip字段对应的变量为“%{X-Forwarded-For}i”,它的输出是代理叠加而成的IP列表,
    • 而direct_ip对应的变量为%a,表示不经过代理访问的直连IP,当用户不经过任何代理直接访问apache时,client_ip和direct_ip应该是同一个IP。
配置 filebeat

修改配置文件

  1. filebeat是安装在apache服务器上
1
2
3
4
5
6
7
8
9
10
11
12
13
14
15
16
17
18
19
20
21
22
23
24
25
26
27
28
29
30
31
32
33
34
35
36
[root@filebeat1 logs]# cd /usr/local/filebeat/

[root@filebeat1 filebeat]# vim filebeat.yml

filebeat.inputs:
- type: log
enabled: true
paths:
- /var/log/httpd/access.log
fields:
log_topic: apachelogs

filebeat.config.modules:
path: ${path.config}/modules.d/*.yml
reload.enabled: false

name: "172.17.70.235"

#============================= kafka output ==================================
output.kafka:
enabled: true
hosts: ["172.17.70.232:9092", "172.17.70.232:9092", "172.17.70.232:9092"]
version: "0.10"
topic: '%{[fields][log_topic]}'
partition.round_robin:
reachable_only: true
worker: 2
required_acks: 1
compression: gzip
max_message_bytes: 10000000

#processors:
#- drop_fields:
# fields: ["beat", "input", "source", "offset","prospector"]

logging.level: debug
1
2
1. 这个配置文件中,是将apache的访问日志/var/log/httpd/access.log内容实时的发送到kafka集群topic为apachelogs中。
2. 需要注意的是filebeat输出日志到kafka中配置文件的写法。

测试并启动

1
2
3
4
5
6
7
8
9
10
11
12
13
14
15
16
17
18
19
20
21
22
# 启动
# filebeat的职责是监控收集日志,发送给kafka

[root@filebeat1 filebeat]#./filebeat -e -c filebeat.yml

# debug模式
# 访问一下 产生点内容
[root@server2 html]# curl 172.17.70.235
hello apache

# 去kafka查看

[root@kafkazk1 kafka]# bin/kafka-topics.sh --zookeeper 172.17.70.232:2181,172.17.70.233:2181,172.17.70.234:2181 --list
__consumer_offsets
apachelogs
osmessages

# 启动消费数据
bin/kafka-console-consumer.sh --zookeeper 172.17.70.232:2181,172.17.70.233:2181,172.17.70.234:2181 --topic apachelogs

# 消息已可正常发送到kafka
# 使用logstash消费数据 并进行清洗数据

配置 logstash

  1. logstash事件配置文件kafka_apache_into_es.conf
1
[root@logstash logstash]# cd /usr/local/logstash/

输入部分

1
2
3
4
5
6
7
8
9
10
11
12
13
14
15
16
17
# 输入部分
input {
kafka {
# 指定输入源中kafka集群的地址。
bootstrap_servers => "172.17.70.232:9092,172.17.70.233:9092,172.17.70.234:9092"
#指定输入源中需要从哪个topic中读取数据。
topics => "apachelogs"
group_id => "logstash"
codec => json {
# 将输入的json格式进行UTF8格式编码
# 从kafka取出数据也必须是json格式
charset => "UTF-8"
}
# 增加一个字段,用于标识和判断,在output输出中会用到,用作标识判断,有标识就输出
add_field => { "[@metadata][tagid]" => "apacheaccess_log" }
}
}

过滤部分

1
2
3
4
5
6
7
8
9
10
11
12
13
14
15
16
17
18
19
20
21
22
23
24
25
26
27
28
29
30
31
32
33
34
35
36
37
38
39
40
41
42
43
44
45
46
47
48
49
50
51
52
53
54
55
56
57
58
59
60
61
62
# 过滤部分
# 由于我们在apache日志已经自定义了格式,所有过滤的工作减少了不少,否则要自制写正则过滤
filter {
if [@metadata][myid] == "apacheaccess_log" {
# mutate 数据修改
# 这里的message就是message字段,也就是日志的内容。
# 这个插件的作用是将message字段内容中UTF-8单字节编码做替换处理,这是为了应对URL有中文出现的情况。
mutate {
gsub => ["message","\\x","\\\x"]
}
# 如果message字段中有HEAD请求,就删除此条信息。get/post留下。
if ('method":"HEAD' in [message]) {
drop {}
}
# 启用json解码插件
json {
# 为什么要删除 message字段,是因为json插件解码后,已经保留了13个字段,而message就没有用了
source => "message"
# 这里添加一个字段,用于后面的判断。
add_field => { "[@metadata][direct_ip]" => "%{direct_ip}"}
# 移除不需要的字段,九个字段都是filebeat传输日志时添加的,没什么用处,所以需要移除。
remove_field => "@version"
remove_field => "prospector"
remove_field => "beat"
remove_field => "source"
remove_field => "input"
remove_field => "offset"
remove_field => "fields"
remove_field => "host"
# 因为json格式中已经定义好了每个字段,那么输出也是按照每个字段输出的,
# 因此就不需要message字段了,这里是移除message字段。
remove_field => "message"
}
# 这是对client_ip这个字段按逗号进行分组切分,因为在多级代理情况下,client_ip获取到的IP可能是IP列表,
# 如果是单个ip的话,也会进行分组,只不过是分一个组而已。
mutate {
split => ["client_ip", ","]
}
# 将切分出来的第一个分组赋值给client_ip,因为client_ip是IP列表的情况下,第一个IP才是客户端真实的IP。
mutate {
replace => { "client_ip" => "%{client_ip[0]}" }
}
# if判断,主要用来判断当client_ip为"-"的情况下,
# 当direct_ip不为"-"的情况下,就将direct_ip的值赋给client_ip。因为在client_ip为"-"的情况下,都是直接不经过代理的访问,
# 此时direct_ip的值就是客户端真实IP地址,所以要进行一下替换。
# not in ["%{direct_ip}","-"] 这个判断的意思是如果direct_ip非空。
if [client_ip] == "-" {
if [@metadata][direct_ip] not in ["%{direct_ip}","-"] {
mutate {
replace => { "client_ip" => "%{direct_ip}" }
}
}
}else{
drop{}
}
# direct_ip只是一个过渡字段,主要用于在某些情况下将值传给client_ip,
# 因此传值完成后,就可以删除direct_ip字段了。
#mutate {
# remove_field => "direct_ip"
#}
}
}

输出到终端测试

1
2
3
4
5
6
7
8
# 放到终端输出测试
output {
if [@metadata][myid] == "apacheaccess_log" {
stdout {
codec => "rubydebug"
}
}
}
1
2
3
4
5
6
7
8
9
10
11
12
13
14
15
16
17
18
19
20
21
22
23
24
25
26
27
28
29
30
31
32
33
34
35
36
37
38
39
40
41
42
43
44
45
46
47
48
49
50
51
52
53
54
55
56
57
58
### 完整版本

[root@logstash logstash]# vim kafka_apache_into_es.conf


mutate {
gsub => ["message","\\x","\\\x"]
}

if ('method":"HEAD' in [message]) {
drop {}
}

json {
source => "message"
add_field => { "[@metadata][direct_ip]" => "%{direct_ip}"}
remove_field => "@version"
remove_field => "prospector"
remove_field => "beat"
remove_field => "source"
remove_field => "input"
remove_field => "offset"
remove_field => "fields"
remove_field => "host"
remove_field => "message"
}

mutate {
split => ["client_ip", ","]
}

mutate {
replace => { "client_ip" => "%{client_ip[0]}" }
}

if [client_ip] == "-" {
if [@metadata][direct_ip] not in ["%{direct_ip}","-"] {
mutate {
replace => { "client_ip" => "%{direct_ip}" }
}
}
}else{
drop{}
}

#mutate {
# remove_field => "direct_ip"
#}
}
}

output {
if [@metadata][myid] == "apacheaccess_log" {
stdout {
codec => "rubydebug"
}
}
}
1
2
3
4
5
6
# 放到终端测试
# 启动logstash
[root@logstash logstash]# ./bin/logstash -f kafka_apache_into_es.conf
# 测试
[root@server2 html]# curl 172.17.70.235/index.html
hello apache

输出到 ES集群

1
2
3
4
5
6
7
8
9
10
11
12
13
14
15
16
17
output {
# 用于判断,跟上面input中[@metadata][myid]对应,当有多个输入源的时候,
# 可根据不同的标识,指定到不同的输出地址。
if [@metadata][myid] == "apacheaccess_log" {

elasticsearch {
# 这是指定输出到elasticsearch,并指定elasticsearch集群的地址。
hosts => ["172.17.70.229:9200","172.17.70.230:9200","172.17.70.231:9200"]
# 指定apache日志在elasticsearch中索引的名称,这个名称会在Kibana中用到。
# 索引的名称推荐以logstash开头,后面跟上索引标识和时间。
index => "logstash_apachelogs-%{+YYYY.MM.dd}"
}
}
}

[root@logstash logstash]# ./bin/logstash -f kafka_apache_into_es.conf
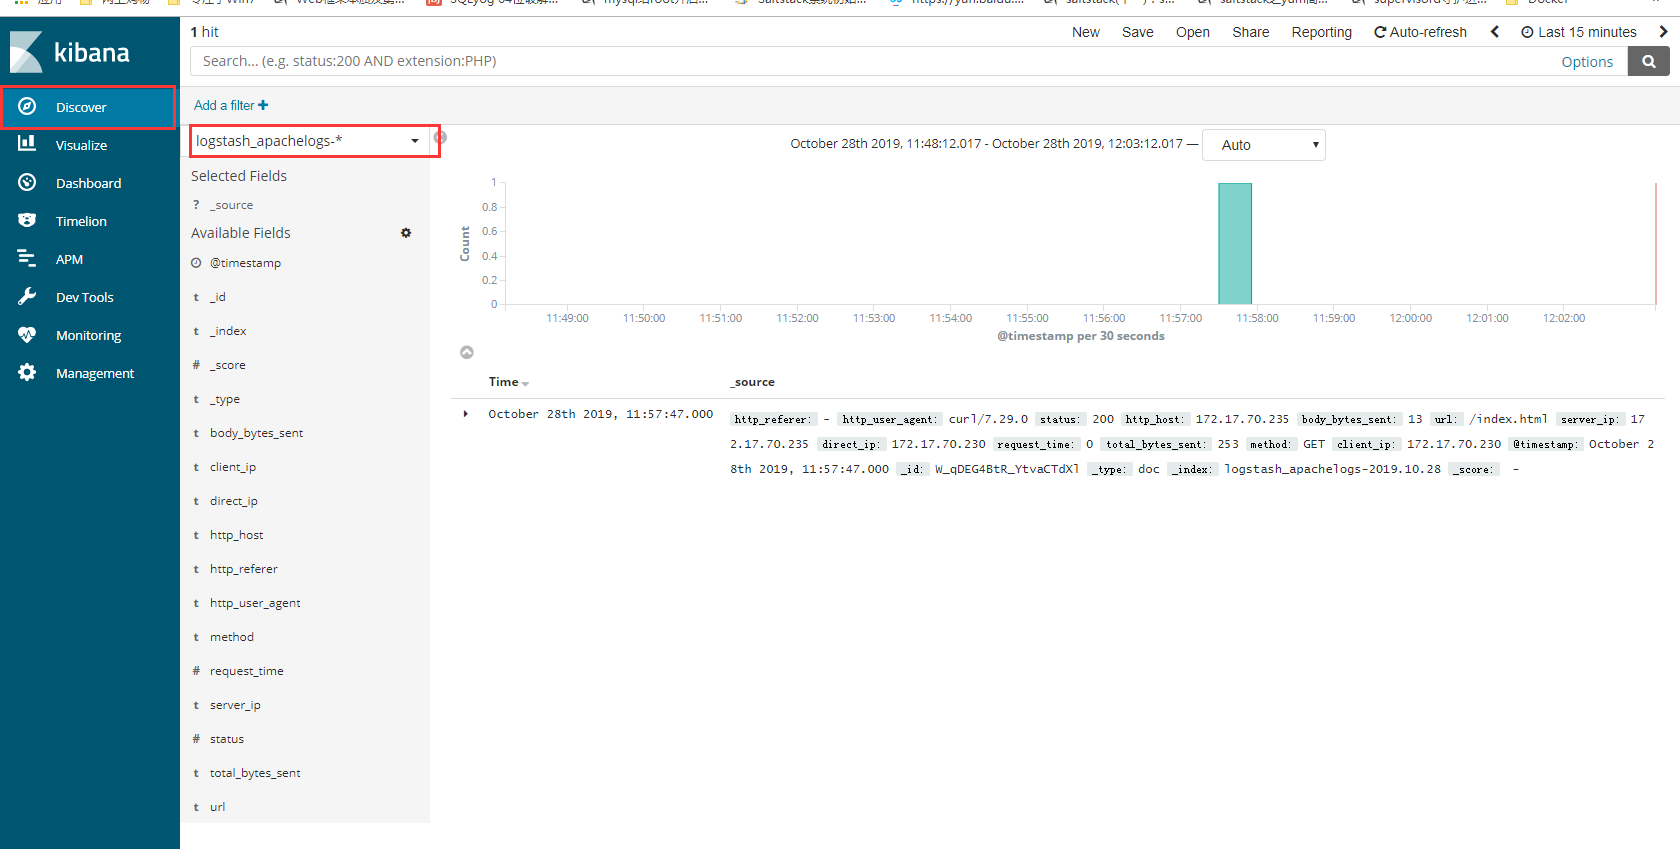
http://60.205.217.112:5601/app/kibana#/home?_g=()

klbana 展示数据

  1. filebeat收集数据到kafka,然后logstash从kafka拉取数据,如果数据能够正确发送到elasticsearch,
  2. 我们就可以在Kibana中配置索引了。
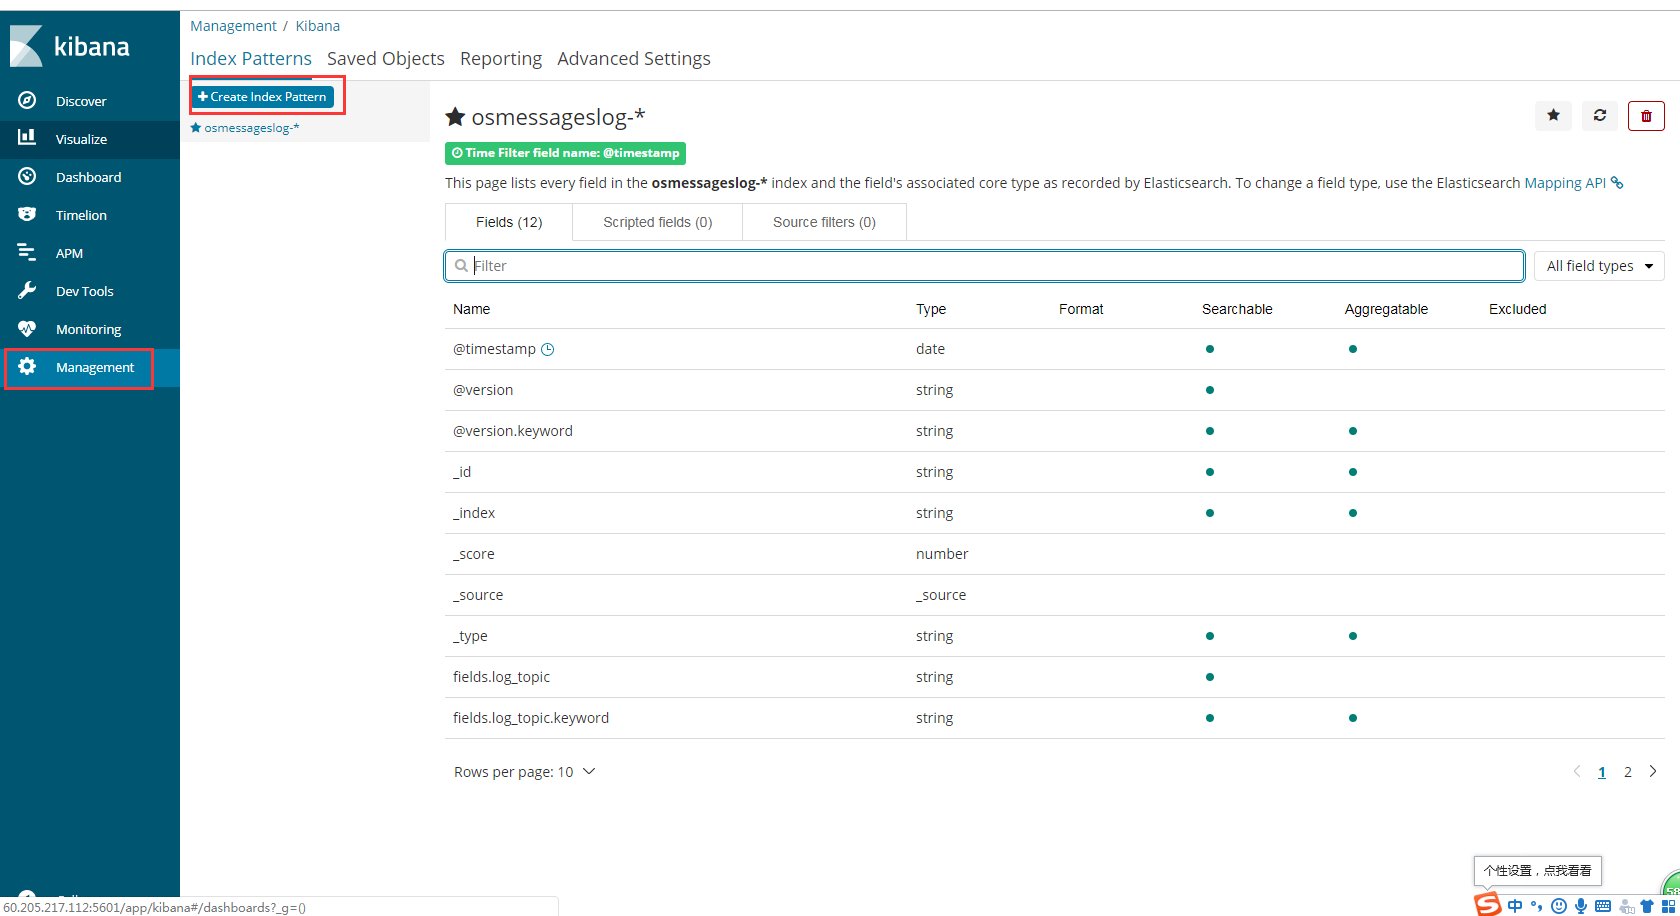
  3. 登录Kibana,首先配置一个index_pattern,点击kibana左侧导航中的Management菜单,
  4. 然后选择右侧的Index Patterns按钮,最后点击左上角的Create index pattern。

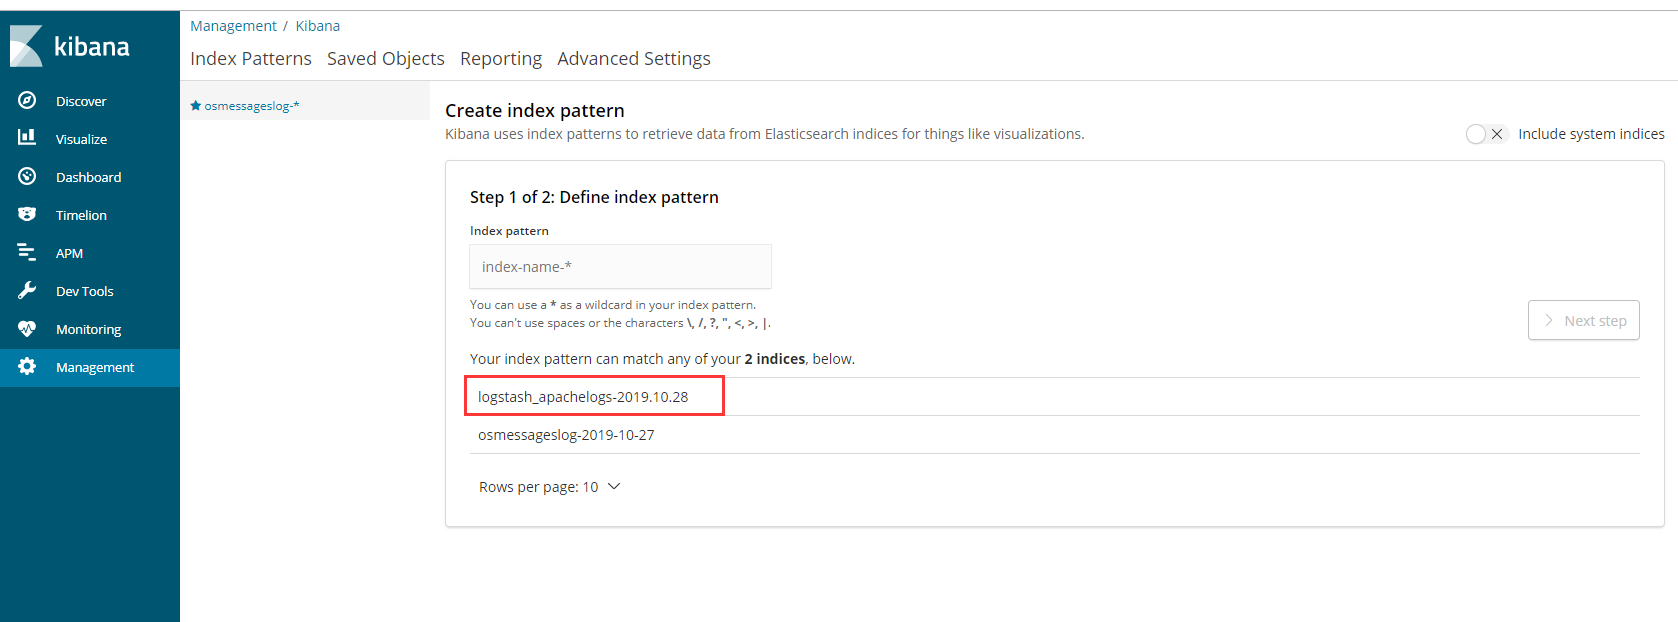
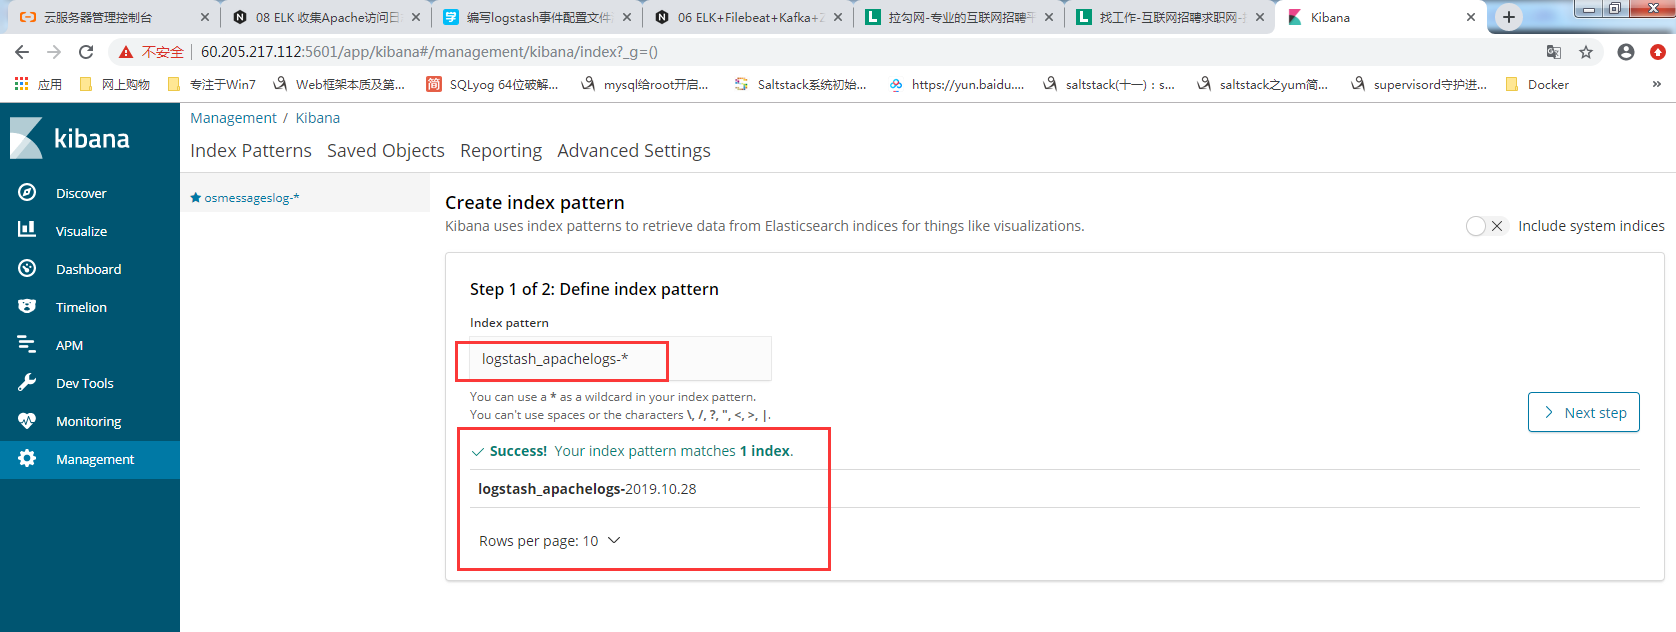
创建索引

1
2
# 有数据才有索引
# -* 索引会以日期命名,每天一个索引

索引以什么排序

1
2
以时间字段@timestamp排序
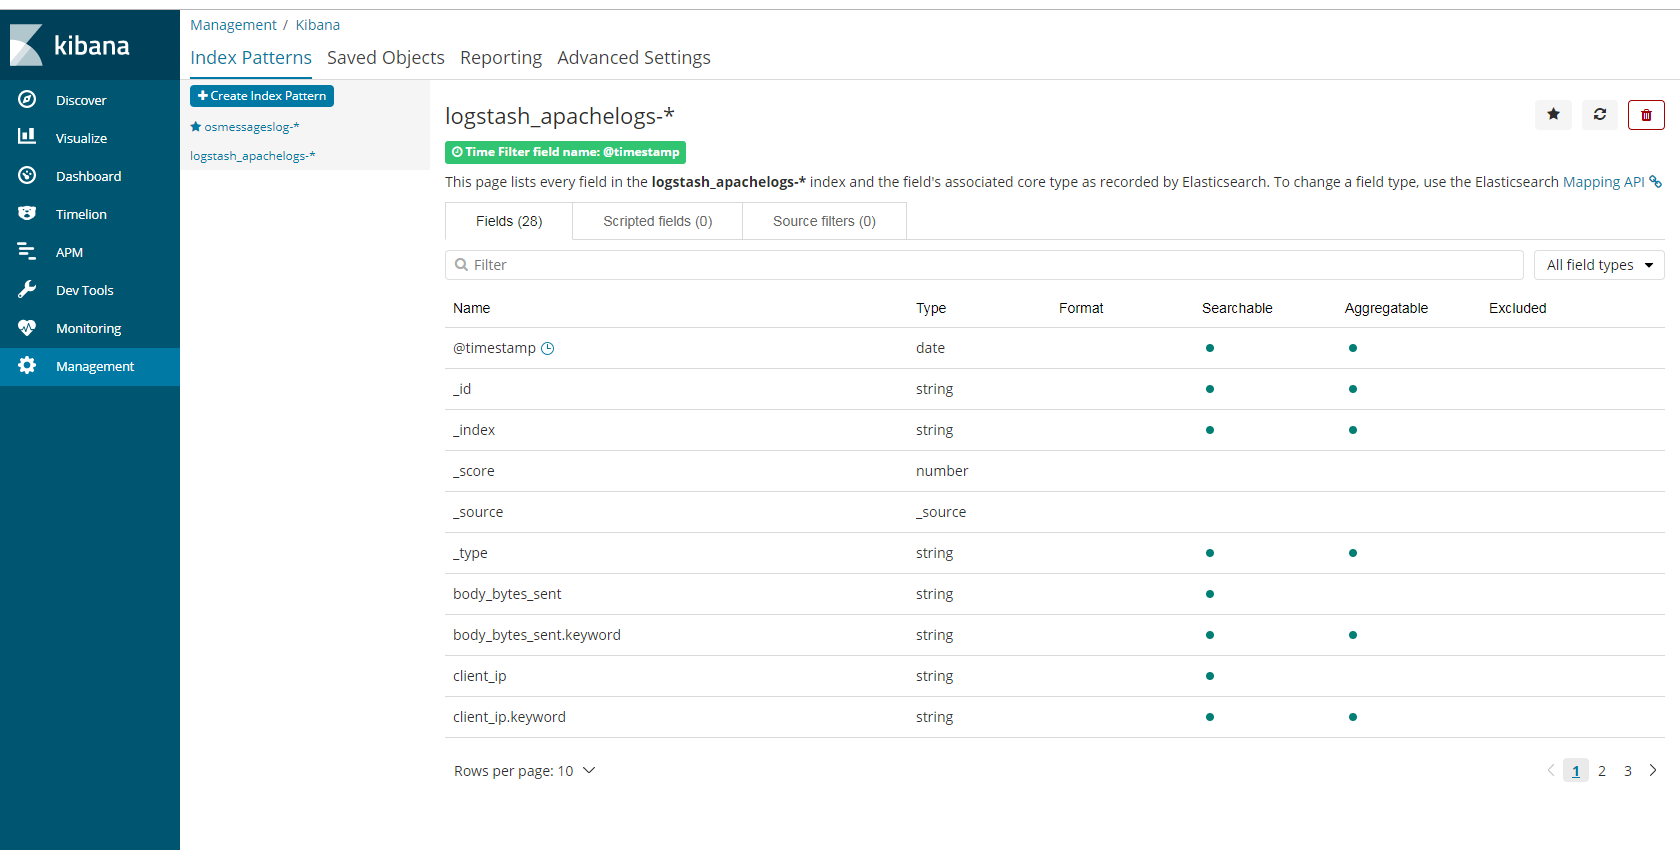
创建成功字段全部都正常先收拾

展示