05 Service 与 外界连通


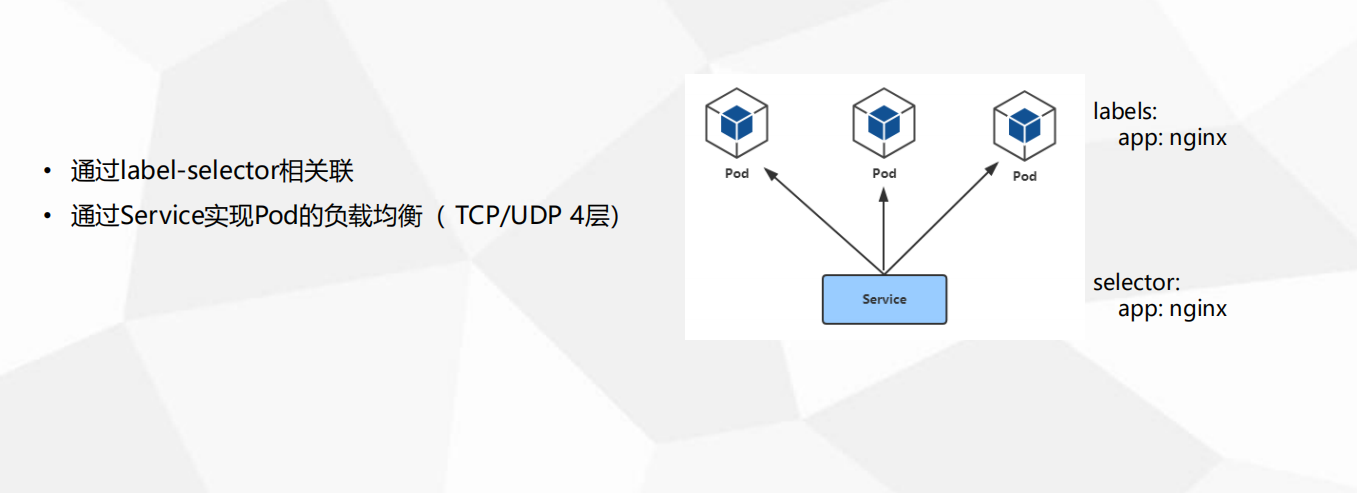
Pod与Service的联系

  1. 防止Pod失联
  2. 定义一组Pod的访问策略
  3. 支持ClusterIP,NodePort以及LoadBalancer三种类型
  4. Service的底层实现主要有Iptables和IPVS二种网络模式 如何转发流量和负载均衡
  5. 问题:
    • 1.多个Pod如何负载均衡
    • 2.容器崩溃重新拉起,IP发生变化,如何感知
    • 3.如何通过域名访问应用
1
2
3
4
5
1. Service 的主要作用: 防止Pod失联 
2. Service 感知PodIP: 如果一个Pod里面有创建3个副本,其中一个down了需要拉起来一个新的,新的IP又与之前的不一致
3. Service 可以动态感知将这个新的Pod加入进来
4. 用户不用去考虑PodIP 访问Service即可
5. Service负载均衡到Pod

Service 定义

1
2
3
4
5
6
7
8
9
10
11
12
13
14
15
[root@k8s-master1 demo]# vim web-service.yaml 
apiVersion: v1 # api版本
kind: Service # 资源对象 Service
metadata: # 元数据
labels:
app: web
name: web # service name
spec:
ports:
- port: 80 # service端口
protocol: TCP
targetPort: 8080 # 指向容器的端口
selector:
app: web # 如何知道后端关联的pod 标签选择器
type: NodePort # NodePort:在每个Node上分配一个端口作为外部访问入口
1
2
[root@k8s-master demo2]# kubectl apply -f service1.yaml 
service/my-service created
1
2
3
4
5
6
# 列出当前service
# kubernetes 默认service
[root@k8s-master demo2]# kubectl get svc
NAME TYPE CLUSTER-IP EXTERNAL-IP PORT(S) AGE
kubernetes ClusterIP 10.0.0.1 <none> 443/TCP 31h
my-service ClusterIP 10.0.0.123 <none> 80/TCP 26s
1
2
3
4
5
6
7
8
9
# kubernetes这个默认的service是负载 master apiserver的IP
# 查看endpoints

[root@k8s-master demo2]# kubectl get endpoints
NAME ENDPOINTS AGE
kubernetes 172.17.70.245:6443,172.17.70.246:6443 31h
my-service 10.244.1.24:80 2m34s

[root@k8s-master demo2]# kubectl get ep
  1. 每个service对应1个endpoint控制器
  2. endpoints关联pod

查看pod的标签

1
2
3
4
5
6
7
8
9
10
11
12
13
14
15
16
17
# 查看具有 app=web 的pod
[root@k8s-master1 demo]# kubectl get pod -l app=web
NAME READY STATUS RESTARTS AGE
web-84c6fbbdcc-6vsj8 1/1 Running 0 2m23s
web-84c6fbbdcc-krrdr 1/1 Running 0 2m23s
web-84c6fbbdcc-q8x8l 1/1 Running 0 2m23s


[root@k8s-master1 demo]# kubectl get pod -l app=web -o wide
NAME READY STATUS RESTARTS AGE IP NODE NOMINATED NODE READINESS GATES
web-84c6fbbdcc-6vsj8 1/1 Running 0 3m2s 10.244.0.60 k8s-node1 <none> <none>
web-84c6fbbdcc-krrdr 1/1 Running 0 3m2s 10.244.0.59 k8s-node1 <none> <none>
web-84c6fbbdcc-q8x8l 1/1 Running 0 3m2s 10.244.1.60 k8s-node2 <none> <none>


# 容器IP 10.244.0.60 10.244.0.59 10.244.1.60
# endpoint控制器 帮我们感知到新启动的pod,加入进来
1
2
3
4
5
6
7
8
9
10
11
12
13
14
15
16
17
# 查看svc详细信息
[root@k8s-master1 demo]# kubectl describe svc web
Name: web
Namespace: default
Labels: app=web
Annotations: kubectl.kubernetes.io/last-applied-configuration:
{"apiVersion":"v1","kind":"Service","metadata":{"annotations":{},"creationTimestamp":null,"labels":{"app":"web"},"name":"web","namespace":...
Selector: app=web
Type: NodePort
IP: 10.0.0.155
Port: <unset> 80/TCP
TargetPort: 8080/TCP
NodePort: <unset> 30669/TCP
Endpoints: 10.244.0.59:8080,10.244.0.60:8080,10.244.1.60:8080
Session Affinity: None
External Traffic Policy: Cluster
Events: <none>

启动pod关联service

1
2
3
4
5
6
7
8
9
10
11
12
13
14
15
16
17
18
19
20
21
22
23
24
25
26
27
[root@k8s-master demo2]# vim nginx-1108.yaml 

apiVersion: apps/v1
kind: Deployment
metadata:
labels:
app: nginx
name: nginx
namespace: default
spec:
replicas: 3
selector:
matchLabels:
app: nginx # 与pod的labels 保持一致
template:
metadata:
labels: # 与service的labels 保持一致
app: nginx
spec:
containers:
- image: nginx:1.16
imagePullPolicy: IfNotPresent
name: nginx
ports:
- containerPort: 80
protocol: TCP
restartPolicy: Always
1
2
3
4
5
6
7
8
9
10
11
12
13
14
15
16
17
18
19
20
[root@k8s-master demo2]# kubectl apply -f nginx-1108.yaml 
deployment.apps/nginx created

[root@k8s-master demo2]# kubectl get pods,svc -o wide
NAME READY STATUS RESTARTS AGE IP NODE NOMINATED NODE READINESS GATES
pod/nginx-594cc45b78-9p9p6 1/1 Running 0 25s 10.244.1.27 k8s-node2 <none> <none>
pod/nginx-594cc45b78-ltql8 1/1 Running 0 25s 10.244.1.26 k8s-node2 <none> <none>
pod/nginx-594cc45b78-zhxs6 1/1 Running 0 25s 10.244.0.29 k8s-node1 <none> <none>

NAME TYPE CLUSTER-IP EXTERNAL-IP PORT(S) AGE SELECTOR
service/kubernetes ClusterIP 10.0.0.1 <none> 443/TCP 31h <none>
service/my-service ClusterIP 10.0.0.123 <none> 80/TCP 22s app=nginx


[root@k8s-master demo2]# kubectl get endpoints
NAME ENDPOINTS AGE
kubernetes 172.17.70.245:6443,172.17.70.246:6443 31h
my-service 10.244.0.29:80,10.244.1.26:80,10.244.1.27:80 5s

# service 提供的是4层的TCP 负载均衡 即端口转发

Service 类型

1
2
3
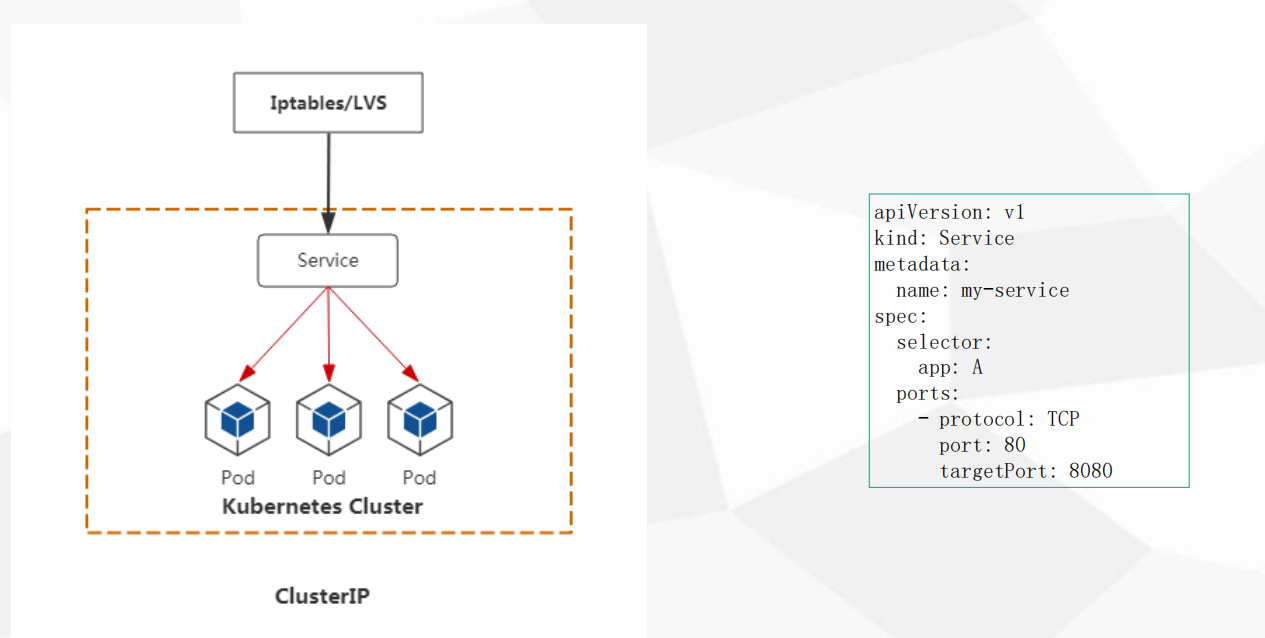
• ClusterIP:默认,分配一个集群内部可以访问的虚拟IP(VIP) 
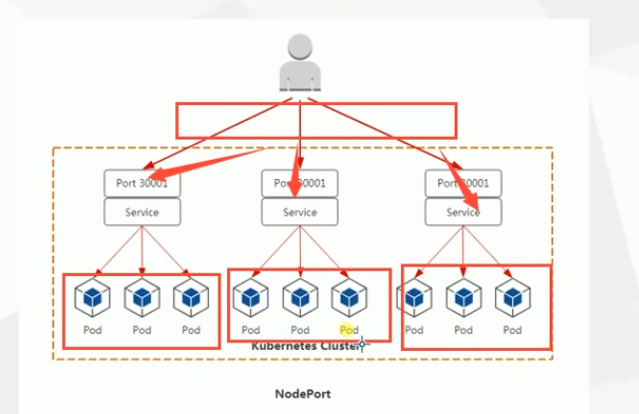
• NodePort:在每个Node上分配一个端口作为外部访问入口
• LoadBalancer:工作在特定的Cloud Provider上,例如Google Cloud,AWS,OpenStack

ClusterIP

  1. 集群内部应用中间之间访问
  2. ClusterIP 用于集群内部负载均衡IP 不对外暴露
  3. 有两个应用 A应用多个副本 访问 B应用多个副本
  4. B想访问A应用 不能访问PODIP,需要访问ServiceIP的ClusterIP
  5. B应用写 ClusterIP

  1. 应用访问 通过 Iptables/LVS(IPVS) 转发 给serviceIP 再去负载到后面的POD

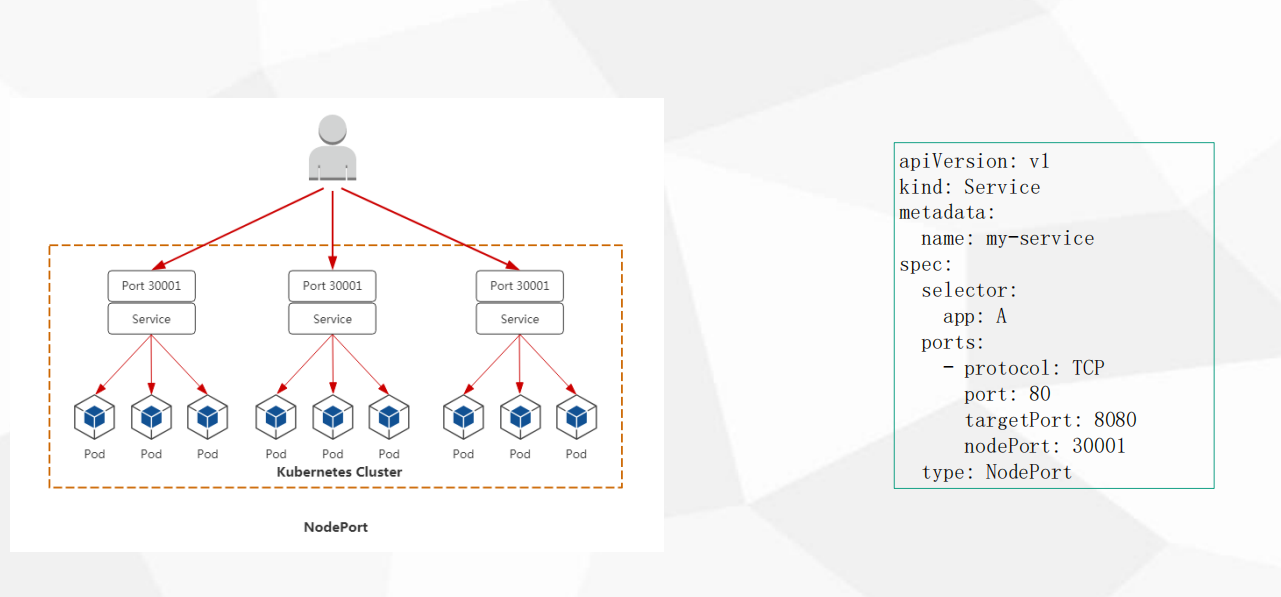
NodePort

  1. 外部使用 暴露一个访问入口
  2. 如何让用户访问到 部署的应用
  3. 用户访问 -> 暴露的端口 再转发给 -> service -> pods
  4. NodePort 会在每个 node 上暴露一个端口 这个端口作为用户访问的 入口port
1
2
3
4
5
6
7
8
9
10
11
12
13
14
15
16
[root@k8s-master demo2]# vim service1.yaml 

apiVersion: v1
kind: Service
metadata:
name: my-service
namespace: default
spec:
type: NodePort
ports:
- name: http
port: 80
protocol: TCP
targetPort: 80
selector:
app: nginx
1
2
3
4
5
6
7
8
9
[root@k8s-master demo2]# kubectl delete -f service1.yaml 
service "my-service" deleted
[root@k8s-master demo2]# kubectl apply -f service1.yaml
service/my-service created

[root@k8s-master demo2]# kubectl get svc -o wide
NAME TYPE CLUSTER-IP EXTERNAL-IP PORT(S) AGE SELECTOR
kubernetes ClusterIP 10.0.0.1 <none> 443/TCP 31h <none>
my-service NodePort 10.0.0.125 <none> 80:31376/TCP 26s app=nginx
  1. NodePort 也分配 CLUSTER-IP = 10.0.0.125
  2. NodePort 在node上分配端口 80:31376/TCP 31376就是对外访问端口
1
2
3
4
5
6
7
[root@k8s-node2 ~]# netstat -tnlp | grep 31376
tcp6 0 0 :::31376 :::* LISTEN 2788/kube-proxy
[root@k8s-node1 ~]# netstat -tnlp | grep 31376
tcp6 0 0 :::31376 :::* LISTEN 1632/kube-proxy

# 访问:nodeIP+端口
# http://39.106.100.108:31376/

查看 ipvsadm 规则

  1. 安装
1
2
3
4
5
6
7
8
9
10
11
12
13
14
15
16
17
18
19
20
21
22
23
24
25
26
27
28
29
30
31
32
33
34
35
36
37
[root@k8s-node1 ~]# yum install ipvsadm -y

[root@k8s-node1 yum.repos.d]# ipvsadm -ln
IP Virtual Server version 1.2.1 (size=4096)
Prot LocalAddress:Port Scheduler Flags
-> RemoteAddress:Port Forward Weight ActiveConn InActConn
TCP 172.17.70.247:31376 rr
-> 10.244.0.29:80 Masq 1 0 0
-> 10.244.1.26:80 Masq 1 0 0
-> 10.244.1.27:80 Masq 1 0 0
TCP 172.18.0.1:31376 rr
-> 10.244.0.29:80 Masq 1 0 0
-> 10.244.1.26:80 Masq 1 0 0
-> 10.244.1.27:80 Masq 1 0 0
TCP 10.0.0.1:443 rr
-> 172.17.70.245:6443 Masq 1 2 0
-> 172.17.70.246:6443 Masq 1 0 0
TCP 10.0.0.2:53 rr
-> 10.244.0.20:53 Masq 1 0 0
TCP 10.0.0.125:80 rr
-> 10.244.0.29:80 Masq 1 0 0
-> 10.244.1.26:80 Masq 1 0 0
-> 10.244.1.27:80 Masq 1 0 0
TCP 10.244.0.0:31376 rr
-> 10.244.0.29:80 Masq 1 0 0
-> 10.244.1.26:80 Masq 1 0 0
-> 10.244.1.27:80 Masq 1 0 0
TCP 10.244.0.1:31376 rr
-> 10.244.0.29:80 Masq 1 0 0
-> 10.244.1.26:80 Masq 1 0 0
-> 10.244.1.27:80 Masq 1 0 0
TCP 127.0.0.1:31376 rr
-> 10.244.0.29:80 Masq 1 0 0
-> 10.244.1.26:80 Masq 1 0 0
-> 10.244.1.27:80 Masq 1 0 0
UDP 10.0.0.2:53 rr
-> 10.244.0.20:53 Masq 1 0 0

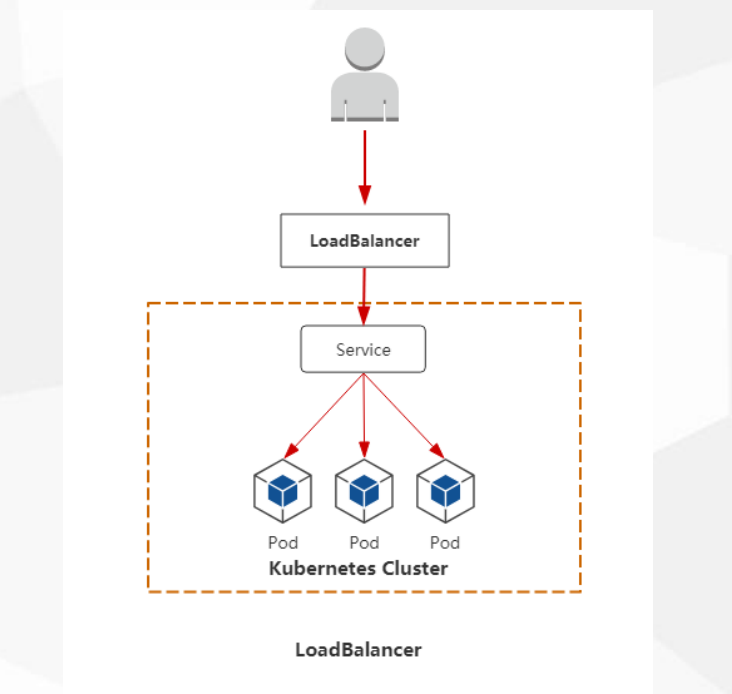
域名应该找哪个node

  1. 还得有一层负载均衡
  2. 这层负载均衡负责 转发给 node集群+对外端口
  3. 域名解析 -> 负载均衡器 -> node集群+对外端口 -> pod集群

LoadBalancer

  1. 这就是前面加一个LB
  2. LB 转发给 每个nodeIP+port
  3. 域名解析到LB地址
  4. 自建LB 需要知道 生成的端口是多少 再添加到LB
  5. 公有云 LoadBalancer LB 可以自动关联 提供访问 访问流程和NodePort一致
Service类型小结

  1. NodePort
    • 用户 -> 域名 -> 负载均衡(阿里云公网)(后端手动添加) -> NodeIP(内网):Port -> PodIP+Port
  1. LoadBalancer
    • 用户 -> 域名 -> 负载均衡(阿里云公网)(自动添加) -> NodeIP(内网):Port -> PodIP+Port
    • LoadBalancer 特定云提供商底层LB接口 例如aws,google,openstack,aliyun不知道
  1. NodeIP:Port NodeIP不固定 Port可以固定
1
2
3
4
5
6
7
# cluster IP 范围
[root@k8s-master demo2]# cat /opt/kubernetes/cfg/kube-apiserver.conf | grep service-cluster-ip-range
--service-cluster-ip-range=10.0.0.0/24 \

# 创建 NodePort 生成范围
[root@k8s-master demo2]# cat /opt/kubernetes/cfg/kube-apiserver.conf | grep service-node-port
--service-node-port-range=30000-32767 \

固定 NodePort 端口

  1. 端口要提前规划好
  2. 不要冲突
1
2
3
4
5
6
7
8
9
10
11
12
13
14
15
16
17
18
19
# 也得注意范围区间
# 固定到31000
[root@k8s-master demo2]# vim service1.yaml

apiVersion: v1
kind: Service
metadata:
name: my-service
namespace: default
spec:
type: NodePort
ports:
- name: http
port: 80
protocol: TCP
targetPort: 80
nodePort: 31000
selector:
app: nginx
1
2
3
4
5
6
7
8
9
[root@k8s-master demo2]# kubectl apply -f service1.yaml 
service/my-service configured

[root@k8s-master demo2]# kubectl get svc
NAME TYPE CLUSTER-IP EXTERNAL-IP PORT(S) AGE
kubernetes ClusterIP 10.0.0.1 <none> 443/TCP 32h
my-service NodePort 10.0.0.125 <none> 80:31000/TCP 28m

http://39.106.100.108:31000/

Service 代理模式

1
2
3
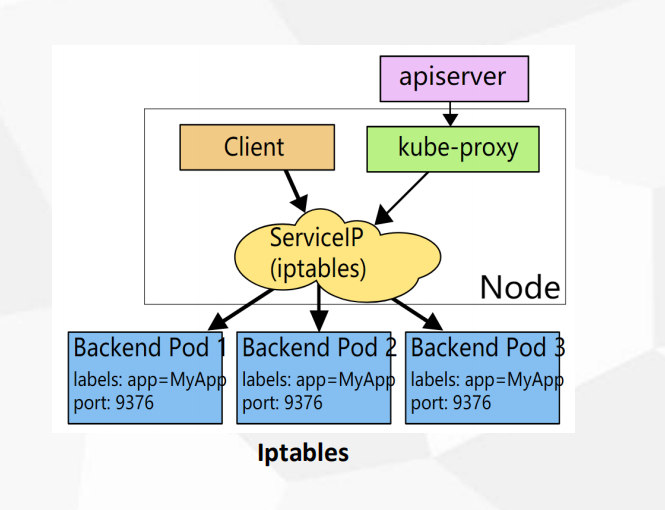
底层流量转发与负载均衡实现:
• Iptables
• IPVS
  1. 工作进程 kube-proxy
  2. 他完成了 流量转发规则 1.12/13 都是 Iptables
  3. 创建pod时 kube-proxy 会在node上生成规则
    4,如果是iptabes 使用iptables-save | more 查看所有规则 流量转发Dnat
1
2
3
[root@k8s-node1 yum.repos.d]# ps -ef|grep kube-proxy
root 1632 1 0 07:53 ? 00:00:17 /opt/kubernetes/bin/kube-proxy --logtostderr=false --v=2 --log-dir=/opt/kubernetes/logs --config=/opt/kubernetes/cfg/kube-proxy-config.yml
root 4672 4070 0 17:19 pts/1 00:00:00 grep --color=auto kube-proxy
1
2
[root@k8s-node1 yum.repos.d]# cat /opt/kubernetes/cfg/kube-proxy-config.yml  | grep mode
mode: ipvs

IPVS

  1. 如果是iptabes代理 一个service会创建很多的规则 (更新) pod挂了会刷新规则
  2. iptabes规则都是从上到下逐条匹配(匹配延迟)
  1. ipvs:LVS基于IPVS内核调度模块实现的负载均衡,LVS基于四层负载均衡,IPVS解决上面的问题
  2. ipvs 基于内核态规则 性能更好
  3. iptables 用户态
1
2
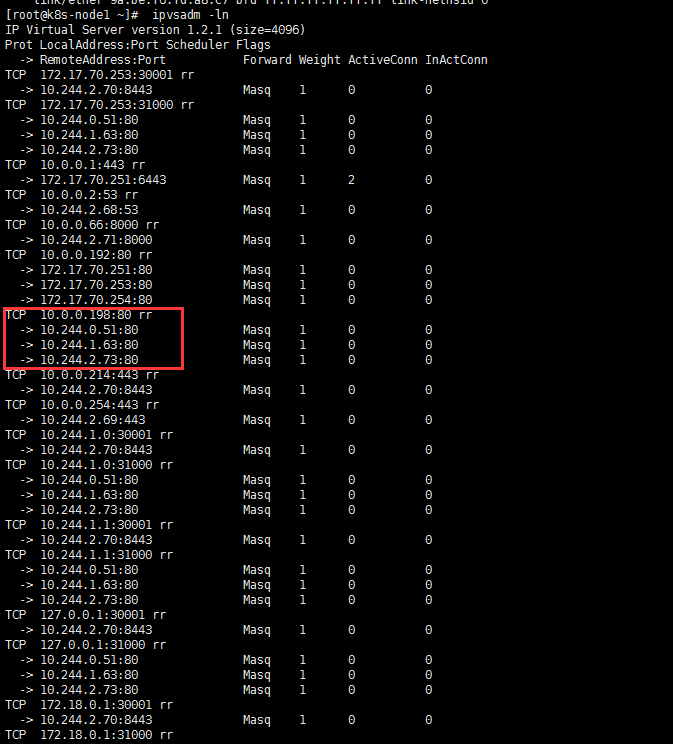
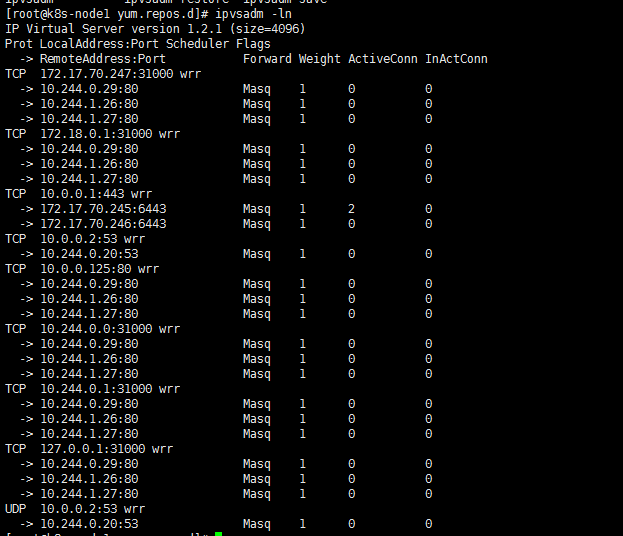
[root@k8s-node1 yum.repos.d]# ipvsadm -ln
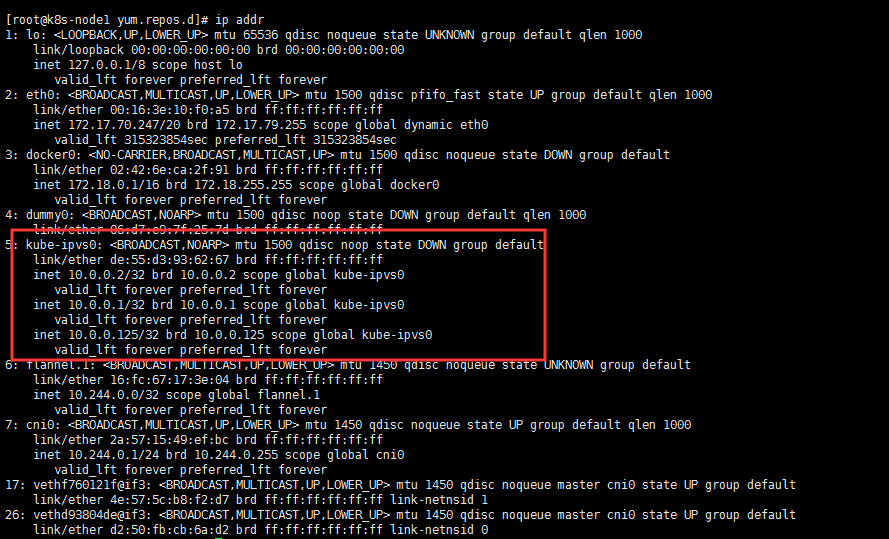
[root@k8s-node1 yum.repos.d]# ip addr
1
2
3
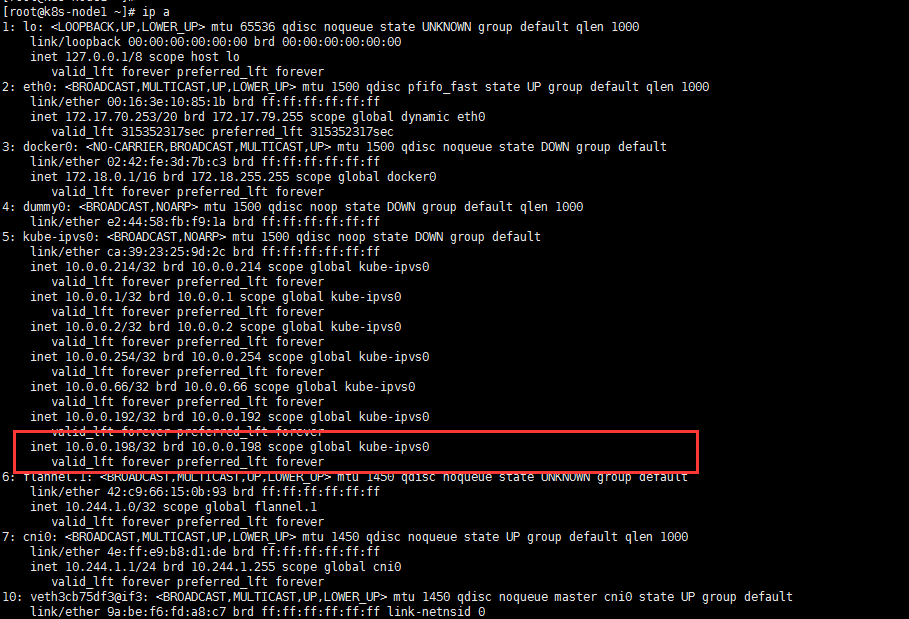
# 当创建 svc 会在node上创建一个 kube-ipvs0 虚拟网卡
# 他绑定所有 svc IP 来应答所有数据库交给谁来处理
# 这些IP 都会通过 ipvs来刷新规则

Iptables VS IPVS

  1. 企业中更多使用ipvs
  2. 在配置文件中 设置调度算法
1
2
3
4
Iptables: • 灵活,功能强大(可以在数据包不同阶段对包进行操作)
• 规则遍历匹配和更新,呈线性时延
IPVS: • 工作在内核态,有更好的性能
• 调度算法丰富:rr,wrr,lc,wlc,ip hash...

修改ipvs的调度算法

1
2
3
4
5
6
7
8
9
10
11
12
13
14
15
[root@k8s-node1 yum.repos.d]# vim /opt/kubernetes/cfg/kube-proxy-config.yml 

kind: KubeProxyConfiguration
apiVersion: kubeproxy.config.k8s.io/v1alpha1
address: 0.0.0.0
metricsBindAddress: 0.0.0.0:10249
clientConnection:
kubeconfig: /opt/kubernetes/cfg/kube-proxy.kubeconfig
hostnameOverride: k8s-node1
clusterCIDR: 10.0.0.0/24
mode: ipvs
ipvs:
scheduler: "wrr"
iptables:
masqueradeAll: true
1
2
[root@k8s-node1 yum.repos.d]# systemctl restart kube-proxy
[root@k8s-node1 yum.repos.d]# ipvsadm -ln

部署集群内部DNS服务(CoreDNS)

  1. service 内部之间用clusterIP 进行通信
  2. clusterIP 并不是固定的 程序也不该写死 项目迁移写死IP很麻烦 访问地址可以通过dns名称 IP有变化也不会影响
  3. 集群内部的dns来为service做名称的访问
1
2
3
1. DNS服务监视Kubernetes API,为每一个Service创建DNS记录用于域名解析。
2. ClusterIP A记录格式:<service-name>.<namespace-name>.svc.cluster.local
3. 示例:my-svc.my-namespace.svc.cluster.local
  1. 默认的是 coredns
  2. 早期版本 kube-dns
  3. 下载地址:
1
https://github.com/kubernetes/kubernetes/tree/master/cluster/addons/dns/coredns
1
2
3
4
5
6
7
8
9
10
11
spec:
selector:
k8s-app: kube-dns
clusterIP: 10.0.0.2
ports:
- name: dns
port: 53
protocol: UDP
- name: dns-tcp
port: 53
protocol: TCP
1
2
3
4
5
6
7
8
9
10
11
12
13
14
15
16
17
18
# cluster.local 域
data:
Corefile: |
.:53 {
errors
health
kubernetes cluster.local in-addr.arpa ip6.arpa {
pods insecure
upstream
fallthrough in-addr.arpa ip6.arpa
}
prometheus :9153
proxy . /etc/resolv.conf
cache 30
loop
reload
loadbalance
}
1
2
3
4
# 镜像地址
containers:
- name: coredns
image: lizhenliang/coredns:1.2.2
1
2
3
4
5
[root@k8s-master ~]# kubectl get pod -n kube-system
NAME READY STATUS RESTARTS AGE
coredns-6d8cfdd59d-vfzxs 1/1 Running 3 32h
kube-flannel-ds-amd64-4jkk8 1/1 Running 9 32h
kube-flannel-ds-amd64-vxfdb 1/1 Running 2 32h

测试解析dns

1
2
3
4
5
6
7
8
9
10
11
12
13
14
15
16
17
# 部署 busybox镜像  指定版本 1.28.4

[root@k8s-master1 demo]# vim busybox.yaml

apiVersion: v1
kind: Pod
metadata:
name: dns-test
spec:
containers:
- name: busybox
image: busybox:1.28.4
args:
- /bin/sh
- -c
- sleep 36000
restartPolicy: Never
1
2
3
4
5
6
7
8
9
10
11
12
13
14
15
16
17
18
19
20
[root@k8s-master1 demo]# kubectl get svc
NAME TYPE CLUSTER-IP EXTERNAL-IP PORT(S) AGE
app01 NodePort 10.0.0.198 <none> 80:31000/TCP 93m
kubernetes ClusterIP 10.0.0.1 <none> 443/TCP 6d1h

[root@k8s-master1 demo]# kubectl exec -it dns-test sh
/ # nslookup app01
Server: 10.0.0.2
Address 1: 10.0.0.2 kube-dns.kube-system.svc.cluster.local

Name: app01
Address 1: 10.0.0.198 app01.default.svc.cluster.local

# <service-name>.<namespace-name>.svc.cluster.local

/ # ping app01.default.svc.cluster.local
PING app01.default.svc.cluster.local (10.0.0.198): 56 data bytes
64 bytes from 10.0.0.198: seq=0 ttl=64 time=0.053 ms
64 bytes from 10.0.0.198: seq=1 ttl=64 time=0.056 ms
64 bytes from 10.0.0.198: seq=2 ttl=64 time=0.055 ms

跨命名空间解析

1
2
3
4
5
6
# 默认是解析当前pod的命名空间下的service名字
nslookup my-service

# 跨命名空间需要加上 service.命名空间
nslookup my-service.default
nslookup my-service."namespace"