03 自动化部署 K8S(离线版)


服务器规划

角色 IP 组件
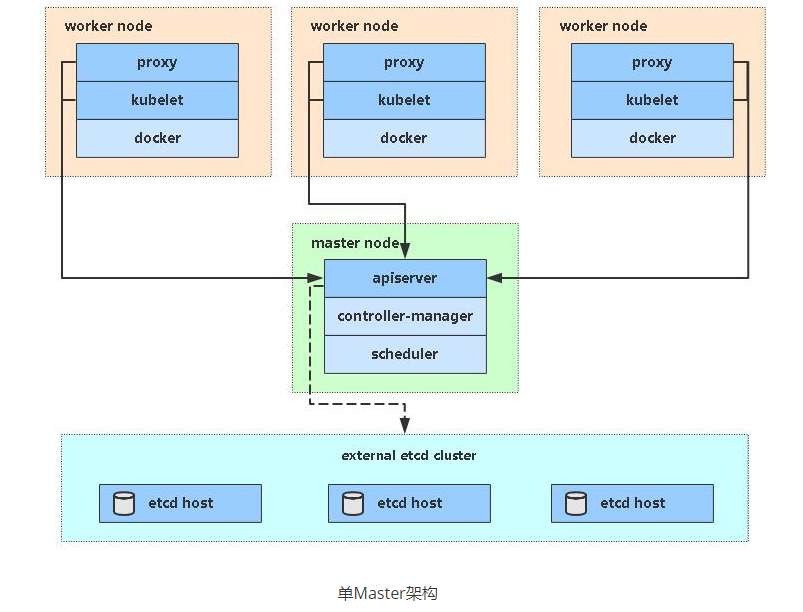
k8s-master1 192.168.0.101 kube-apiserver kube-controller-manager kube-scheduler etcd
k8s-master2 192.168.0.104 kube-apiserver kube-controller-manager kube-scheduler
k8s-node1 192.168.0.102 kubelet kube-proxy docker etcd
k8s-node2 192.168.0.103 kubelet kube-proxy docker etcd
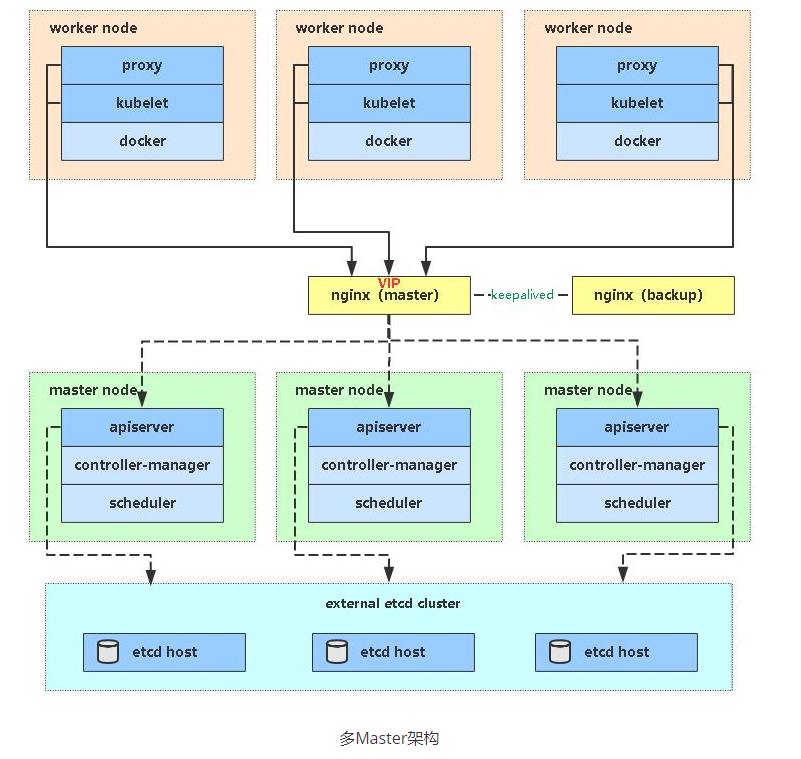
Load Balancer(Master) 192.168.0.201 192.168.0.200 (VIP) nginx keepalived
Load Balancer(Backup) 192.168.0.202 nginx keepalived

部署架构图

Roles组织 K8S各组件部署解析

  1. 梳理流程和Roles结构
  2. 如果配置文件有不固定内容,使用jinja渲染
  3. 人工干预改动的内容应统一写到一个文件中

部署说明

系统初始化

  1. 关闭 selinux
  2. 关闭 firewalld
  3. 关闭 swap
  4. 时钟同步
  5. hosts 文件
  6. 常用基础命令

创建roles初始化目录

1
2
3
4
# 创建roles初始化目录
[root@localhost ~]# mkdir -p ansible-k8s-deploy # 项目目录
[root@localhost ~]# mkdir -p ansible-k8s-deploy/roles # roles目录
[root@localhost ~]# mkdir -p ansible-k8s-deploy/group_vars # 变量目录

系统初始化 执行模块

1
2
3
# 创建任务和模板目录
[root@localhost ~]# mkdir -p ansible-k8s-deploy/roles/common/tasks # tasks任务目录
[root@localhost ~]# mkdir -p ansible-k8s-deploy/roles/common/templates # 模板目录
1
2
3
4
5
6
7
8
9
10
11
12
13
14
15
16
17
18
19
20
21
22
23
24
25
26
27
28
29
30
31
32
33
34
35
[root@localhost ~]# cd ansible-k8s-deploy/roles/common/tasks/
[root@k8s-master1 tasks]# vim main.yaml
---
# 系统初始化 所有节点上执行

- name: 关闭 selinux
# lineinfile 正则匹配,更改某个关键参数值
lineinfile:
dest: /etc/selinux/config
regexp: '^SELINUX='
line: 'SELINUX=disabled'

- name: 关闭 firewalld
systemd:
name: firewalld
state: stopped
enabled: no

- name: 关闭 swap
lineinfile:
dest: /etc/fstab
regexp: "UUID.*swap"
line: ""

- name: 关闭 swap 和 selinux 即时生效
shell: setenforce 0 ; swapoff -a

- name: 设置 hosts
template: src=hosts.j2 dest=/etc/hosts

- name: 设置 主机名
shell: hostnamectl set-hostname {{node_name|quote}}

# 欠缺 时间同步服务器
# https://www.cnblogs.com/bowen-li/p/s155201.html
1
2
3
4
5
6
7
8
# 模板
[root@k8s-master1 common]# vim templates/hosts.j2
127.0.0.1 localhost localhost.localdomain localhost4 localhost4.localdomain4
::1 localhost localhost.localdomain localhost6 localhost6.localdomain6

{% for host in groups['k8s'] %}
{{ hostvars[host].inventory_hostname }} {{ hostvars[host].node_name }}
{% endfor %}
1
2
3
4
5
6
7
8
9
10
11
12
13
14
[root@k8s-master1 ansible-k8s-deploy]# tree ../
../
├── anaconda-ks.cfg
└── ansible-k8s-deploy
├── ansible.cfg # 配置文件
├── group_vars # 变量目录
├── hosts # 配置资源清单
├── roles
│   └── common
│   ├── tasks
│   │   └── main.yaml
│   └── templates
│   └── hosts.j2
└── single-master-deploy.yaml
1
2
3
4
5
6
7
8
9
10
11
12
13
14
# hosts文件
[root@localhost ansible-k8s-deploy]# cat hosts
[master]
# 如果部署单Master,只保留一个Master节点
192.168.0.101 node_name=k8s-master1
# 192.168.0.104 node_name=k8s-master2

[node]
192.168.0.102 node_name=k8s-node1
192.168.0.103 node_name=k8s-node2

[k8s:children]
master
node
1
2
# 执行
[root@localhost ansible-k8s-deploy]# ansible-playbook -i hosts single-master-deploy.yaml -uroot -k

Etcd集群部署

  1. 生成etcd证书
  2. 部署三个etcd集群
  3. 查看集群状态

部署Maste

  1. 生成apiserver证书
  2. 部署apiserver、controller-manager和scheduler组件
  3. 启动TLS Bootstrapping

部署Node

  1. 安装Docker
  2. 部署kubelet和kube-proxy
  3. 在Master上允许为新Node颁发证书
  4. 授权apiserver访问kubelet
1
2
3
4
5
6
7
8
[root@k8s-node1 k8s]# docker images
REPOSITORY TAG IMAGE ID CREATED SIZE
kubernetesui/dashboard v2.0.0-beta4 6802d83967b9 3 months ago 84MB
kubernetesui/metrics-scraper v1.0.1 709901356c11 4 months ago 40.1MB
lizhenliang/flannel v0.11.0-amd64 ff281650a721 10 months ago 52.6MB
lizhenliang/nginx-ingress-controller 0.20.0 a3f21ec4bd11 14 months ago 513MB
lizhenliang/coredns 1.2.2 367cdc8433a4 15 months ago 39.2MB
lizhenliang/pause-amd64 3.0 99e59f495ffa 3 years ago 747kB

部署插件(准备好镜像)

  1. Flannel
  2. Web UI
  3. CoreDNS
  4. Ingress Controller

Master高可

  1. 增加Master节点(与Master1一致)
  2. 部署Nginx负载均衡器
  3. Nginx+Keepalived高可用
  4. 修改Node连接VIP