01 Ansible 快速入门


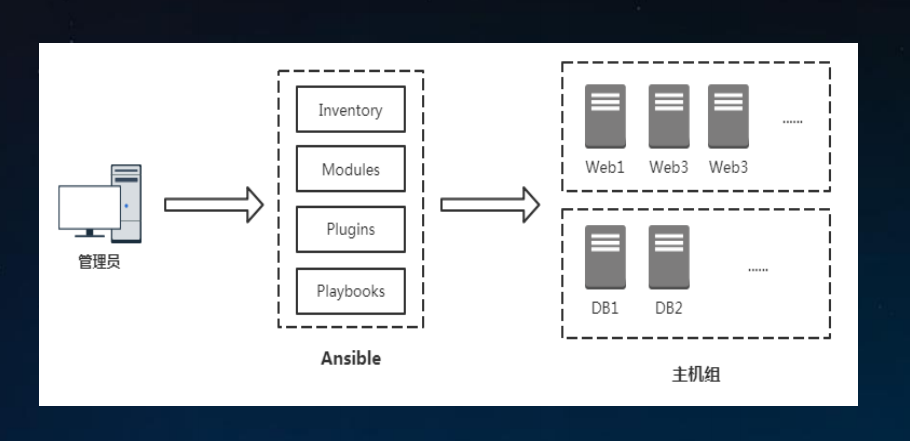
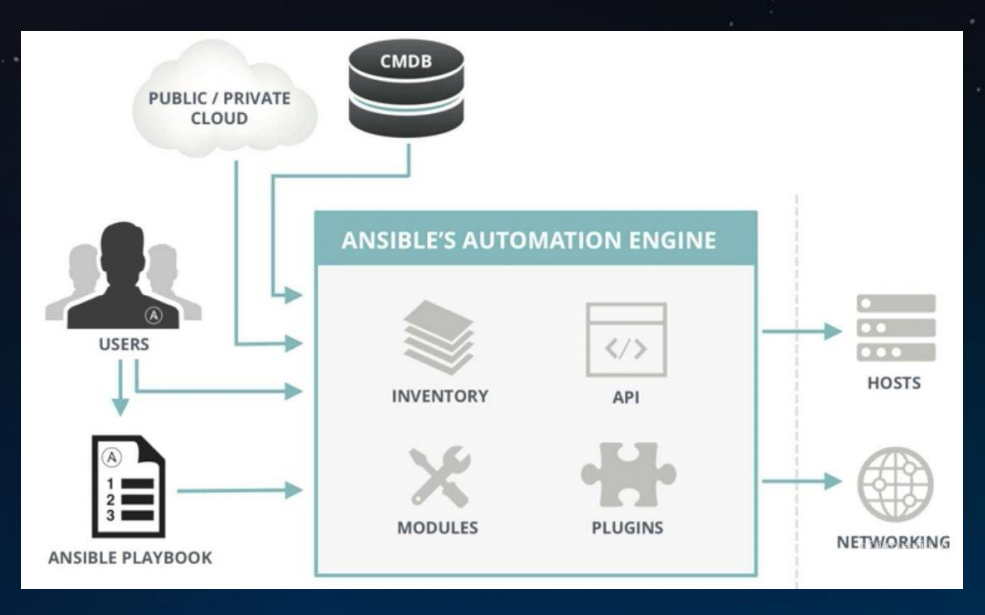
Ansible 架构

  • Inventory:Ansible管理的主机信息,包括IP地址、SSH端口、账号、密码等
  • Modules: 任务均有模块完成,也可以自定义模块,例如经常用的脚本。
  • Plugins: 使用插件增加Ansible核心功能,自身提供了很多插件,也可以自定义插件。例如connection插件,用于连接目标主机。
  • Playbooks:“剧本”,模块化定义一系列任务,供外部统一调用。Ansible核心功能。
Ansible 安装与配置

Ansible 使用要求

1
2
3
4
5
6
7
服务端要求
• Python2.6/2.7/3.x
• RedHat,Debian,CentOS,OS X等。不支持Windows

被管理端要求
• OpenSSH
• Python2.6/2.7/3.x

安装 Ansible

1
2
3
4
# 推荐 yum 安装
[root@localhost ~]# yum install ansible -y
[root@localhost ~]# ansible --version
[root@localhost ~]# ansible --help

配置文件

1
2
3
4
5
6
7
8
9
10
11
[root@master ~]# vim /etc/ansible/ansible.cfg 

[defaults]
# inventory = /etc/ansible/hosts # 被管理的主机资源清单
# forks = 5 # 执行任务并发数,越大服务端消耗
# become = root # 提权
# remote_port = 22 # ssh远程端口
host_key_checking = False # 主机key认证检查,建议关闭,减少交互
# timeout = 10 # 连接超时时间
log_path = /var/log/ansible.log # 日志路径
private_key_file = /root/.ssh/id_rsa # 秘钥认证的私钥路径,基于密钥对

主机资源清单

1
2
3
4
5
6
7
8
9
10
11
12
13
14
15
16
17
18
19
20
21
# 示例1:未分组的主机
green.example.com
blue.example.com
192.168.100.1
192.168.100.10

# 示例2:属于webservers组主机集合
[webservers]
alpha.example.org
beta.example.org
192.168.1.100
192.168.1.110
www[001:006].example.com

示例3:属于dbservers组主机集合
[dbservers]
db01.intranet.mydomain.net
db02.intranet.mydomain.net
10.25.1.56
10.25.1.57
db-[99:101]-node.example.com
1
2
3
4
5
6
7
8
9
10
11
# 加入被管理服务器资源

1. 未分组的主机统一的组名叫做 all
2. 可以是IP也可以是主机名,主机名需要配置host
3. 写入了ansible登陆的用户和密码

[root@master ~]# vim /etc/ansible/hosts

[web]
10.0.0.202 ansible_ssh_user=root ansible_ssh_pass=222222
10.0.0.203 ansible_ssh_user=root ansible_ssh_pass=222222

指定主机组执行命令

1
2
3
4
5
6
[root@master ~]# ansible --help
# 默认模块
# -m MODULE_NAME, --module-name MODULE_NAME
# module name to execute (default=command)

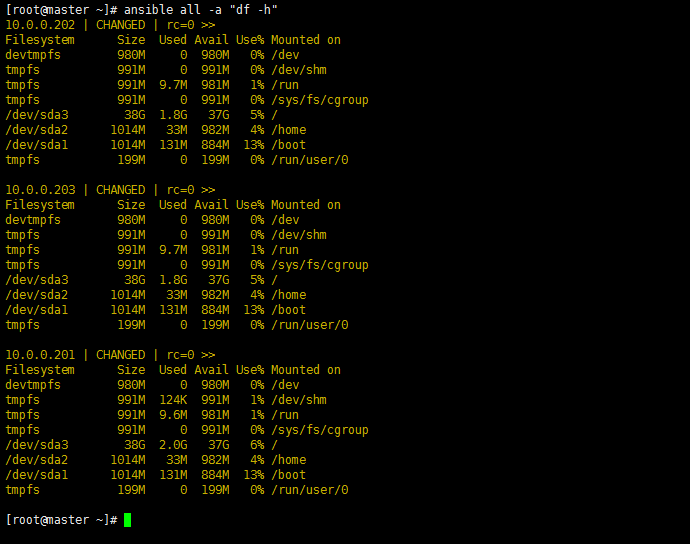
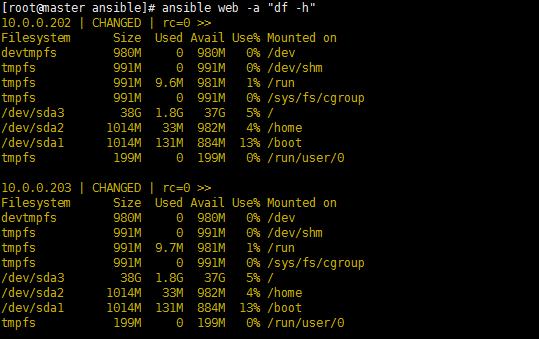
[root@master ~]# ansible web -m command -a "df -h"

all 所有主机执行

1
2
3
4
5
6
7
8
9
10
# 1. 未分组的主机统一的组名叫做 all 

[root@master ~]# vim /etc/ansible/hosts

## db-[99:101]-node.example.com
10.0.0.201 ansible_ssh_user=root ansible_ssh_pass=222222

[web]
10.0.0.202 ansible_ssh_user=root ansible_ssh_pass=222222
10.0.0.203 ansible_ssh_user=root ansible_ssh_pass=222222

通过IP或者主机名 指定执行

1
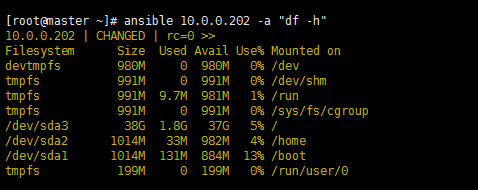
[root@master ~]# ansible 10.0.0.202 -a "df -h"

主机和主机组变量

1
官方手册 https://docs.ansible.com/
1
2
3
4
5
6
7
8
# 在资源清单里设置 主机定义
[root@master ~]# vim /etc/ansible/hosts

[web]
10.0.0.202 ansible_ssh_user=root ansible_ssh_pass=222222 http_port=80
10.0.0.203 ansible_ssh_user=root ansible_ssh_pass=222222 http_port=80

[root@master ~]# ansible web -a "echo {{ http_port }}"

1
2
3
4
5
6
7
8
9
10
11
12
13
14
# 主机组定义
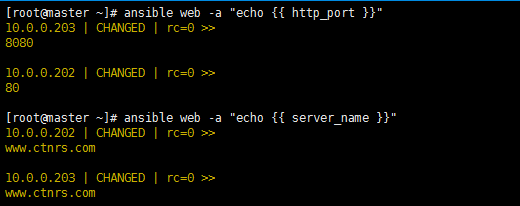
# 主机定义 优先级大于 主机组,主机组相当于一个默认定义
[root@master ~]# vim /etc/ansible/hosts

[web]
10.0.0.202 ansible_ssh_user=root ansible_ssh_pass=222222 http_port=80
10.0.0.203 ansible_ssh_user=root ansible_ssh_pass=222222

[web:vars]
http_port=8080
server_name=www.ctnrs.com

[root@master ~]# ansible web -a "echo {{ http_port }}"
[root@master ~]# ansible web -a "echo {{ server_name }}"

1
2
3
4
5
6
# 组变量分解到单个文件
[root@master ~]# mkdir -p /etc/ansible/group_vars/
[root@master ~]# vim /etc/ansible/group_vars/web.yaml

http_port: 9090
server_name: www.teamshub.com

1
2
3
4
# 优先级总结:
1. 主机定义
2. 文件定义
3. 主机组定义

Ansible ad-hoc 命令

1
2
1. ad-hoc   简单的批量管理
2. ploybook 任务编排

命令行工具常用选项

1
2
3
4
5
6
7
8
9
10
11
12
13
14
15
16
17
18
19
20
21
22
23
24
25
1. 格式:ansible <host-pattern> [ options ]

2. 选项:
-a MODULE_ARGS, --args=MODULE_ARGS 模块参数
-C, --check 运行检查,不执行任何操作
-e EXTRA_VARS, --extra-vars=EXTRA_VARS 设置附加变量 key=value
-f FORKS, --forks=FORKS 指定并行进程数量,默认5 -i INVENTORY, --inventory=INVENTORY 指定主机清单文件路径
--list-hosts 输出匹配的主机列表,不执行任何操作
-m MODULE_NAME, --module-name=MODULE_NAME 执行的模块名,默认command
--syntax-check 语法检查playbook文件,不执行任何操作
-t TREE, --tree=TREE 将日志输出到此目录
-v, --verbose 详细信息,-vvv更多, -vvvv debug
--version 查看程序版本

3. 连接选项:控制谁连接主机和如何连接
-k, --ask-pass 请求连接密码
--private-key=PRIVATE_KEY_FILE, --key-file=PRIVATE_KEY_FILE 私钥文件
-u REMOTE_USER, --user=REMOTE_USER 连接用户,默认None
-T TIMEOUT, --timeout=TIMEOUT 覆盖连接超时时间,默认10秒

4. 提权选项:控制在目标主机以什么用户身份运行
-b, --become 以另一个用户身份操作
--become-method=BECOME_METHOD 提权方法,默认sudo
--become-user=BECOME_USER 提权后的用户身份,默认root
-K, --ask-become-pass 提权密码

shell 模块

1
2
# 默认command模块不支持 | 管道符 、&& 和 > 重定向
# 所以使用shell模块
1
2
3
4
5
6
7
8
9
10
[root@master ~]# ansible web -m shell -a "echo 123 > /tmp/a.log"
10.0.0.202 | CHANGED | rc=0 >>
10.0.0.203 | CHANGED | rc=0 >>

[root@master ~]# ansible web -m shell -a "cat /tmp/a.log"
10.0.0.203 | CHANGED | rc=0 >>
123

10.0.0.202 | CHANGED | rc=0 >>
123

SSH 密码认证

1
2
3
4
5
6
[root@master ~]# vim /etc/ansible/hosts 
# 别忘记关闭 指纹认证 host_key_checking = False

[web]
10.0.0.202 ansible_ssh_user=root ansible_ssh_pass=222222
10.0.0.203 ansible_ssh_user=root ansible_ssh_pass=222222

SSH 密钥对认证

1
2
3
4
5
6
7
8
9
10
11
12
13
14
15
16
17
18
# 推荐使用免交互方式
# 生成 ssh 秘钥对
[root@master ~]# ssh-keygen

[root@master ~]# ls -l .ssh/
total 12
-rw-------. 1 root root 1679 Nov 30 18:01 id_rsa # 私钥 登录认证
-rw-r--r--. 1 root root 393 Nov 30 18:01 id_rsa.pub # 公钥 放在目标主机上
-rw-r--r--. 1 root root 516 Nov 30 17:01 known_hosts

# 将公钥拷贝到目标主机
[root@master ~]# ssh-copy-id root@10.0.0.202
[root@master ~]# ssh-copy-id root@10.0.0.203


# 输入秘钥后 免认证登录
[root@master ~]# ssh 10.0.0.202
[root@node2 ~]# ls -l .ssh/authorized_keys
1
2
3
4
5
6
7
8
9
# 无需在配置用户密码
[root@master ansible]# vim /etc/ansible/hosts

[web]
10.0.0.202
10.0.0.203


[root@master ansible]# ansible web -a "df -h"

Ansible 常用模块

1
2
# 官方文档
https://docs.ansible.com/ansible/latest/user_guide/intro_adhoc.html#intro-adhoc

执行shell命令(command和shell)

1
2
3
4
5
6
7
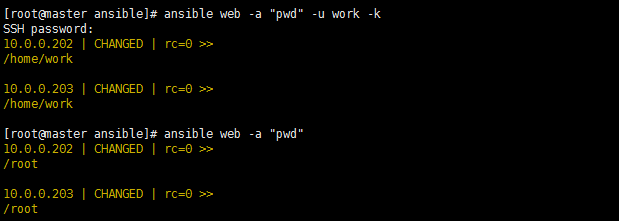
# -u 指定用户操作
# -k 指定用户密码

[root@node1 ~]# useradd work
[root@node1 ~]# passwd work

[root@master ansible]# ansible web -a "pwd" -u work -k
1
2
# 执行多条命令
[root@master ansible]# ansible web -m shell -a "ls /opt;touch /opt/ansible.log ls /opt"

sudo 的使用

1
2
3
4
5
6
7
8
9
10
11
[work@node2 ~]$ sudo ls -l /root

We trust you have received the usual lecture from the local System
Administrator. It usually boils down to these three things:

#1) Respect the privacy of others.
#2) Think before you type.
#3) With great power comes great responsibility.

[sudo] password for work:
work is not in the sudoers file. This incident will be reported.
1
2
3
4
5
6
7
8
9
10
11
12
13
14
15
# 配置 sudo 两种模式  
# 1. 提权的时候无需输入密码
# 2. 需要输入密码
# 3. 只配置node1 查看区别

[root@node2 ~]# visudo

## Allow root to run any commands anywhere
root ALL=(ALL) ALL
work ALL=(ALL) ALL

[root@master ansible]# ansible web -m shell -a "ls -l /root" -u work -k --become --become-user root --ask-become-pass
# 输入了两次密码,第一次是因为执行用户是work,work并没有免交互,第二次是sudo密码
# node2 并没有sudo权限
# --ask-become-pass == -K

文件管理(copy和file)

1
2
3
# copy 将本地文件copy到目标主机
[root@master opt]# ansible web -m copy -a "src=/opt/nginx-1.16.1.tar.gz dest=/tmp"
[root@master opt]# ansible web -m shell -a "ls -l /tmp"
1
2
# copy 目录
[root@master ansible]# ansible web -m copy -a "src=/etc/ansible dest=/tmp"
1
2
3
4
5
6
7
8
9
10
11
12
13
14
15
16
# file 创建文件或目录
# 通过状态区分
[root@master opt]# ansible web -m file -a "dest=/tmp/src mode=600 owner=work state=directory"

# 查看所有状态
[root@master opt]# ansible web -m file -a "dest=/tmp/src mode=600 owner=work state="
...
"msg": "value of state must be one of: absent, directory, file, hard, link, touch, got: "
...

# 创建目录
# 删除目录
# touch 创建空文件
[root@master ansible]# ansible web -m file -a "path=/tmp/src state=directory"
[root@master opt]# ansible web -m file -a "dest=/tmp/src state=absent"
[root@master opt]# ansible web -m shell -a "ls -l /tmp"

管理软件包(yum)

1
2
3
4
5
6
7
# present 安装软件
[root@master opt]# ansible web -m yum -a "name=memcached state=present"
[root@node1 ~]# rpm -qa | grep memcached

# absent 卸载
[root@master opt]# ansible web -m yum -a "name=memcached state=absent"
[root@node1 ~]# rpm -qa | grep memcached
1
2
3
4
5
6
# 使用远程rpm安装
present,latest:表示安装
absent:表示卸载
[root@master ansible]# ansible web -m yum -a "name=http://nginx.org/packages/rhel/7/x86_64/RPMS/nginx-1.16.1-1.el7.ngx.x86_64.rpm state=present"
[root@localhost opt]# rpm -qa | grep nginx
nginx-1.16.1-1.el7.ngx.x86_64

用户和组(user)

1
2
3
4
5
6
7
8
9
10
# 创建用户
[root@master opt]# ansible web -m user -a "name=foo password=foo123"
[root@node1 ~]# id foo
uid=1001(foo) gid=1001(foo) groups=1001(foo)

# 删除用户
[root@master opt]# ansible web -m user -a "name=foo state=absent"

# nologin 用户
[root@master opt]# ansible web -m user -a "name=foo password=foo123 shell=/sbin/nologin "

从源代码管理系统部署(git)

1
2
3
4
# 要想使用git模块,目标主机必须有git命令
# 可以用于部署
[root@master opt]# ansible web -m yum -a "name=git state=present"
[root@master opt]# ansible web -m git -a "repo=https://github.com/ansible/ansible.git dest=/opt" -u root

管理服务(service|systemctl)

1
2
3
4
5
6
7
8
9
10
11
12
13
14
15
16
# 安装
[root@master opt]# ansible web -m yum -a "name=memcached state=present"

# 查看服务
[root@node1 ansible]# systemctl status memcached

# 启动
[root@master opt]# ansible web -m service -a "name=memcached state=started" -u root
[root@node1 ansible]# systemctl status memcached
[root@node1 ansible]# ps -ef|grep memcached

# 停止服务
[root@master opt]# ansible web -m service -a "name=memcached state=stopped" -u root

# 开机启动
[root@master opt]# ansible web -m service -a "name=memcached enabled=true" -u root
1
2
3
4
5
6
7
8
9
# centos7 使用 systemd模块
[root@master ansible]# ansible web -m systemd -a "name=nginx state=started enabled=yes"

[root@localhost opt]# ps -ef|grep nginx
root 5178 1 0 09:11 ? 00:00:00 nginx: master process /usr/sbin/nginx -c /etc/nginx/nginx.conf
nginx 5179 5178 0 09:11 ? 00:00:00 nginx: worker process
root 5216 1955 0 09:12 pts/0 00:00:00 grep --color=auto nginx
[root@localhost opt]# netstat -tnlp|grep 80
tcp 0 0 0.0.0.0:80 0.0.0.0:* LISTEN 5178/nginx: master

unarchive 解压

1
2
3
4
- name: 解压
unarchive:
src=test.tar.gz
dest=/tmp

debug 调试

1
2
3
4
5
6
7
8
9
# 执行过程中打印语句。

- debug:
msg: System {{ inventory_hostname }} has uuid {{ ansible_product_uuid }}

- name: 显示主机已知的所有变量
debug:
var: hostvars[inventory_hostname]
verbosity: 4
1
2
3
4
# 打印主机组变量
# ansible变量级别: 主机 主机组
# hostvars 打印每个主机默认的变量,主机名,IP...用于playbook
[root@master ansible]# ansible web -m debug -a "var=hostvars"

收集目标主机信息(setup)

1
2
3
4
5
6
7
8
# 常用信息
# ploybook会使用到

ansible_nodename
ansible_os_family
ansible_pkg_mgr
ansible_processor
ansible_processor_cores
1
2
3
4
5
6
7
8
9
10
11
12
13
14
15
16
17
18
19
# 过滤
[root@master opt]# ansible web -m setup -a "filter=ansible_nodename"
10.0.0.202 | SUCCESS => {
"ansible_facts": {
"ansible_nodename": "node1",
"discovered_interpreter_python": "/usr/bin/python"
},
"changed": false
}
10.0.0.203 | SUCCESS => {
"ansible_facts": {
"ansible_nodename": "node2",
"discovered_interpreter_python": "/usr/bin/python"
},
"changed": false
}


[root@master opt]# ansible web -m setup -a "filter=ansible_*_mb"