04 k8s 弹性伸缩


传统弹性伸缩的困境

1
2
3
4
5
1. 简单理解,资源不够了加机器,资源多了减机器
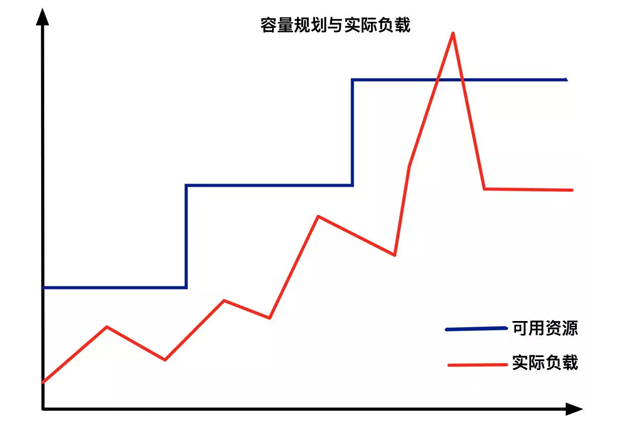
2. 从传统意义上,弹性伸缩主要解决的问题是 容量规划与实际负载的矛盾。
3. 资源池能否快速扩大,快速回收
4. 快速的流量突发难以提前预知
5. 已知的可以提前准备,如遇到活动业务
  1. 从传统意义上,弹性伸缩:主要解决的问题是 容量规划 与 实际负载 的矛盾。
  2. 蓝色水位线表示集群资源容量随着负载的增加不断扩容,红色曲线表示集群资源实际负载变化。
  3. 弹性伸缩就是要解决当实际负载增大,而集群资源容量没来得及反应的问题。

Kubernetes 中弹性伸缩存在的问题

  1. 常规的做法是给集群资源预留保障集群可用,通常20%左右。
  2. 这种方式看似没什么问题,但放到Kubernetes中,就会发现如下2个问题。

机器规格不统一,造成机器利用率百分比碎片化

  1. 在一个Kubernetes集群中,通常不只包含一种规格的机器,
  2. 假设集群中存在4C8G与16C32G两种规格的机器,对于10%的资源预留,这两种规格代表的意义是完全不同的。
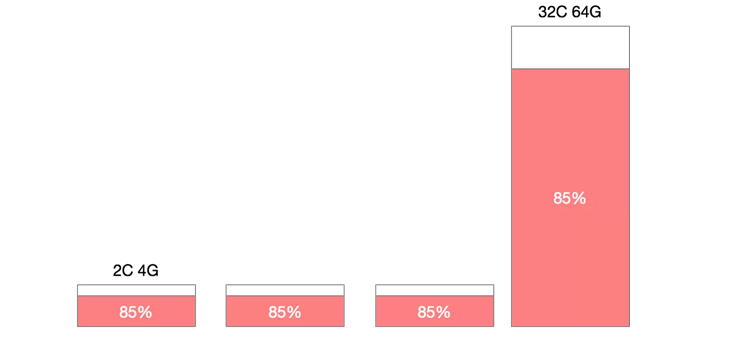
  1. 特别是在缩容的场景下,为了保证缩容后集群稳定性,我们一般会一个节点一个节点从集群中摘除,
  2. 那么如何判断节点是否可以摘除其利用率百分比就是重要的指标。
  3. 此时如果大规格机器有较低的利用率被判断缩容,那么很有可能会造成节点缩容后,容器重新调度后的争抢。
  4. 如果优先缩容小规格机器,则可能造成缩容后资源的大量冗余。

机器利用率不能单纯依靠宿主机计算

  1. 在大部分生产环境中,资源利用率都不会保持一个高的水位,但从调度来讲,调度应该保持一个比较高的水位,这样才能保障集群稳定性,又不过多浪费资源。

弹性伸缩概念的延伸

  1. 不是所有的业务都存在峰值流量,越来越细分的业务形态带来更多成本节省和可用性之间的跳转。
  2. 不同类型的负载对于弹性伸缩的要求有所不同,在线负载对弹出时间敏感,离线任务对价格敏感,定时任务对调度敏感。
1
2
3
1. 在线负载型:微服务、网站、API
2. 离线任务型:离线计算、机器学习
3. 定时任务型:定时批量计算

kubernetes 弹性伸缩布局

  1. 在 Kubernetes 的生态中,在多个维度、多个层次提供了不同的组件来满足不同的伸缩场景。
  2. 有三种弹性伸缩:
1
2
3
4
5
6
7
- CA(Cluster Autoscaler):Node级别自动扩/缩容  适用于,无状态应用 
cluster-autoscaler组件 适用于,无状态应用

- HPA(Horizontal Pod Autoscaler):Pod个数自动扩/缩容

- VPA(Vertical Pod Autoscaler):Pod配置自动扩/缩容,主要是CPU、内存
addon-resizer组件 适用于,有状态应用
  1. 如果在云上建议 HPA 结合 cluster-autoscaler 的方式进行集群的弹性伸缩管理。

Node 自动扩容/缩容

Cluster AutoScaler

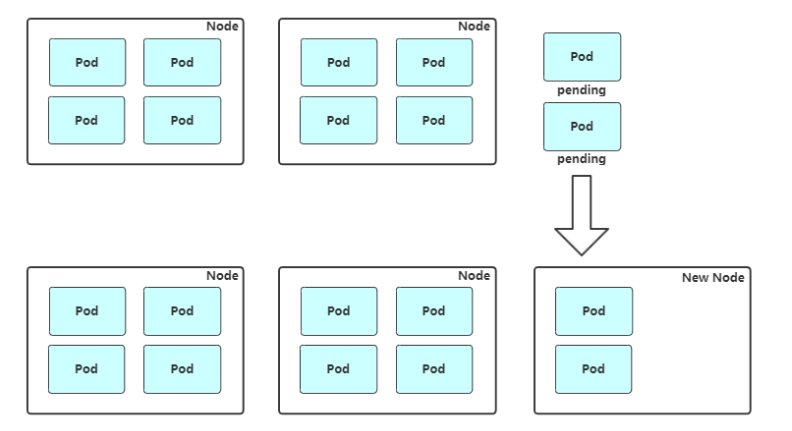
  1. 扩容:Cluster AutoScaler 定期检测是否有充足的资源来调度新创建的 Pod,当资源不足时会调用 Cloud Provider 创建新的 Node。
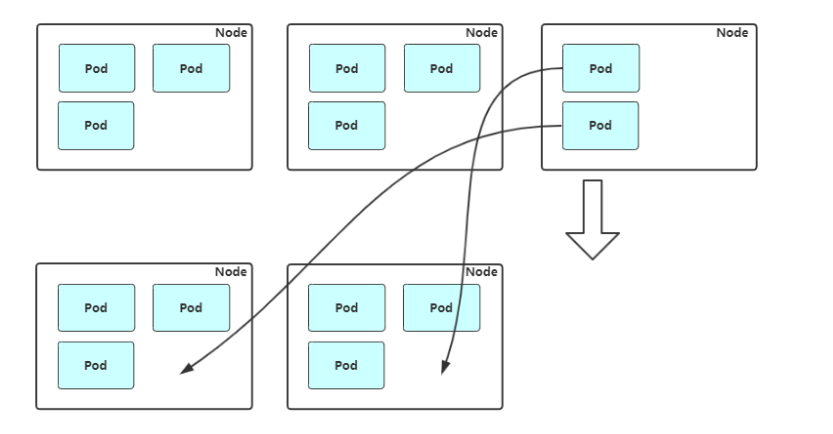
  1. 缩容:Cluster AutoScaler 也会定期监测 Node 的资源使用情况,当一个 Node 长时间资源利用率都很低时(低于 50%)自动将其所在虚拟机从云服务商中删除。此时,原来的 Pod 会自动调度到其他 Node 上面。
1
2
3
4
5
支持的云提供商:

# aliyun: https://github.com/kubernetes/autoscaler/blob/master/cluster-autoscaler/cloudprovider/alicloud/README.md
# AWS: https://github.com/kubernetes/autoscaler/blob/master/cluster-autoscaler/cloudprovider/aws/README.md
# Azure: https://github.com/kubernetes/autoscaler/blob/master/cluster-autoscaler/cloudprovider/azure/README.md

Ansible 扩容 Node

  1. 自动化流程:

1
2
3
4
5
6
1. 触发新增Node
2. 调用Ansible脚本部署组件
3. 检查服务是否可用
4. 调用API将新Node加入集群或者启用Node自动加入
5. 观察新Node状态
6. 完成Node扩容,接收新Pod

扩容

1
2
3
4
5
6
7
# 模拟场景:创建超出当前资源的 pod,使当前k8s环境又需要扩容node的需求
# 1. 查看当前各个node节点配置
# 服务器配置是 2c2G
[root@k8s-master1 ~]# kubectl get nodes
NAME STATUS ROLES AGE VERSION
k8s-node1 Ready <none> 17h v1.16.0
k8s-node2 Ready <none> 17h v1.16.0
1
2
3
4
5
6
7
8
9
10
11
12
13
14
15
16
17
18
19
20
# 2. 创建超出当前资源的 pod 

[root@k8s-master1 ansible-k8s-deploy]# kubectl run web --image=nginx:1.16 --replicas=4 --requests='cpu=1,memory=256Mi'
kubectl run --generator=deployment/apps.v1 is DEPRECATED and will be removed in a future version. Use kubectl run --generator=run-pod/v1 or kubectl create instead.
deployment.apps/web created

[root@k8s-master1 ansible-k8s-deploy]# kubectl get pods -o wide
NAME READY STATUS RESTARTS AGE IP NODE NOMINATED NODE READINESS GATES
web-584dbdb99d-2cv2z 0/1 Pending 0 8s <none> <none> <none> <none>
web-584dbdb99d-crfdz 1/1 Running 0 8s 10.244.1.13 k8s-node1 <none> <none>
web-584dbdb99d-hclmf 1/1 Running 0 8s 10.244.0.11 k8s-node2 <none> <none>
web-584dbdb99d-mtthk 0/1 Pending 0 8s <none> <none> <none> <none>

[root@k8s-master1 ansible-k8s-deploy]# kubectl describe pod/web-584dbdb99d-2cv2z
# scheduler 调度器提示 2个node 都不满足 cpu不充足

Events:
Type Reason Age From Message
---- ------ ---- ---- -------
Warning FailedScheduling <unknown> default-scheduler 0/2 nodes are available: 2 Insufficient cpu.
1
2
3
4
# 3. 准备 k8s-node3 节点
[root@k8s-master1 ansible-k8s-deploy]# cat hosts
[newnode]
172.17.70.252 node_name=k8s-node3
1
2
3
# 4. 部署k8s-node3节点
[root@k8s-master1 ansible-k8s-deploy]# ansible-playbook -i hosts add-node.yaml -uroot -k
[root@k8s-master2 ~]# ps -ef|grep kube
1
2
3
4
5
6
7
8
9
10
11
12
13
14
15
16
17
18
19
20
21
22
23
24
25
26
27
28
29
30
31
32
33
34
35
36
37
38
# 5. 手动加入集群 
# 如果是物理服务器,别忘记时间需要同步 ntpdate time.windows.com

[root@k8s-master1 ansible-k8s-deploy]# kubectl get csr
NAME AGE REQUESTOR CONDITION
node-csr-y6GEkP8FXoD3VJnj-BkmrKBO6vSPA32Coi3Wf2Vu9og 8m6s kubelet-bootstrap Pending

[root@k8s-master1 ansible-k8s-deploy]# kubectl certificate approve node-csr-y6GEkP8FXoD3VJnj-BkmrKBO6vSPA32Coi3Wf2Vu9og
[root@k8s-master1 ansible-k8s-deploy]# kubectl get csr
NAME AGE REQUESTOR CONDITION
node-csr-y6GEkP8FXoD3VJnj-BkmrKBO6vSPA32Coi3Wf2Vu9og 9m44s kubelet-bootstrap Approved,Issued

# daemonset 自动部署了 flannel
[root@k8s-master1 ansible-k8s-deploy]# kubectl get nodes
NAME STATUS ROLES AGE VERSION
k8s-node1 Ready <none> 17h v1.16.0
k8s-node2 Ready <none> 17h v1.16.0
k8s-node3 Ready <none> 42s v1.16.0

[root@k8s-master1 ansible-k8s-deploy]# kubectl get pods
NAME READY STATUS RESTARTS AGE
web-584dbdb99d-2cv2z 1/1 Running 0 7m40s
web-584dbdb99d-crfdz 1/1 Running 0 7m40s
web-584dbdb99d-hclmf 1/1 Running 0 7m40s
web-584dbdb99d-mtthk 0/1 Pending 0 7m40s

# 资源多起来一台 还是资源不够 所有还需要扩容~ 但是扩容的操作已经成功
[root@k8s-master1 ansible-k8s-deploy]# kubectl describe node k8s-node3

# 修改配置 再启动
[root@k8s-master1 ansible-k8s-deploy]# kubectl delete deployment/web
[root@k8s-master1 ansible-k8s-deploy]# kubectl run web --image=nginx:1.16 --replicas=4 --requests='cpu=500m,memory=256Mi'
[root@k8s-master1 ansible-k8s-deploy]# kubectl get pods
NAME READY STATUS RESTARTS AGE
web-868b6f9d7f-5j4d9 1/1 Running 0 3s
web-868b6f9d7f-98wc4 1/1 Running 0 3s
web-868b6f9d7f-spmsd 1/1 Running 0 3s
web-868b6f9d7f-wlnw7 1/1 Running 0 3s

缩容

1
2
3
4
# 考虑的较多
# 1. 集群中哪个节点可以删除 资源利用率最低
# 2. 跑的POD 最少
# 3. 人工干预
1
2
3
4
5
6
7
8
# 平滑移除了一个 k8s 节点,正确流程如下:
# 1. 获取节点列表
# 可以下线pod最少的node,这次测试 就下线node3
[root@k8s-master1 ~]# kubectl get nodes
NAME STATUS ROLES AGE VERSION
k8s-node1 Ready <none> 17h v1.16.0
k8s-node2 Ready <none> 17h v1.16.0
k8s-node3 Ready <none> 8m45s v1.16.0
1
2
3
4
5
6
7
8
9
# 2. 设置不可调度
# 防止有新的pod调度过来
[root@k8s-master1 ~]# kubectl cordon k8s-node3
node/k8s-node3 cordoned
[root@k8s-master1 ~]# kubectl get nodes
NAME STATUS ROLES AGE VERSION
k8s-node1 Ready <none> 17h v1.16.0
k8s-node2 Ready <none> 17h v1.16.0
k8s-node3 Ready,SchedulingDisabled <none> 10m v1.16.0
1
2
3
4
5
6
7
8
9
10
11
12
13
14
15
# 3. 驱逐这个节点上的已有的pod 到其他节点
# 将节点设置为 维护状态并驱逐pod,但是忽略驱逐daemonsets (--ignore-daemonsets)
# 在驱逐之前也要考虑计算其他节点是否有足够的资源,可以接纳node3上的pod
[root@k8s-master1 ~]# kubectl drain k8s-node3 --ignore-daemonsets

[root@k8s-master1 ~]# kubectl get pods -o wide
NAME READY STATUS RESTARTS AGE IP NODE NOMINATED NODE READINESS GATES
web-868b6f9d7f-5j4d9 1/1 Running 0 9m33s 10.244.1.14 k8s-node1 <none> <none>
web-868b6f9d7f-ctxk5 1/1 Running 0 48s 10.244.1.15 k8s-node1 <none> <none>
web-868b6f9d7f-wlnw7 1/1 Running 0 9m33s 10.244.0.12 k8s-node2 <none> <none>
web-868b6f9d7f-wngdw 1/1 Running 0 48s 10.244.0.13 k8s-node2 <none> <none>

# 驱逐流程:
1. 删除下线节点上的pod
2. pod 是deployment 维护副本数,是由控制器来维护操作并拉起指定的副本数,该操作会走调度
1
2
3
4
5
6
7
8
# 4. 移除节点
# 该节点上已经没有任何资源了,可以直接移除节点
[root@k8s-master1 ~]# kubectl delete node k8s-node3
node "k8s-node3" deleted
[root@k8s-master1 ~]# kubectl get nodes
NAME STATUS ROLES AGE VERSION
k8s-node1 Ready <none> 17h v1.16.0
k8s-node2 Ready <none> 17h v1.16.0
1
2
3
4
5
# 总结:
1. 如果直接关闭node3服务器,模拟自动出现故障,k8s大约需要5分钟才能调度,而驱逐是即时操作,不如驱逐效率
2. 重启node3的kubelet 可以重新发送加入请求,并加入到集群中
3. 如何自动通过csr 怎么配置
4. 当前是自动化 和 人工干预 对node的扩容和缩容

Pod 自动扩容/缩容(HPA)

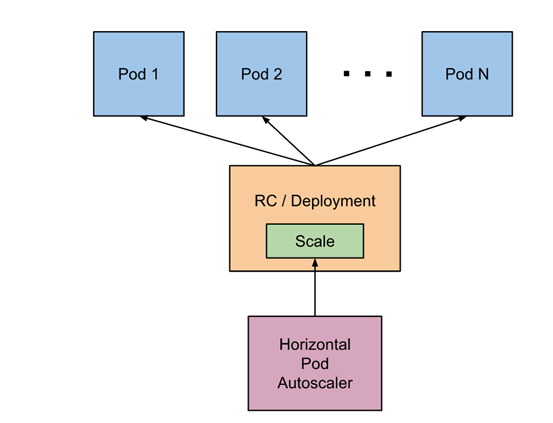
  1. Horizontal Pod Autoscaler(HPA,Pod水平自动伸缩),根据资源利用率或者自定义指标自动调整 replication controller, deployment 或 replica set,
  2. 实现部署的自动扩展和缩减,让部署的规模接近于实际服务的负载。HPA不适于无法缩放的对象,例如DaemonSet。
1
1. 针对pod的利用率做计算 然后调整副本数量

HPA 基本原理

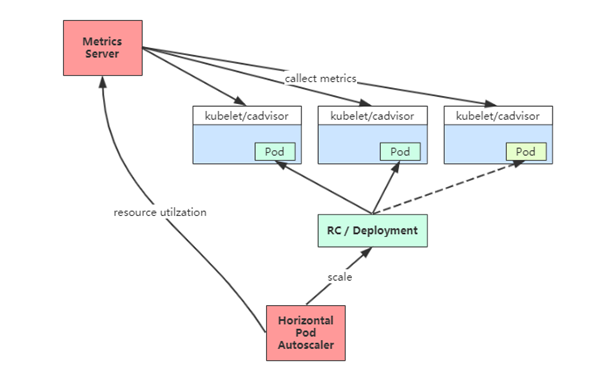
  1. Kubernetes 中的组件 Metrics Server 持续采集所有 Pod 副本的指标数据。 (heapster 在k8s 1.13 版本后 被弃用了)
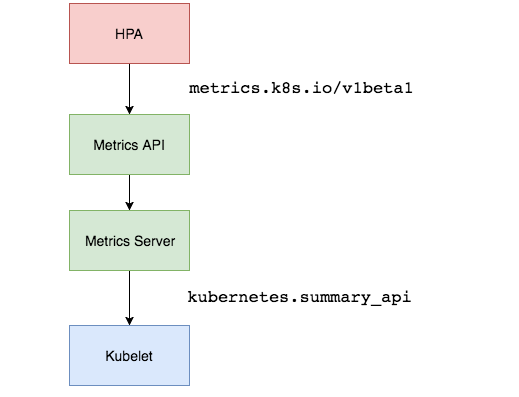
  2. HPA 控制器通过 Metrics Server 的 API(Heapster 的 API 或聚合 API)获取这些数据,基于用户定义的扩缩容规则进行计算,得到目标 Pod 副本数量。
  3. 当目标 Pod 副本数量与当前副本数量不同时,HPA 控制器就向 Pod 的副本控制器(Deployment、RC 或 ReplicaSet)发起 scale 操作,调整 Pod 的副本数量,完成扩缩容操作。
1
2
3
4
5
1. HPA需要创建规则,里面定义好缩容和扩容范围,设置好对象,设置阈值
2. HPA会去从Metrics Server中 获取指标,判断是否到达HPA的阈值,如果是,会去执行deployment scale去扩容
3. 如果长期在低使用率会帮我们缩容POD副本
4. Metrics Server 从cadvisor中获取
5. cadvisor 提供哪些指标? CPU、内存 的使用率,cadvisor 采集容器的资源利用率

扩容冷却 和 缩容冷却

  1. 在弹性伸缩中,冷却周期是不能逃避的一个话题, 由于评估的度量标准是动态特性,副本的数量可能会不断波动。有时被称为颠簸,所以在每次做出扩容缩容后,冷却时间是多少。
  2. 在 HPA 中,默认的扩容冷却周期是 3 分钟,缩容冷却周期是 5 分钟。
  3. 可以通过调整 kube-controller-manager 组件启动参数设置冷却时间:
1
2
--horizontal-pod-autoscaler-downscale-delay : 扩容冷却
--horizontal-pod-autoscaler-upscale-delay : 缩容冷却
1
2
3
4
5
6
7
8
9
10
11
12
13
14
15
16
pod1 pod2 pod3      # cpu使用率 50%
HPA # cpu阈值 60% 周期对比pod的cpu使用率

# HPA 指标:
1. 最大创建POD数量 最小POD数量
2. 阈值
3. 对象 操作哪一组POD

# 转化
扩容: cpu利用率 70%了 扩容 3-10个副本
缩容: 马上利用率下降了 到20%了 由10个 降低到 5个
这个转化时间频率不能太高,如果太高或者利用率间隙触发,业务不稳定,HPA拥有冷却机制
1. 第一次扩容之后,第二次扩容需要经过扩容冷却时间, 默认三分钟
2. 第一次缩容之后,第二次缩容需要经过缩容冷却时间, 默认五分钟
3. 这些都在 kube-controller-manager 组件参数中设置
4. 不断的扩容、缩容这种现象,成为颠簸

HPA 的演进历程

  1. 目前 HPA 已经支持了 autoscaling/v1、autoscaling/v2beta1 和 autoscaling/v2beta2 三个大版本。
  2. 目前大多数人比较熟悉是 autoscaling/v1 ,这个版本只支持 CPU 一个指标的弹性伸缩。
  3. 而 autoscaling/v2beta1 增加了支持自定义指标, 如第三方支持QPS
  4. autoscaling/v2beta2 又额外增加了外部指标支持。
  5. 而产生这些变化不得不提的是Kubernetes社区对监控与监控指标的认识与转变。从早期Heapster到Metrics Server再到将指标边界进行划分,一直在丰富监控生态。
1
2
1. autoscaling/v1版本 只暴露了cpu 为什么没有暴露内存 ? 因为内存不是很好的提现弹性伸缩的指标,都是应用在调整
2. autoscaling/v2beta2 增加更多的指标

基于 CPU 指标缩放

Kubernetes API Aggregation

  1. 在 Kubernetes 1.7 版本引入了聚合层,允许第三方应用程序通过将自己注册到kube-apiserver上,仍然通过 API Server 的 HTTP URL 对新的 API 进行访问和操作。
  2. 为了实现这个机制,Kubernetes 在 kube-apiserver 服务中引入了一个 API 聚合层(API Aggregation Layer),用于将扩展 API 的访问请求转发到用户服务的功能。
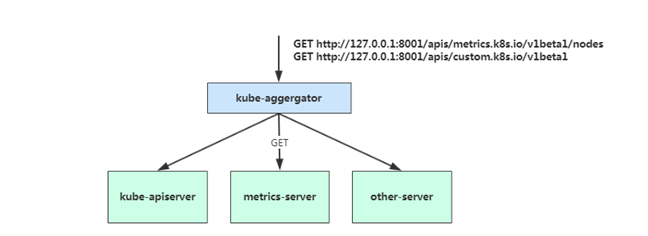
  1. 当你访问 apis/metrics.k8s.io/v1beta1 的时候,实际上访问到的是一个叫作 kube-aggregator 的代理。而 kube-apiserver,正是这个代理的一个后端;而 Metrics Server,则是另一个后端 。
  2. 通过这种方式,我们就可以很方便地扩展 Kubernetes 的 API 了。
  3. 如果你使用kubeadm部署的,默认已开启。
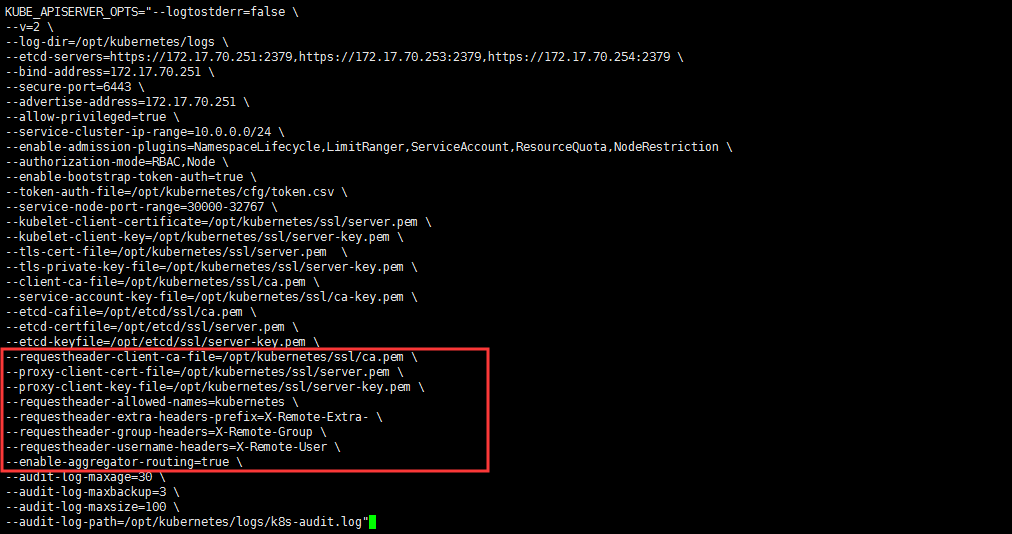
  4. 如果你使用二进制方式部署的话,需要在kube-APIServer中添加启动参数,增加以下配置:
1
2
3
4
5
6
7
8
9
10
11
12
13
14
15
# vi /opt/kubernetes/cfg/kube-apiserver.conf
...
# 指定ca根证书和客户端证书 访问聚合层的认证
--requestheader-client-ca-file=/opt/kubernetes/ssl/ca.pem \
--proxy-client-cert-file=/opt/kubernetes/ssl/server.pem \
--proxy-client-key-file=/opt/kubernetes/ssl/server-key.pem \
# server.pem 证书cn名称 = kubernetes
--requestheader-allowed-names=kubernetes \
# 请求头信息
--requestheader-extra-headers-prefix=X-Remote-Extra- \
--requestheader-group-headers=X-Remote-Group \
--requestheader-username-headers=X-Remote-User \
# 启用聚合层路由
--enable-aggregator-routing=true \
...
  1. 在设置完成 重启 kube-apiserver 服务,就启用 API 聚合功能了。

开启 kube-apiserver 聚合层

1
2
3
[root@k8s-master1 ~]# vim /opt/kubernetes/cfg/kube-apiserver.conf 
[root@k8s-master1 ssl]# systemctl restart kube-apiserver
[root@k8s-master1 ssl]# systemctl status kube-apiserver

autoscaling/v1(CPU指标实践)

部署 Metrics Server

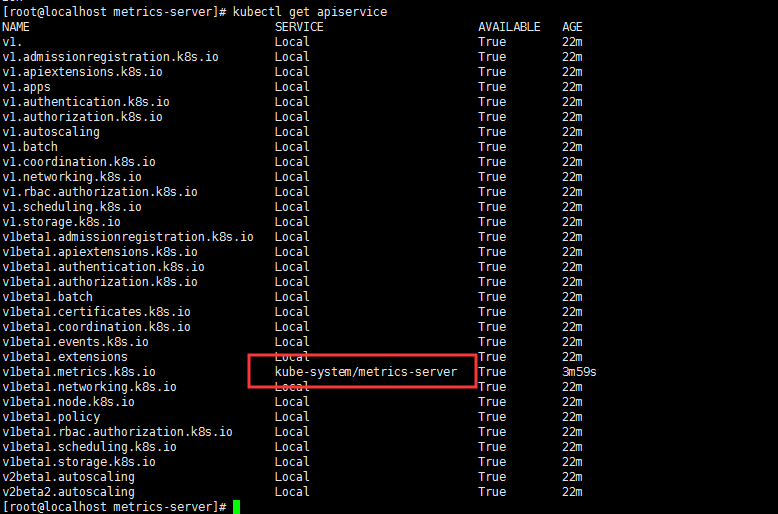
  1. Metrics Server 是一个集群范围的资源使用情况的数据聚合器。作为一个应用部署在集群中。
  2. Metrics Server 从每个节点上Kubelet(内置的cadvisor)公开的摘要API收集指标。
  3. Metrics Server 通过Kubernetes聚合器注册在Master APIServer中。
1
2
3
4
5
6
7
                      HPA 
获取整体POD的CPU资源利用率

Metrics
汇总

pod1(cadvisor) pod2(cadvisor) pod3(cadvisor)

1
2
3
4
5
6
7
8
9
10
11
12
13
14
15
16
17
18
19
20
21
22
23
24
25
26
27
[root@k8s-master1 ~]# yum install lrzsz unzip
[root@k8s-master1 ~]# unzip metrics-server.zip
[root@k8s-master1 ~]# cd metrics-server
# 修改参数:
[root@k8s-master1 metrics-server]# vim metrics-server-deployment.yaml
...
containers:
- name: metrics-server
image: lizhenliang/metrics-server-amd64:v0.3.1
command:
- /metrics-server
- --kubelet-insecure-tls # 忽略证书
- --kubelet-preferred-address-types=InternalIP # 找到nodeIP,默认使用注册节点名称,修改成IP
...

# 部署
[root@k8s-master1 metrics-server]# kubectl apply -f .
[root@k8s-master1 metrics-server]# kubectl get pods -n kube-system
NAME READY STATUS RESTARTS AGE
coredns-6d8cfdd59d-mh5pk 1/1 Running 2 22h
kube-flannel-ds-amd64-5bfgl 1/1 Running 2 22h
kube-flannel-ds-amd64-pjjgj 1/1 Running 2 22h
metrics-server-7dbbcf4c7-vzdn2 1/1 Running 0 28s

# 检查是否正常工作
[root@k8s-master1 metrics-server]# kubectl logs metrics-server-7dbbcf4c7-vzdn2 -n kube-system
[root@k8s-master1 metrics-server]# kubectl get apiservice

1
2
3
4
5
6
7
8
9
10
11
12
13
# 获取资源利用率 metrics-server 工作正常 采集到了数据
[root@localhost metrics-server]# kubectl top node
NAME CPU(cores) CPU% MEMORY(bytes) MEMORY%
k8s-master1 119m 5% 1075Mi 57%
k8s-node1 59m 2% 630Mi 33%
k8s-node2 61m 3% 672Mi 35%

[root@localhost metrics-server]# kubectl top pods
NAME CPU(cores) MEMORY(bytes)
web-868b6f9d7f-d4rwc 0m 2Mi
web-868b6f9d7f-dj9nb 0m 3Mi
web-868b6f9d7f-n6gv8 0m 3Mi
web-868b6f9d7f-s6hk4 0m 2Mi
1
2
3
4
5
6
7
8
9
10
11
12
13
14
15
16
17
18
19
20
21
22
23
24
25
# 可通过Metrics API在Kubernetes中获得资源使用率指标,例如容器CPU和内存使用率。这些度量标准既可以由用户直接访问
# 例如,通过使用`kubectl top`命令,也可以由集群中的控制器(例如,Horizontal Pod Autoscaler)用于进行决策。
# 测试:hpa获取资源利用率是使用api接口 返回json格式

[root@localhost metrics-server]# kubectl get --raw /apis/metrics.k8s.io/v1beta1/nodes

{"kind":"NodeMetricsList","apiVersion":"metrics.k8s.io/v1beta1",
"metadata":{"selfLink":"/apis/metrics.k8s.io/v1beta1/nodes"},
"items":[{"metadata":{"name":"k8s-master1",
"selfLink":"/apis/metrics.k8s.io/v1beta1/nodes/k8s-master1",
"creationTimestamp":"2019-12-11T11:48:23Z"},"timestamp":"2019-12-11T11:47:31Z",
"window":"30s","usage":{"cpu":"141907959n","memory":"1121116Ki"}},
{"metadata":{"name":"k8s-node1","selfLink":"/apis/metrics.k8s.io/v1beta1/nodes/k8s-node1",
"creationTimestamp":"2019-12-11T11:48:23Z"},"timestamp":"2019-12-11T11:47:40Z","window":"30s",
"usage":{"cpu":"88731198n","memory":"646736Ki"}},{"metadata":{"name":"k8s-node2",
"selfLink":"/apis/metrics.k8s.io/v1beta1/nodes/k8s-node2",
"creationTimestamp":"2019-12-11T11:48:23Z"},
"timestamp":"2019-12-11T11:47:32Z","window":"30s","usage":{"cpu":"55617927n","memory":"693224Ki"}}]}


[root@localhost metrics-server]# kubectl top node
NAME CPU(cores) CPU% MEMORY(bytes) MEMORY%
k8s-master1 94m 4% 1074Mi 57%
k8s-node1 89m 4% 634Mi 33%
k8s-node2 173m 8% 662Mi 35%

启动三个web副本

1
2
3
4
5
6
7
8
9
10
11
12
13
14
15
16
17
18
19
20
21
22
23
24
25
26
27
28
29
30
31
32
33
34
35
36
37
38
39
40
[root@k8s-master1 hpa]# mkdir -p /root/hpa
[root@k8s-master1 hpa]# vim app.yaml

apiVersion: v1
kind: Service
metadata:
name: web
spec:
ports:
- port: 80
protocol: TCP
targetPort: 80
selector:
run: web
---
apiVersion: apps/v1
kind: Deployment
metadata:
labels:
run: web
name: web
spec:
replicas: 3
selector:
matchLabels:
run: web
template:
metadata:
labels:
run: web
spec:
containers:
- image: nginx:1.16
name: web
ports:
- containerPort: 80
resources:
requests:
cpu: 100m
memory: 100Mi
1
2
3
4
5
6
7
8
9
10
11
12
13
14
15
16
17
18
19
20
21
22
23
[root@k8s-master1 hpa]# kubectl delete deploy web 

[root@k8s-master1 hpa]# kubectl apply -f app.yaml
service/web unchanged
deployment.apps/web created

[root@k8s-master1 hpa]# kubectl get pods
NAME READY STATUS RESTARTS AGE
web-6f4b67f8cc-kz295 1/1 Running 0 5s
web-6f4b67f8cc-nmfpv 1/1 Running 0 5s
web-6f4b67f8cc-s9mvc 1/1 Running 0 5s

# 测试访问
[root@k8s-master1 hpa]# kubectl get pods,svc
NAME READY STATUS RESTARTS AGE
pod/web-6f4b67f8cc-kz295 1/1 Running 0 3m47s
pod/web-6f4b67f8cc-nmfpv 1/1 Running 0 3m47s
pod/web-6f4b67f8cc-s9mvc 1/1 Running 0 3m47s

NAME TYPE CLUSTER-IP EXTERNAL-IP PORT(S) AGE
service/kubernetes ClusterIP 10.0.0.1 <none> 443/TCP 39m
service/web ClusterIP 10.0.0.129 <none> 80/TCP 10m
[root@k8s-master1 hpa]# curl 10.0.0.129

创建 HPA 策略

1
2
3
4
5
6
7
8
9
10
11
12
13
14
15
16
17
18
19
20
21
22
# 自动创建
[root@k8s-master1 hpa]# kubectl autoscale --help
[root@k8s-master1 hpa]# kubectl autoscale deployment web --min=2 --max=10 -o yaml --dry-run > hpa-v1.yaml

# 修改后
[root@k8s-master1 hpa]# vim hpa-v1.yaml

apiVersion: autoscaling/v1
kind: HorizontalPodAutoscaler
metadata:
name: web
spec:
maxReplicas: 10
minReplicas: 2
scaleTargetRef:
apiVersion: apps/v1
kind: Deployment
name: web
targetCPUUtilizationPercentage: 60

# scaleTargetRef:表示当前要伸缩对象是谁
# targetCPUUtilizationPercentage:当整体的资源利用率超过60%的时候,会进行扩容。低于60%且在2个副本上会被缩容
1
2
3
4
5
6
7
8
# 创建并查看 需要等待一小会 hpa会去调用api汇总web的使用率
[root@k8s-master1 hpa]# kubectl apply -f hpa-v1.yaml
horizontalpodautoscaler.autoscaling/web created

# 现在web中的nginx 还没有什么使用率
[root@k8s-master1 hpa]# kubectl get hpa
NAME REFERENCE TARGETS MINPODS MAXPODS REPLICAS AGE
web Deployment/web 0%/60% 2 10 3 17s
1
2
3
4
5
6
7
# 长时间没有利用率 帮我们缩容了
[root@k8s-master1 hpa]# kubectl describe hpa web

Events:
Type Reason Age From Message
---- ------ ---- ---- -------
Normal SuccessfulRescale 9m19s horizontal-pod-autoscaler New size: 2; reason: All metrics below target
1
2
3
4
5
6
7
8
9
10
11
12
13
14
15
16
17
18
19
20
21
22
23
24
25
26
27
28
29
30
31
32
33
34
35
36
37
38
39
40
41
42
43
44
45
46
47
48
49
50
51
52
# 开启压测
# 安装ab工具
# ab -n 100000 -c 100 http://10.0.0.129/status.php
# -n 请求数
# -c 并发数

[root@k8s-master1 hpa]# yum install httpd-tools

[root@k8s-master1 hpa]# kubectl get hpa
NAME REFERENCE TARGETS MINPODS MAXPODS REPLICAS AGE
web Deployment/web 0%/60% 2 10 2 18m

# 没有坐limit限制下 进行ab测试
[root@k8s-master1 hpa]# ab -n 1000000 -c 100 http://10.0.0.129/index.html

[root@k8s-master1 ~]# kubectl top pods
NAME CPU(cores) MEMORY(bytes)
web-6f4b67f8cc-nmfpv 701m 3Mi
web-6f4b67f8cc-s9mvc 662m 3Mi

# 负载上来了 并且副本个数动态增加了 实验成功后 可以关闭压测
[root@k8s-master1 ~]# kubectl get hpa
NAME REFERENCE TARGETS MINPODS MAXPODS REPLICAS AGE
web Deployment/web 681%/60% 2 10 8 23m

[root@k8s-master1 ~]# kubectl get pods
NAME READY STATUS RESTARTS AGE
web-6f4b67f8cc-9h2c6 1/1 Running 0 39s
web-6f4b67f8cc-czpp4 1/1 Running 0 39s
web-6f4b67f8cc-frd8k 1/1 Running 0 55s
web-6f4b67f8cc-ls6z9 1/1 Running 0 24s
web-6f4b67f8cc-nfnhs 1/1 Running 0 39s
web-6f4b67f8cc-nmfpv 1/1 Running 0 48m
web-6f4b67f8cc-s9mvc 1/1 Running 0 48m
web-6f4b67f8cc-sxtbq 1/1 Running 0 24s
web-6f4b67f8cc-tkmzr 1/1 Running 0 39s
web-6f4b67f8cc-vnbcj 1/1 Running 0 54s

# 等待几分钟 负载下来后 查看缩容
[root@k8s-master1 ~]# kubectl get hpa
NAME REFERENCE TARGETS MINPODS MAXPODS REPLICAS AGE
web Deployment/web 0%/60% 2 10 10 23m

[root@k8s-master1 ~]# kubectl describe hpa web

Events:
Type Reason Age From Message
---- ------ ---- ---- -------
Normal SuccessfulRescale 18m horizontal-pod-autoscaler New size: 2; reason: All metrics below target
Normal SuccessfulRescale 102s horizontal-pod-autoscaler New size: 4; reason: cpu resource utilization (percentage of request) above target
Normal SuccessfulRescale 86s horizontal-pod-autoscaler New size: 8; reason: cpu resource utilization (percentage of request) above target
Normal SuccessfulRescale 71s horizontal-pod-autoscaler New size: 10; reason: cpu resource utilization (percentage of request) above target

工作流程:hpa -> apiserver -> kube aggregation -> metrics-server -> kubelet(cadvisor)

autoscaling/v2beta2(多指标)

  1. 为满足更多的需求,HPA 还有 autoscaling/v2beta1 和 autoscaling/v2beta2 两个版本。
  2. 这两个版本的区别是 autoscaling/v1beta1支持了 Resource Metrics(CPU)和 Custom Metrics(应用程序指标),
  3. 而在 autoscaling/v2beta2的版本中额外增加了 External Metrics 的支持。
1
# v2版本支持 自定义指标 ,可以对接第三方监控的指标
1
2
3
4
5
6
7
8
9
10
11
12
13
14
15
16
17
18
19
20
21
22
23
24
25
26
# 自动生成
[root@k8s-master1 hpa]# kubectl get hpa.v2beta2.autoscaling -o yaml > hpa-v2.yaml

[root@k8s-master1 hpa]# vim hpa-v2.yaml

apiVersion: v1
items:
apiVersion: autoscaling/v2beta2
kind: HorizontalPodAutoscaler
metadata:
name: web
namespace: default
spec:
maxReplicas: 10
minReplicas: 2
metrics:
- resource:
name: cpu
target:
averageUtilization: 60
type: Utilization
type: Resource
scaleTargetRef:
apiVersion: apps/v1
kind: Deployment
name: web
1
2
3
4
5
6
7
8
9
metrics中的type字段有四种类型的值:Object、Pods、Resource、External。 

- Resource:指的是当前伸缩对象下的pod的cpu和memory指标,只支持Utilization和AverageValue类型的目标值。

- Object:指的是指定k8s内部对象的指标,数据需要第三方adapter提供,只支持Value和AverageValue类型的目标值。

- Pods:指的是伸缩对象Pods的指标,数据需要第三方的adapter提供,只允许AverageValue类型的目标值。

- External:指的是k8s外部的指标,数据同样需要第三方的adapter提供,只支持Value和AverageValue类型的目标值。

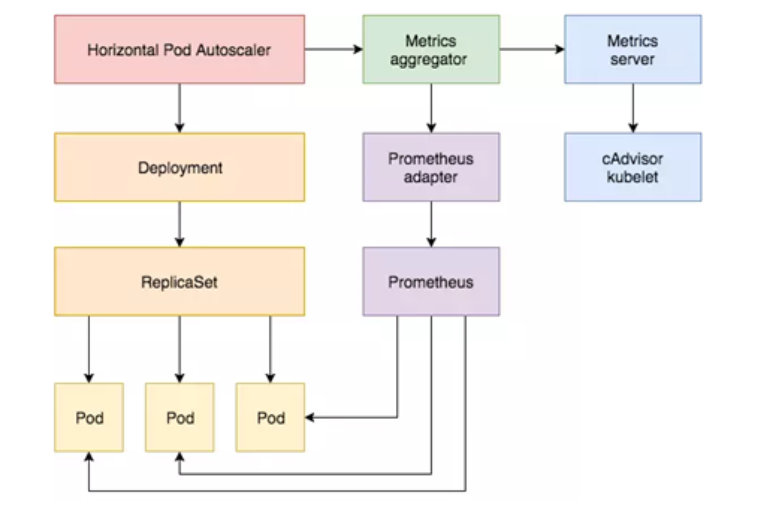
工作流程:hpa -> apiserver -> kube aggregation -> metrics-server -> kubelet(cadvisor)
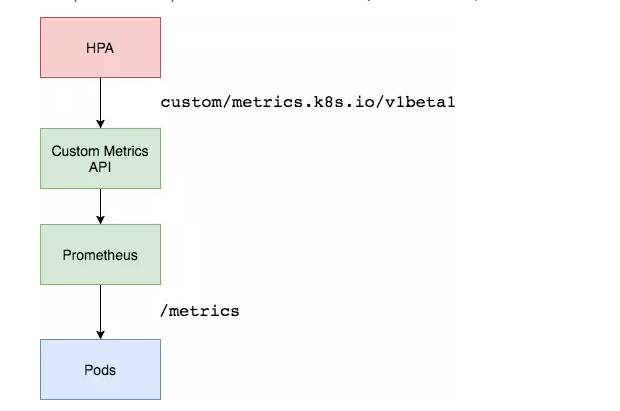
工作流程:hpa -> apiserver -> kube aggregation -> prometheus-adapter -> prometheus -> pods

1
prometheus-adapter 完成注册 和 数据格式的转换

基于 Prometheus 自定义指标缩放

  1. 资源指标只包含CPU、内存,一般来说也够了。但如果想根据自定义指标:如请求qps/5xx错误数来实现HPA,就需要使用自定义指标了,
  2. 目前比较成熟的实现是 Prometheus Custom Metrics。
  3. 自定义指标由Prometheus来提供,再利用k8s-prometheus-adpater聚合到apiserver,实现和核心指标(metric-server)同样的效果。
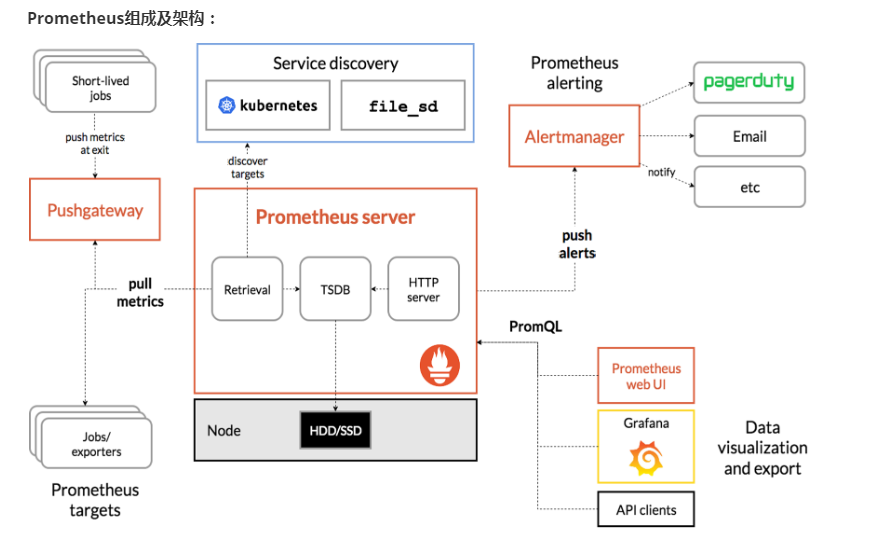
Prometheus 介绍

  1. Prometheus(普罗米修斯)是一个最初在SoundCloud上构建的监控系统。自2012年成为社区开源项目,拥有非常活跃的开发人员和用户社区。
  2. 为强调开源及独立维护,Prometheus于2016年加入云原生云计算基金会(CNCF),成为继Kubernetes之后的第二个托管项目。

Prometheus 特点:

  • 多维数据模型:由度量名称和键值对标识的时间序列数据

  • PromSQL:一种灵活的查询语言,可以利用多维数据完成复杂的查询

  • 不依赖分布式存储,单个服务器节点可直接工作

  • 基于HTTP的pull方式采集时间序列数据

  • 推送时间序列数据通过PushGateway组件支持

  • 通过服务发现或静态配置发现目标

  • 多种图形模式及仪表盘支持(grafana)

  • Prometheus Server:收集指标和存储时间序列数据,并提供查询接口

  • ClientLibrary:客户端库

  • Push Gateway:短期存储指标数据。主要用于临时性的任务

  • Exporters:采集已有的第三方服务监控指标并暴露metrics

  • Alertmanager:告警

  • Web UI:简单的Web控制台

Prometheus 部署

1
# 只需要部署服务端
  1. 部署nfs自动供给
1
2
3
4
5
6
7
8
9
10
11
12
13
14
15
16
17
18
19
20
21
22
23
24
25
26
27
28
29
30
31
32
33
34
35
36
37
# 安装nfs
# 选择 master2 作为服务端
# 客户端也所有 node上也要安装
[root@k8s-master2 ~]# yum install -y nfs-utils

[root@k8s-node2 ~]# mkdir -p /ifs/kubernetes
[root@k8s-node2 ~]# cat /etc/exports
/ifs/kubernetes *(rw,no_root_squash)

[root@k8s-node2 ~]# systemctl start nfs
[root@k8s-node2 ~]# ps -ef|grep nfs

# 上传nfs-client 修改IP地址为nfs服务端地址
[root@k8s-master1 nfs-client]# ls -l
total 12
-rw-r--r-- 1 root root 225 Nov 30 20:50 class.yaml
-rw-r--r-- 1 root root 993 Dec 13 09:25 deployment.yaml
-rw-r--r-- 1 root root 1526 Nov 30 20:50 rbac.yaml

[root@k8s-master1 nfs-client]# cat deployment.yaml
- name: NFS_SERVER
value: 172.17.70.254
- name: NFS_PATH
value: /ifs/kubernetes
volumes:
- name: nfs-client-root
nfs:
server: 172.17.70.254
path: /ifs/kubernetes

# 创建
[root@k8s-master1 nfs-client]# kubectl apply -f .
[root@k8s-master1 nfs-client]# kubectl get pods
NAME READY STATUS RESTARTS AGE
nfs-client-provisioner-5dd6f66f47-27rcz 1/1 Running 0 5m50s
web-6f4b67f8cc-nmfpv 1/1 Running 1 17h
web-6f4b67f8cc-s9mvc 1/1 Running 1 17h
  1. 安装 Prometheus
1
2
3
4
5
6
7
8
9
10
11
12
13
14
15
16
17
18
19
20
21
22
23
24
[root@k8s-master1 prometheus]# kubectl apply -f prometheus-rbac.yaml          # 授权
[root@k8s-master1 prometheus]# kubectl apply -f prometheus-configmap.yaml # 配置文件
[root@k8s-master1 prometheus]# kubectl apply -f prometheus-rules.yaml # 告警文件
[root@k8s-master1 prometheus]# kubectl apply -f prometheus-service.yaml # 告警规则
[root@k8s-master1 prometheus]# kubectl apply -f prometheus-statefulset.yaml # 服务

[root@k8s-master1 prometheus]# kubectl get pods -n kube-system
NAME READY STATUS RESTARTS AGE
coredns-6d8cfdd59d-h59sl 1/1 Running 1 18h
kube-flannel-ds-amd64-9s7s2 1/1 Running 1 18h
kube-flannel-ds-amd64-j77m8 1/1 Running 1 18h
kube-flannel-ds-amd64-pqw7p 1/1 Running 2 18h
metrics-server-7dbbcf4c7-29ms2 1/1 Running 1 18h
prometheus-0 2/2 Running 0 58s

[root@k8s-master1 prometheus]# kubectl get svc -n kube-system
NAME TYPE CLUSTER-IP EXTERNAL-IP PORT(S) AGE
kube-dns ClusterIP 10.0.0.2 <none> 53/UDP,53/TCP 18h
metrics-server ClusterIP 10.0.0.52 <none> 443/TCP 18h
prometheus NodePort 10.0.0.237 <none> 9090:30090/TCP 4m5s

# 访问web 没有部署node 并不影响,只要能采集到pod就行
http://39.106.100.108:30090/graph
http://39.106.100.108:30090/targets

1
# 自定义指标逻辑很负载 做的不是很多

部署一个监控应用

1
2
3
4
5
6
7
8
9
10
11
12
13
14
15
16
17
18
19
20
21
22
23
24
25
26
27
28
29
30
31
32
33
34
35
36
37
38
39
40
41
42
43
44
45
46
47
48
49
50
51
52
53
54
55
56
57
58
[root@k8s-master1 hpa]# vim metrics-app.yaml

apiVersion: apps/v1
kind: Deployment
metadata:
labels:
app: metrics-app
name: metrics-app
spec:
replicas: 3
selector:
matchLabels:
app: metrics-app
template:
metadata:
labels:
app: metrics-app
annotations:
prometheus.io/scrape: "true"
prometheus.io/port: "80"
prometheus.io/path: "/metrics"
spec:
containers:
- image: lizhenliang/metrics-app
name: metrics-app
ports:
- name: web
containerPort: 80
resources:
requests:
cpu: 200m
memory: 256Mi
readinessProbe:
httpGet:
path: /
port: 80
initialDelaySeconds: 3
periodSeconds: 5
livenessProbe:
httpGet:
path: /
port: 80
initialDelaySeconds: 3
periodSeconds: 5
---
apiVersion: v1
kind: Service
metadata:
name: metrics-app
labels:
app: metrics-app
spec:
ports:
- name: web
port: 80
targetPort: 80
selector:
app: metrics-app
1
2
3
4
5
6
7
8
9
10
[root@k8s-master1 hpa]# kubectl apply -f metrics-app.yaml 

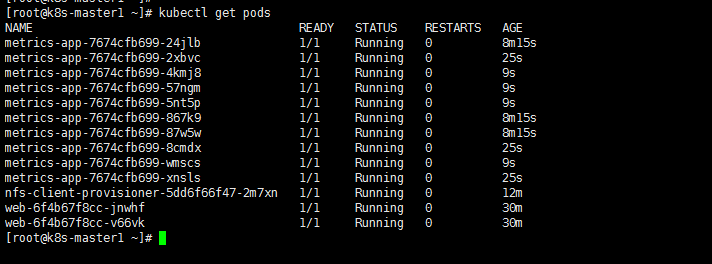
[root@k8s-master1 hpa]# kubectl get pods
NAME READY STATUS RESTARTS AGE
metrics-app-7674cfb699-67252 1/1 Running 0 15s
metrics-app-7674cfb699-crq64 1/1 Running 0 15s
metrics-app-7674cfb699-m7ksd 1/1 Running 0 15s
nfs-client-provisioner-5dd6f66f47-27rcz 1/1 Running 0 45m
web-6f4b67f8cc-nmfpv 1/1 Running 1 18h
web-6f4b67f8cc-s9mvc 1/1 Running 1 18h

查看监控指标

1
2
3
4
5
6
7
8
9
10
[root@k8s-master1 hpa]# curl 10.0.0.36
Hello! My name is metrics-app-7674cfb699-crq64. The last 10 seconds, the average QPS has been 0.5. Total requests served: 24

[root@k8s-master1 hpa]# curl 10.0.0.36/metrics
# HELP http_requests_total The amount of requests in total
# TYPE http_requests_total counter
http_requests_total 53 # 当前pod总共请求了多少次
# HELP http_requests_per_second The amount of requests per second the latest ten seconds
# TYPE http_requests_per_second gauge
http_requests_per_second 0.5 # 吞吐量 10秒之内 0.5个http请求 qps是每秒,吞吐率是一定时间范围之内

查看采集数据

1
2
3
4
5
6
7
8
9
# 1. 暴露指标
# 2. 需要告诉监控采集哪些指标

annotations:
prometheus.io/scrape: "true" # prometheus可以采集我
prometheus.io/port: "80" # 采集我的端口
prometheus.io/path: "/metrics" # 连接路径

# 3. prometheus 服务发现

部署 Custom Metrics Adapter

1
2
3
4
5
6
7
# 先准备下helm环境:
wget https://get.helm.sh/helm-v3.0.0-linux-amd64.tar.gz
tar zxvf helm-v3.0.0-linux-amd64.tar.gz
mv linux-amd64/helm /usr/bin/
helm repo add stable http://mirror.azure.cn/kubernetes/charts
helm repo update
helm repo list
1
2
3
4
5
6
7
8
9
10
11
12
13
14
15
16
17
18
19
[root@k8s-master1 ~]# helm repo list
NAME URL
stable http://mirror.azure.cn/kubernetes/charts

[root@k8s-master1 ~]# helm install prometheus-adapter stable/prometheus-adapter --namespace kube-system --set prometheus.url=http://prometheus.kube-system,prometheus.port=9090

[root@k8s-master1 ~]# helm ls -n kube-system
NAME NAMESPACE REVISION UPDATED STATUS CHART APP VERSION
prometheus-adapter kube-system 1 2019-12-13 10:35:45.714034137 +0800 CST deployed prometheus-adapter-1.4.0 v0.5.0

[root@k8s-master1 ~]# kubectl get pods -n kube-system
NAME READY STATUS RESTARTS AGE
coredns-6d8cfdd59d-h59sl 1/1 Running 1 19h
kube-flannel-ds-amd64-9s7s2 1/1 Running 1 19h
kube-flannel-ds-amd64-j77m8 1/1 Running 1 19h
kube-flannel-ds-amd64-pqw7p 1/1 Running 2 19h
metrics-server-7dbbcf4c7-29ms2 1/1 Running 1 18h
prometheus-0 2/2 Running 0 57m
prometheus-adapter-77b7b4dd8b-bwjrs 1/1 Running 0 57s
1
2
3
4
5
6
7
# 确保适配器注册到APIServer
[root@k8s-master1 ~]# kubectl logs prometheus-adapter-77b7b4dd8b-bwjrs -n kube-system
[root@k8s-master1 ~]# kubectl get apiservice

# 测试数据
[root@k8s-master1 ~]# kubectl get --raw "/apis/custom.metrics.k8s.io/v1beta1"
[root@k8s-master1 ~]# kubectl get --raw "/apis/custom.metrics.k8s.io/v1beta1" | jq

创建 HPA 策略

1
2
3
4
5
6
7
8
9
10
11
12
13
14
15
16
17
18
19
20
21
22
23
24
25
26
27

[root@k8s-master1 hpa]# vim hpa-v2.yaml

apiVersion: autoscaling/v2beta2
kind: HorizontalPodAutoscaler
metadata:
name: metrics-app-hpa
namespace: default
spec:
scaleTargetRef:
apiVersion: apps/v1
kind: Deployment
name: metrics-app
minReplicas: 1
maxReplicas: 10
metrics:
- type: Pods
pods:
metric:
name: http_requests_per_second
target:
type: AverageValue
averageValue: 800m # 800m 即0.8个/秒


[root@k8s-master1 hpa]# kubectl apply -f hpa-v2.yaml
horizontalpodautoscaler.autoscaling/metrics-app-hpa created
1
2
3
4
[root@k8s-master1 hpa]# kubectl get hpa
NAME REFERENCE TARGETS MINPODS MAXPODS REPLICAS AGE
metrics-app-hpa Deployment/web <unknown>/800m 2 10 2 28s
web Deployment/web 0%/60% 2 10 2 18h

配置适配器收集特定的指标

  1. 用来数据转换
1
2
3
4
5
6
7
8
9
10
11
12
13
# 该规则将http_requests在2分钟的间隔内收集该服务的所有Pod的平均速率。
[root@k8s-master1 hpa]# kubectl edit cm prometheus-adapter -n kube-system

rules: # 复制下面的规则
- seriesQuery: 'http_requests_total{kubernetes_namespace!="",kubernetes_pod_name!=""}'
resources:
overrides:
kubernetes_namespace: {resource: "namespace"}
kubernetes_pod_name: {resource: "pod"}
name:
matches: "^(.*)_total"
as: "${1}_per_second"
metricsQuery: 'sum(rate(<<.Series>>{<<.LabelMatchers>>}[2m])) by (<<.GroupBy>>)'
1
2
3
4
5
6
7
8
9
10
11
12
13
14
15
# 重启pod加载生效
[root@k8s-master1 hpa]# kubectl get pods -n kube-system
NAME READY STATUS RESTARTS AGE
coredns-6d8cfdd59d-h59sl 1/1 Running 1 19h
kube-flannel-ds-amd64-9s7s2 1/1 Running 1 19h
kube-flannel-ds-amd64-j77m8 1/1 Running 1 19h
kube-flannel-ds-amd64-pqw7p 1/1 Running 2 19h
metrics-server-7dbbcf4c7-29ms2 1/1 Running 1 19h
prometheus-0 2/2 Running 0 86m
prometheus-adapter-77b7b4dd8b-bwjrs 1/1 Running 0 29m

[root@k8s-master1 hpa]# kubectl delete pod prometheus-adapter-77b7b4dd8b-bwjrs -n kube-system

# 等待重建
[root@k8s-master1 hpa]# kubectl get pods -n kube-system
1
2
3
4
5
6
# 再测试数据
[root@k8s-master1 hpa]# kubectl get --raw "/apis/custom.metrics.k8s.io/v1beta1/namespaces/default/pods/*/http_requests_per_second" | jq
[root@k8s-master1 hpa]# kubectl get hpa
NAME REFERENCE TARGETS MINPODS MAXPODS REPLICAS AGE
metrics-app-hpa Deployment/metrics-app 416m/800m 1 10 2 29s
web Deployment/web 0%/60% 2 10 2 18h
1
2
3
4
5
6
7
8
9
10
11
12
13
[root@k8s-master1 hpa]# ab -n 100000 -c 100  http://10.0.0.136/metrics

[root@k8s-master1 ~]# kubectl get hpa
NAME REFERENCE TARGETS MINPODS MAXPODS REPLICAS AGE
metrics-app-hpa Deployment/metrics-app 100091m/800m 1 10 3 3m32s
web Deployment/web 0%/60% 2 10 2 28m

[root@k8s-master1 ~]# kubectl get hpa
NAME REFERENCE TARGETS MINPODS MAXPODS REPLICAS AGE
metrics-app-hpa Deployment/metrics-app 123285m/800m 1 10 6 3m46s
web Deployment/web 0%/60% 2 10 2 28m

# 扩容成功

对接一个应用需要做哪些事

1
2
3
4
5
6
# 总结
1. 应用程序需要暴露/metrics监控指标,并且是 promettheus 数据格式
2. promettheus 采集入库
3. 针对数据添加adapter规则(promsql)
4. adapter 注册 apiservice
5. 编写HPA规则 (对应指标名称)