08 Kubernetes 控制器(管理Pod)


控制器

控制器的分类

  1. Deployment
  2. StatefulSet
  3. DaemonSet
  4. Job
  5. CronJob
1
1. 控制器也称为 工作负载,它的作用是管理POD

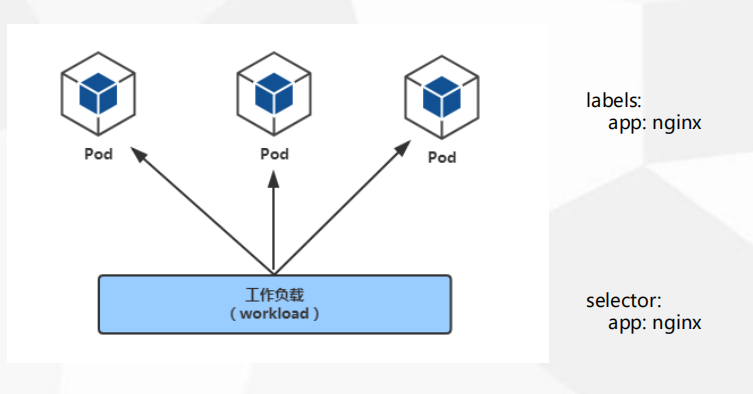
Pod 与 controllers的关系

  1. controllers:在集群上管理和运行容器的对象
  2. 通过label-selector相关联
  3. Pod通过控制器实现应用的运维,如伸缩,升级等

无状态 与 有状态 服务区别

  1. 无状态: deployment
    • 认为所有的POD都是一样的
    • 不用考虑顺序的要求
    • 也不用考虑在哪个Node运行
    • 随意扩容/缩容
  1. 有状态: statefulset
    • 数据不完全一致
    • 节点之间存在关系
  1. 这种实力之间不对等的关系,以及依靠外部存储的应用。成为有状态应用
  2. 部署有状态应用,解决POD独立生命周期,保持Pod启动顺序和唯一性
    • 稳定,唯一的网络标识符,持久存储
    • 有序,优雅的部署和扩展、删除和终止
    • 有序,滚动更新
    • 应用场景:数据库
  1. 官方说明

部署有状态应用

Headless Service

  1. 常规 Service:一组POD的访问策略,提供负载均衡服务发现
  2. Headless Service: 不需要Cluster-IP,他会直接绑定到PODIP

常规 Service 查看

1
2
3
4
5
6
7
8
9
10
11
12
13
14
15
16
17
18
19
20
[root@k8s-master1 demo]# kubectl get pods,svc,ep
NAME READY STATUS RESTARTS AGE
pod/db2-mysql-76495946b5-kv76b 1/1 Running 2 73m
pod/nfs-client-provisioner-5dd6f66f47-9gb4k 1/1 Running 2 77m
pod/web-866f97c649-jx9s6 1/1 Running 0 69s
pod/web-866f97c649-lcdn2 1/1 Running 0 69s
pod/web-866f97c649-qzwmt 1/1 Running 0 69s

NAME TYPE CLUSTER-IP EXTERNAL-IP PORT(S) AGE
service/db2-mysql ClusterIP 10.0.0.159 <none> 3306/TCP 73m
service/kubernetes ClusterIP 10.0.0.1 <none> 443/TCP 24h
service/web NodePort 10.0.0.95 <none> 80:32417/TCP 69s

NAME ENDPOINTS AGE
endpoints/db2-mysql 10.244.0.23:3306 73m
endpoints/kubernetes 172.17.70.251:6443 24h
endpoints/web 10.244.0.24:80,10.244.1.17:80,10.244.2.40:80 69s


[root@k8s-master1 demo]# curl -I 10.0.0.95

Headless Service

1
2
3
4
5
6
7
8
9
10
11
12
13
14
15
16
17
18
19
20
21
22
23
24
25
[root@k8s-master1 demo]# vim headless.yaml

apiVersion: v1
kind: Service
metadata:
name: nginx
labels:
app: nginx
spec:
ports:
- port: 80
name: web
clusterIP: None # 设置为None
selector:
app: nginx

[root@k8s-master1 demo]# kubectl apply -f headless.yaml
service/nginx created

[root@k8s-master1 demo]# kubectl get svc
NAME TYPE CLUSTER-IP EXTERNAL-IP PORT(S) AGE
nginx ClusterIP None <none> 80/TCP 4s # 没有内部IP
web NodePort 10.0.0.95 <none> 80:32417/TCP 5m34s

# 没有IP 使用DNS保证网络唯一标识符 coredns

部署 Coredns 并测试

1
2
3
4
5
6
7
8
9
10
11
12
13
14
15
16
17
18
19
20
21
22
23
24
25
26
27
28
29
30
31
32
33
34
35
36
37
38
39
40
[root@k8s-master1 demo]# kubectl get pods -n kube-system
NAME READY STATUS RESTARTS AGE
coredns-6d8cfdd59d-xwv6v 1/1 Running 3 125m

# 临时任务 不重启 执行后销毁
[root@k8s-master1 demo]# vim busybox.yaml

apiVersion: v1
kind: Pod
metadata:
name: dns-test
spec:
containers:
- name: busybox
image: busybox:1.28.4
args:
- /bin/sh
- -c
- sleep 36000
restartPolicy: Never

[root@k8s-master1 demo]# kubectl apply -f busybox.yaml
pod/dns-test created

# 进入测试
[root@k8s-master1 demo]# kubectl exec -it dns-test sh

/ # nslookup kubernetes
Server: 10.0.0.2
Address 1: 10.0.0.2 kube-dns.kube-system.svc.cluster.local

Name: kubernetes
Address 1: 10.0.0.1 kubernetes.default.svc.cluster.local

/ # nslookup web
Server: 10.0.0.2
Address 1: 10.0.0.2 kube-dns.kube-system.svc.cluster.local

Name: web
Address 1: 10.0.0.95 web.default.svc.cluster.local

创建 StatefulSet

1
2
3
4
5
6
7
8
9
10
11
12
13
14
15
16
17
18
19
20
21
22
23
24
25
26
27
28
29
30
31
32
33
34
35
36
37
38
39
40
41
[root@k8s-master1 demo]# kubectl delete -f .

[root@k8s-master1 demo]# vim sts.yaml

apiVersion: v1
kind: Service
metadata:
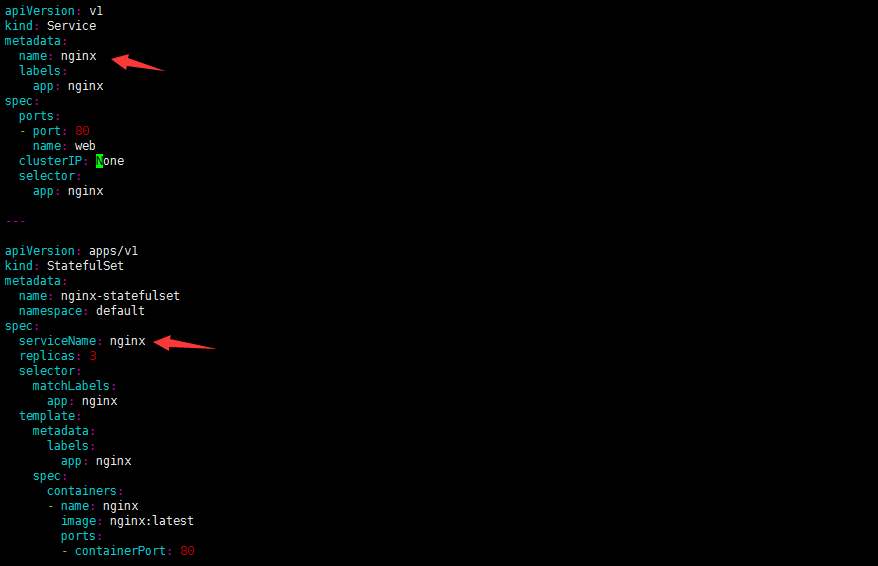
name: nginx # 与 StatefulSet 的 serviceName 一致
labels:
app: nginx
spec:
ports:
- port: 80
name: web
clusterIP: None
selector:
app: nginx

---

apiVersion: apps/v1
kind: StatefulSet
metadata:
name: nginx-statefulset
namespace: default
spec:
serviceName: nginx # 与Headless Service name 一致
replicas: 3
selector:
matchLabels:
app: nginx
template:
metadata:
labels:
app: nginx
spec:
containers:
- name: nginx
image: nginx:latest
ports:
- containerPort: 80
1
2
3
4
5
6
7
8
9
10
11
12
13
[root@k8s-master1 demo]# kubectl get pods,svc
NAME READY STATUS RESTARTS AGE
pod/db2-mysql-76495946b5-kv76b 1/1 Running 2 117m
pod/nfs-client-provisioner-5dd6f66f47-9gb4k 1/1 Running 2 121m
pod/nginx-statefulset-0 1/1 Running 0 31s
pod/nginx-statefulset-1 1/1 Running 0 26s
pod/nginx-statefulset-2 1/1 Running 0 23s

NAME TYPE CLUSTER-IP EXTERNAL-IP PORT(S) AGE
service/db2-mysql ClusterIP 10.0.0.159 <none> 3306/TCP 117m
service/kubernetes ClusterIP 10.0.0.1 <none> 443/TCP 25h
service/metrics-app ClusterIP 10.0.0.24 <none> 80/TCP 24h
service/nginx ClusterIP None <none> 80/TCP 31s

唯一的网络标识

1
2
3
4
# 固定的标号 从0开始 删除的时候也是根据这个标号
nginx-statefulset-0
nginx-statefulset-1
nginx-statefulset-2

1
2
3
4
5
6
7
8
9
10
11
12
13
[root@k8s-master1 demo]# kubectl get pods
NAME READY STATUS RESTARTS AGE
db2-mysql-76495946b5-kv76b 1/1 Running 2 125m
nfs-client-provisioner-5dd6f66f47-9gb4k 1/1 Running 2 129m
nginx-statefulset-0 1/1 Running 0 7m53s
nginx-statefulset-1 1/1 Running 0 7m48s
nginx-statefulset-2 1/1 Running 0 7m45s

[root@k8s-master1 demo]# kubectl get svc
NAME TYPE CLUSTER-IP EXTERNAL-IP PORT(S) AGE
db2-mysql ClusterIP 10.0.0.159 <none> 3306/TCP 124m
kubernetes ClusterIP 10.0.0.1 <none> 443/TCP 25h
nginx ClusterIP None <none> 80/TCP 7m31s
1
2
3
4
5
6
7
8
9
10
11
12
13
14
15
16
17
18
19
20
21
# 即通过dns来找到POD
# 即使POD的IP变更 nginx-statefulset-0 依然可以被svc的nginx 找到
[root@k8s-master1 demo]# kubectl apply -f busybox.yaml
[root@k8s-master1 demo]# kubectl exec -it dns-test sh

/ # nslookup nginx
Server: 10.0.0.2
Address 1: 10.0.0.2 kube-dns.kube-system.svc.cluster.local

Name: nginx
Address 1: 10.244.0.25 nginx-statefulset-1.nginx.default.svc.cluster.local
Address 2: 10.244.1.20 nginx-statefulset-0.nginx.default.svc.cluster.local
Address 3: 10.244.2.41 nginx-statefulset-2.nginx.default.svc.cluster.local

# pod名称+svc名称
/ # nslookup nginx-statefulset-0.nginx
Server: 10.0.0.2
Address 1: 10.0.0.2 kube-dns.kube-system.svc.cluster.local

Name: nginx-statefulset-0.nginx
Address 1: 10.244.1.20 nginx-statefulset-0.nginx.default.svc.cluster.local

StatefulSet 总结

  1. StatefulSet 与 Deployment区别: 有身份的
  2. 身份三要素:
    • 域名
    • 主机名
    • 存储(PVC)
1
2
3
4
5
statefulset 的 POD 名字 == 主机名
ClusterIP A记录: <service-name>.<namespace-name>.svc.cluster.local
ClusterIP = Node A记录格式: <StatefulsetName-index>.<namespace-name>.<service-name>.svc.cluster.local
nginx-statefulset-0.nginx.default.svc.cluster.local
这个就是 statefulset 的 POD 的固定的访问地址 ,通过域名访问到后面的 POD ,通过DNS维持身份

DaemonSet(部署守护进程)

  1. DaemonSet 确保全部(或者某些)节点上运行一个 Pod 的副本。当有节点加入集群时,也会为他们新增一个 Pod 。
  2. 当有节点从集群移除时,这些 Pod 也会被回收。删除 DaemonSet 将会删除它创建的所有 Pod。
  3. 使用 DaemonSet 的一些典型用法:
    • 运行集群存储 daemon,例如在每个节点上运行 glusterd、ceph。
    • 在每个节点上运行日志收集 daemon,例如fluentd、logstash。
    • 在每个节点上运行监控 daemon,例如 Prometheus Node Exporter、collectd、Datadog 代理、New Relic 代理,或 Ganglia gmond。
1
2
3
4
5
1. 在每一个Node上运行一个Pod
2. 新加入的Node也同样会自动运行一个Pod
3. 应用场景:Agent
4. 官方案例:
https://kubernetes.io/docs/concepts/workloads/controllers/daemonset/
1
2
3
4
5
6
7
8
9
10
11
12
13
14
15
16
17
18
19
20
21
22
23
24
25
26
27
28
29
30
31
32
[root@k8s-master1 demo]# vim ds.yaml 

apiVersion: apps/v1
kind: DaemonSet
metadata:
labels:
app: filebeat
name: ds-test
spec:
selector:
matchLabels:
app: filebeat
template:
metadata:
labels:
app: filebeat
spec:
containers:
- image: nginx:1.16
name: logs
ports:
- containerPort: 80
volumeMounts:
- name: varlog
mountPath: /tmp/log
volumes:
- name: varlog
hostPath:
path: /var/log

[root@k8s-master1 demo]# kubectl apply -f ds.yaml
daemonset.apps/ds-test created
1
2
3
4
5
6
7
8
9
10
11
12
13
[root@k8s-master1 demo]# kubectl get pods -o wide
# 每个node节点都会启动
NAME READY STATUS RESTARTS AGE IP NODE NOMINATED NODE READINESS GATES
ds-test-8vxs4 1/1 Running 0 60s 10.244.2.42 k8s-node2 <none> <none>
ds-test-9vvcm 1/1 Running 0 60s 10.244.0.26 k8s-master1 <none> <none>
ds-test-x7tsb 1/1 Running 0 60s 10.244.1.22 k8s-node1 <none> <none>

[root@k8s-master1 demo]# kubectl exec -it ds-test-8vxs4 bash
root@ds-test-8vxs4:/# cd /tmp/log/
# 测试就是把目录挂载上来 后期做node日志收集
root@ds-test-8vxs4:/tmp/log# ls
anaconda boot.log btmp cloud-init.log containers dmesg ecs_network_optimization.log grubby_prune_debug lastlog messages pods sa spooler tuned yum.log
audit boot.log-20191218 chrony cloudinit-deploy.log cron dmesg.old grubby journal maillog ntpstats rhsm secure tallylog wtmp
1
2
3
4
5
6
7
8
9
10
11
12
13
14
15
16
17
18
19
20
21
22
23
24
25
26
27
28
29
30
31
32
# 添加新的node 也同样跑起来
[root@k8s-master1 ansible-k8s-deploy]# kubectl get nodes
NAME STATUS ROLES AGE VERSION
k8s-master1 Ready <none> 26h v1.16.0
k8s-node1 Ready <none> 26h v1.16.0
k8s-node2 Ready <none> 26h v1.16.0
k8s-node3 Ready <none> 33s v1.16.0

[root@k8s-master1 ansible-k8s-deploy]# kubectl get pods
NAME READY STATUS RESTARTS AGE
db2-mysql-76495946b5-kv76b 1/1 Running 2 174m
dns-test 1/1 Running 0 47m
ds-test-8vxs4 1/1 Running 0 10m
ds-test-9vvcm 1/1 Running 0 10m
ds-test-hqtsm 1/1 Running 0 34s
ds-test-x7tsb 1/1 Running 0 10m
nfs-client-provisioner-5dd6f66f47-9gb4k 1/1 Running 2 178m
nginx-statefulset-0 1/1 Running 0 56m
nginx-statefulset-1 1/1 Running 0 56m
nginx-statefulset-2 1/1 Running 0 56m

[root@k8s-master1 ansible-k8s-deploy]# kubectl get pods -o wide
NAME READY STATUS RESTARTS AGE IP NODE NOMINATED NODE READINESS GATES
db2-mysql-76495946b5-kv76b 1/1 Running 2 174m 10.244.0.23 k8s-master1 <none> <none>
dns-test 1/1 Running 0 47m 10.244.1.21 k8s-node1 <none> <none>
ds-test-8vxs4 1/1 Running 0 10m 10.244.2.42 k8s-node2 <none> <none>
ds-test-9vvcm 1/1 Running 0 10m 10.244.0.26 k8s-master1 <none> <none>
ds-test-hqtsm 1/1 Running 0 39s 10.244.3.2 k8s-node3 <none> <none>
ds-test-x7tsb 1/1 Running 0 10m 10.244.1.22 k8s-node1 <none> <none>
nginx-statefulset-0 1/1 Running 0 57m 10.244.1.20 k8s-node1 <none> <none>
nginx-statefulset-1 1/1 Running 0 56m 10.244.0.25 k8s-master1 <none> <none>
nginx-statefulset-2 1/1 Running 0 56m 10.244.2.41 k8s-node2 <none> <none>

Job与CronJob(离线业务)

  1. Job 分为 普通任务(Job) 和 定时任务 (CronJob)
  2. 一次性执行

应用场景: 离线数据处理,视频解码等业务

Job

1
2
3
4
5
6
7
8
9
10
11
12
13
14
15
16
17
18
19
20
21
22
# 计算任务

[root@k8s-master1 ansible-k8s-deploy]# vim job.yaml

apiVersion: batch/v1
kind: Job
metadata:
name: pi
spec:
template:
spec:
containers:
- name: pi
image: perl
command: ["perl", "-Mbignum=bpi", "-wle", "print bpi(2000)"]
restartPolicy: Never
backoffLimit: 4

[root@k8s-master1 ansible-k8s-deploy]# kubectl apply -f job.yaml
job.batch/pi created

[root@k8s-master1 ansible-k8s-deploy]# kubectl describe jobs/pi
1
2
3
4
5
6
7
8
9
10
11
12
13
14
15
16
17
18
19
20
21
22
spec.backoffLimit用于设置Job的容错次数,默认值为6。
当Job运行的Pod失败次数到达.spec.backoffLimit次时,Job Controller不再新建Pod,直接停止运行这个Job,将其运行结果标记为Failure。
另外,Pod运行失败后再次运行的时间间隔呈递增状态,例如10s,20s,40s。。。

[root@k8s-master1 ansible-k8s-deploy]# kubectl get pods
# Completed 完成状态
NAME READY STATUS RESTARTS AGE
pi-2tsx7 0/1 Completed 0 2m29s

# 查看 logs 计算结果输出到控制台
[root@k8s-master1 demo]# kubectl logs pi-qdbnp

# job执行完成后 并不会删除
[root@k8s-master1 demo]# kubectl get job
NAME COMPLETIONS DURATION AGE
pi 1/1 33s 45s

# 删除
[root@k8s-master1 demo]# kubectl delete job pi
job.batch "pi" deleted

# job适合临时任务跑完退出

CronJob

  1. 定时任务,像Linux的Crontab一样
  2. 应用场景: 通知,备份
  3. crontab的格式如下:
    分 时 日 月 周 要运行的命令: 第1列分钟0~59 第2列小时0~23) 第3列日1~31 第4列月1~12 第5列星期0~7(0和7表示星期天) 第6列要运行的命令
1
2
3
4
5
6
7
8
9
10
11
12
13
14
15
16
17
18
19
20
21
22
23
[root@k8s-master1 demo]# vim cronjob.yaml 

apiVersion: batch/v1beta1
kind: CronJob
metadata:
name: hello
spec:
schedule: "*/1 * * * *" # 用来指定任务运行的周期
jobTemplate:
spec:
template:
spec:
containers:
- name: hello
image: busybox
args:
- /bin/sh
- -c
- date; echo Hello from the Kubernetes cluster
restartPolicy: OnFailure

[root@k8s-master1 demo]# kubectl apply -f cronjob.yaml
cronjob.batch/hello created
1
2
3
4
5
6
7
8
9
10
11
12
13
14
15
16
17
[root@k8s-master1 demo]# kubectl get cronjob
NAME SCHEDULE SUSPEND ACTIVE LAST SCHEDULE AGE
hello */1 * * * * False 1 11s 46s

[root@k8s-master1 demo]# kubectl get pods
NAME READY STATUS RESTARTS AGE
hello-1576641600-q78xr 0/1 Completed 0 38s

[root@k8s-master1 demo]# kubectl logs hello-1576641600-q78xr
Wed Dec 18 04:00:05 UTC 2019
Hello from the Kubernetes cluster

# 到达定时后 会再次执行并产生pod记录
[root@k8s-master1 demo]# kubectl get pods
NAME READY STATUS RESTARTS AGE
hello-1576641600-q78xr 0/1 Completed 0 96s
hello-1576641660-htkkg 0/1 Completed 0 35s
1
2
3
4
# 删除任务
[root@k8s-master1 demo]# kubectl get jobs
[root@k8s-master1 demo]# kubectl delete cronjob hello
cronjob.batch "hello" deleted

总结

  1. 控制器实现K8S编排能力
  2. Deployment: 无状态部署
  3. Statefulset: 有状态部署 访问方式:DNS记录 etcd1,etcd2… 还有 存储
  4. DaemonSet: 守护进程部署
  5. Job & CronJob: 批处理 和 定时任务