14 Prometheus + Gafana 全方位立体式监控系统


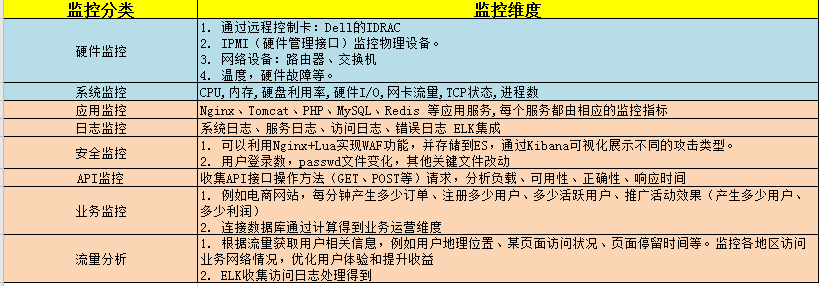
聊聊监控

为什么要监控

  1. 监视应用程序的当前状态是预测问题和发现生产环境中瓶颈的最有效方法之一。
  2. 监控是整个产品周期中最重要的一环,及时预警减少故障影响免扩大,而且能根据历史数据追溯问题。
  • 对系统不间断实时监控
  • 实时反馈系统当前状态
  • 保证业务持续性运行

怎么来监控

监控工具

  1. 适合临时性分析性能及排查故障。少量的服务器。
  2. 目前业内有很多不错的开源产品可供选择,利用开源产品很容易能做到这一点。
  • free
  • vmstat
  • df
  • top
  • ss
  • iftop

监控系统

  1. Zabbix 不适用容器
  2. Open-Falcon 小米开源 功能强大 非容器
  3. Prometheus 适用容器
监控方案 告警 特点 适用
Zabbix Y 大量定制工作 大部分的互联网公司
open-falcon Y 功能模块分解比较细,显得更复杂 系统和应用监控
Prometheus+Grafana Y 扩展性好,容器,应用 主机全方面监控

开源监控系统基本流程

  1. 数据采集:对监控数据采集
  2. 数据存储:将监控数据持久化存储,用于历时查询
  3. 数据分析:数据按需处理,例如阈值对比、聚合
  4. 数据展示:Web页面展示
  5. 监控告警:电话,邮件,微信,短信

要监控什么

  1. 可以从其他监控产品公司了解到要监控什么。
  2. 可参考的网站 https://www.jiankongbao.com

准备工作

  1. 熟悉被监控对象
  2. 整理监控指标
  3. 告警阈值定义
  4. 故障处理流程

Prometheus 监控范畴

  1. Prometheus 最擅长 api监控、应用监控
  2. Prometheus 不擅长 日志监控、安全监控
  3. Prometheus 需要数据源传来数据

Prometheus 概述

Prometheus 介绍及特点

Prometheus 是什么

  1. Prometheus(普罗米修斯)是一个最初在SoundCloud上构建的监控系统。自2012年成为社区开源项目,拥有非常活跃的开发人员和用户社区。为强调开源及独立维护,Prometheus于2016年加入云原生云计算基金会(CNCF),成为继Kubernetes之后的第二个托管项目。
  2. Prometheus是由SoundCloud开发的开源监控报警系统和时序列数据库。从字面上理解,Prometheus由两个部分组成,一个是监控报警系统,另一个是自带的时序数据库(TSDB)
  3. 官方网站:
1
2
https://prometheus.io
https://github.com/prometheus

Prometheus 特点

  1. 多维数据模型:由度量名称(metric名称)和键/值对标识的时间序列数据
  2. PromSQL:一种灵活的查询语言,可以利用多维数据完成复杂的查询
  3. 不依赖分布式存储,单个服务器节点可直接工作,数据被存储在本地磁盘上
  4. 基于HTTP的pull方式采集时间序列数据
  5. 推送时间序列数据通过PushGateway组件支持
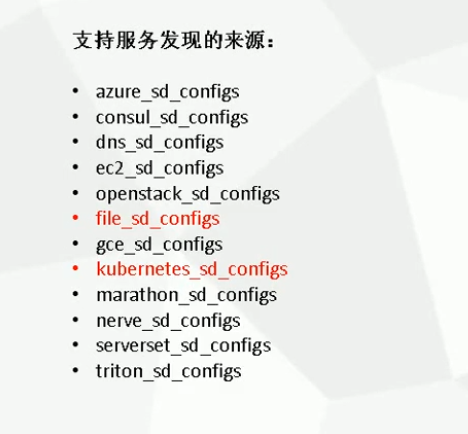
  6. 通过服务发现或静态配置发现目标
  7. 多种图形和仪表板支持

Prometheus 组成及架构

Prometheus 架构图
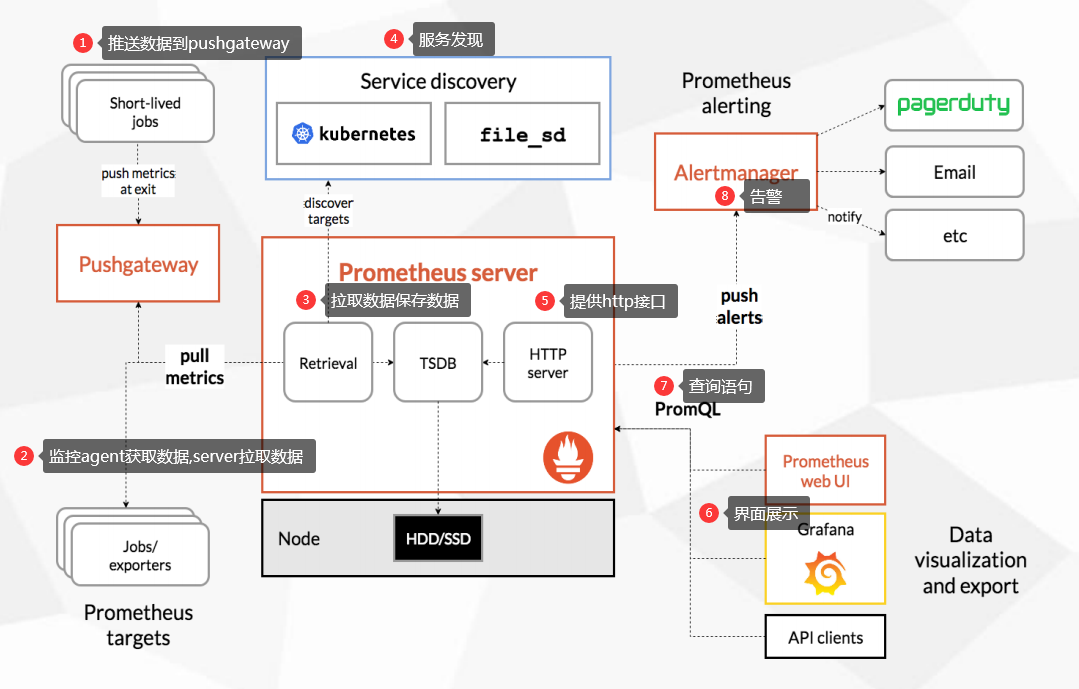
  1. 定时任务和短任务,他们会向Pushgateway传送数据,主动push,Prometheus Server 会定时拉取(pull) Pushgateway 里面的数据
  2. jobs/Exporters 长期任务,jobs采集项目提供的metrics接口指标,Exporters是已经制造好的监控,是官方提供的现成的采集方法,它负责采集数据,Prometheus Server来定时拉取
  3. Prometheus Server 的 Retrieval 模块负责定时拉取数据,存储时间序列数据(TSDB)
  4. 服务发现功能,动态的发现监控对象
  5. 提供查询接口 http server
  6. 数据展现除了 Prometheus 自带的 webui,还可以通过 grafana 等组件查询 Prometheus 监控数据
  7. PromQL 为 Prometheus 提供的查询语法,PromQL 模块通过解析语法树,调用存储模块,查询获取监控数据
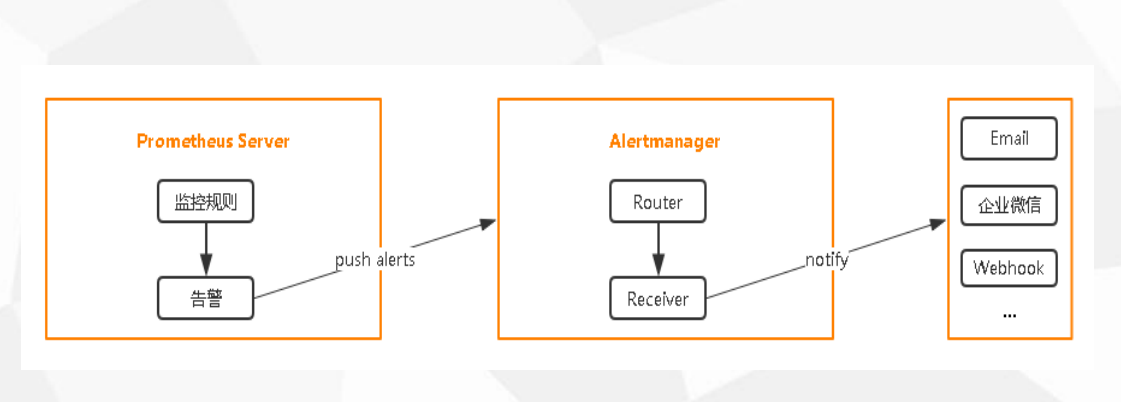
  8. Prometheus 将告警推送到 alertmanger,然后通过 alertmanger 对告警进行处 理并执行相应动作,有多钟告警类型,微信、邮件、钉钉(需要第三方服务支持)

Prometheus 组成

  1. Prometheus Server:收集指标和存储时间序列数据,并提供查询接口
  2. ClientLibrary:客户端库,为各种语言提供客户端工具,让用户自己编写暴露metrics
  3. Push Gateway:短期存储指标数据。主要用于临时性的任务
  4. Exporters:采集已有的第三方服务监控指标并暴露metrics
  5. Alertmanager:告警
  6. Web UI:简单的Web控制台

Prometheus 监控指标数据模型

监控指标 数据模型

  1. Prometheus将所有数据存储为时间序列;具有相同度量名称以及标签属于同一个指标。
  2. 每个时间序列都由度量标准名称和一组键值对(也称为标签)唯一标识
  3. 时间序列格式:
1
2
3
度量标准名称{标签(健值对),标签2(健值对),...} 值
<metric name>{<label name>=<label value>, ...}
api_http_requests_total{method="POST", handler="/messages"}
1
2
3
4
5
1. 指标格式分为两个部分:一份是指标名称,另一个是指标标签。
2. 标签可体现指标的维度特征,用于过滤和聚合。它通过标签名(label name)和标签值(label value) 这种键值对的形式,形成多种维度。
3. 例如:对于指标 http_request_total , 可以有 {status="200", method="POST"} 和 {status="200", method="GET"}这两个标签。
4. 在需要分别获取 GET 和 POST 返回 200 的请求时,可分别使用上述两种指标;
5. 在需要获取所有返回 200 的请求时,可以通过 http_request_total{status="200"}完成数据的聚合,非常便捷和通用。

监控指标 数据类型

  1. Counter:递增的计数器
  2. Gauge:可以任意变化的数值
  3. Histogram:对一段时间范围内数据进行采样,并对所有数值求和与统计数量
  4. Summary:与Histogram类似
1
2
3
4
5
6
7
1. 数据类型是提现在客户端的,在暴露数据的时候要指定数据类型
2. 开发自己写的项目,想要采集的指标需要暴露出来,使用客户端引用接口,将数据和数据类型填写上去
3. Counter: 可以选择接口请求次数,适用于一直递增的数据
4. Gauge: 波浪线数据
5. Histogram: web上某一个时间阶段的数据 求和和统计数量 , 比如一个时间段内http响应的大小,耗时多长时间等
6. Summary:与Histogram类似
7. 服务端不会区分这些数据类型,只有客户端写

作业和实例

监控目标的两个概念

  1. 实例:可以抓取的目标称为实例(Instances), 比如监控的某一台服务器,它就是一个实例
  2. 作业:具有相同目标的实例集合称为作业(Job), 类型一样的实例的集合。
  3. 在配置文件里面定义,是监控目标的概念术语
1
2
3
4
5
6
7
8
9
10
scrape_configs:
# 作业
- job_name: 'prometheus'
static_configs:
# 实例
- targets: ['localhost:9090']

- job_name: 'node'
static_configs:
- targets: ['192.168.1.10:9090']

Prometheus 数据采集

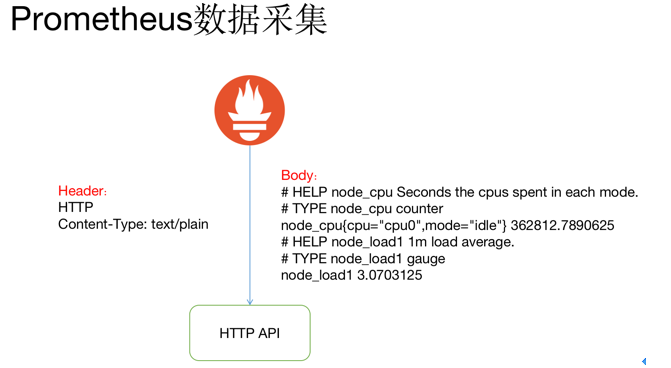
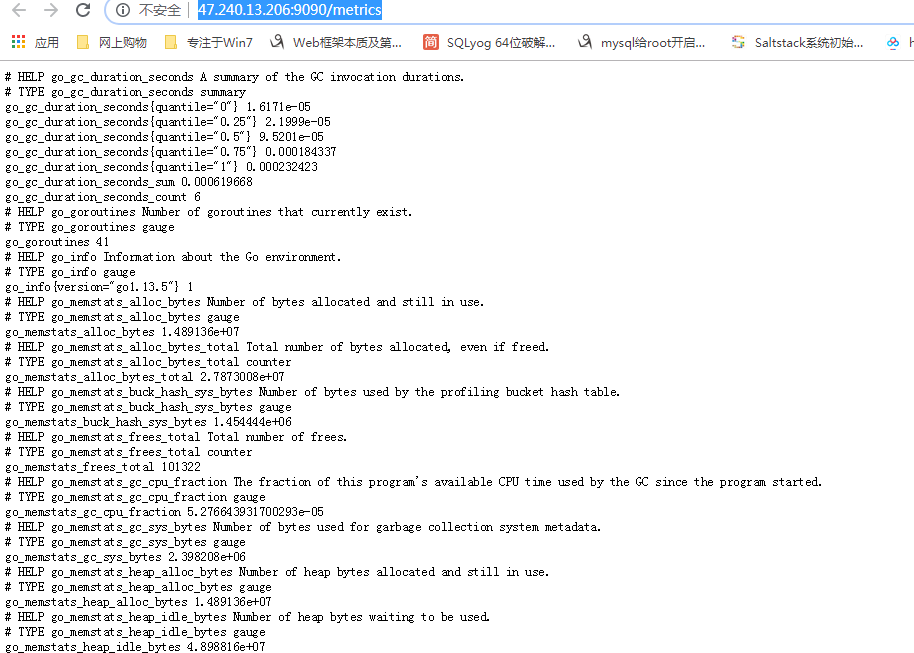
  1. Prometheus 通过 HTTP 接口的方式从各种客户端获取数据,这些客户端必须符合 Prometheus 监控数据格式,通常由两种方式。
  2. 一是侵入式埋点监控,通过在客户端集成,如果 kubernetes API 直接通过引入 Prometheus go client,提供/metrics 接口查询 kubernetes API 各种指标,
  3. 另一种是通过 exporter 方式,在外部将原来各种中间件的监控支持转化为 Prometheus 的监控数据格式,如 redis exporter 将 reids 指标转化为 Prometheus 能够识别的 HTTP 请求。
  4. Prometheus 并没有采用 json 的数据格式,而是采用 text/plain 纯文本的方式 ,这是它的特殊之处。
  5. HTTP 返回 Header 和 Body 如上图所示,指标前面两行#是注释,标识指标的含义和类型。指标和指标的值 通过空格分割,开发者通常不需要自己拼接这种个数的数据, Prometheus 提供了各种语言的 SDK 支持。

Prometheus exporter
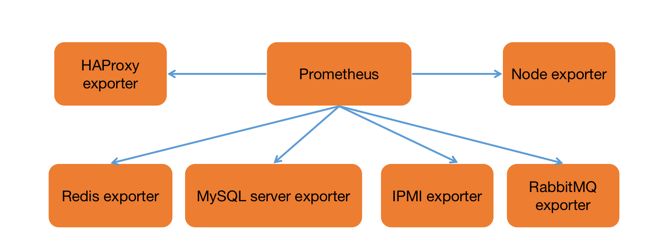
  1. Prometheus 为了支持各种中间件以及第三方的监控提供了 exporter,大家可以把它理解成监控适配器, 将不同指标类型和格式的数据统一转化为 Prometheus 能够识别的指标类型。
  2. 譬如 Node exporter 主要通过读取 linux 的/proc 以及/sys 目录下的系统文件获取操作系统运行状态
  3. reids exporter 通过 reids 命令行获取指标,mysql exporter 通过读取数据库监控表获取 mysql 的性能数据。 他们将这些异构的数据转化为标准的 Prometheus 格式,并提供 HTTP 查询接口。

Prometheus 数据存储
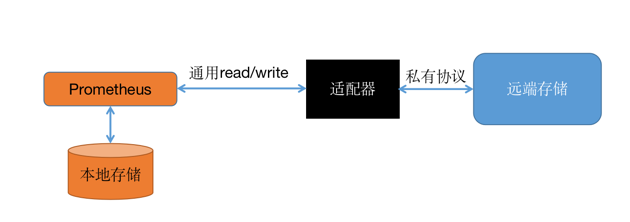
  1. Prometheus 提供了两种数据持久化方式:一种是本地存储,通过 Prometheus 自带的tsdb(时序数据库),将数据保存到本地磁盘,为了性能考虑,建议使用 SSD。
  2. 但本地存储的容量毕竟有限,建议不要保存超过一个月的数据。
  3. Prometheus 本地存储经过多年改进,自Prometheus2.0 后提供的V3版本tsdb性能已经非常高,可以支持单机每秒 1000w 个指标的收集。
  4. Prometheus 本地数据存储能力一直为大家诟病,但 Prometheus 本地存储设计的初衷就是为了监控数据的查询。
  5. Facebook 发现85%的查询是针对 26 小时内的数据。所以 Prometheus 本地时序数据库的设计更多考虑的是高性能而非分布式大容量。
  6. 另一种是远端存储,适用于大量历史监控数据的存储和查询。通过中间层的适配器的转化,Prometheus 将数据保存到远端存储。
  7. 适配器实现 Prometheus 存储的 remote write 和 remote read 接口并把数据转化为 远端存储支持的数据格式。
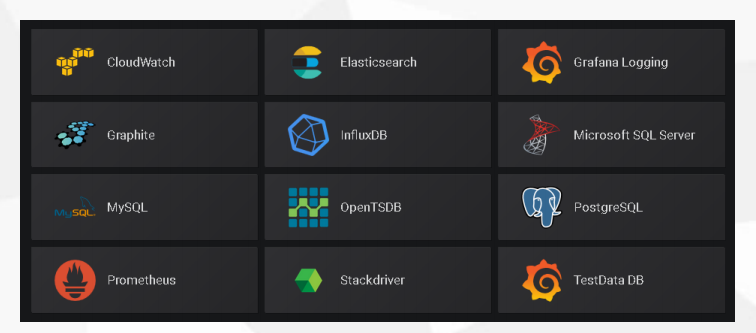
  8. 目前,远端存储主要包括 OpenTSDB、InfluxDB、Elasticsearch、M3db 等,其中 M3db 是目前非常受欢迎的后端存储。

Prometheus 部署

Prometheus 二进制部署

二进制部署:

1
2
https://prometheus.io/docs/prometheus/latest/getting_started/
https://prometheus.io/download/
1
2
3
4
5
6
7
8
9
10
11
12
13
14
15
16
17
18
# 下载安装包
[root@k8s-master2 opt]# wget https://github.com/prometheus/prometheus/releases/download/v2.15.1/prometheus-2.15.1.linux-amd64.tar.gz
# 解压
[root@k8s-master2 opt]# tar -zxvf prometheus-2.15.1.linux-amd64.tar.gz

[root@k8s-master2 prometheus-2.15.1.linux-amd64]# ls -l
total 140132
drwxr-xr-x 2 3434 3434 4096 Dec 25 10:59 console_libraries
drwxr-xr-x 2 3434 3434 4096 Dec 25 10:59 consoles
-rw-r--r-- 1 3434 3434 11357 Dec 25 10:59 LICENSE
-rw-r--r-- 1 3434 3434 3184 Dec 25 10:59 NOTICE
-rwxr-xr-x 1 3434 3434 81905918 Dec 25 09:06 prometheus # 服务端
-rw-r--r-- 1 3434 3434 926 Dec 25 10:59 prometheus.yml # 配置文件
-rwxr-xr-x 1 3434 3434 47954507 Dec 25 09:07 promtool # 客户端工具
-rwxr-xr-x 1 3434 3434 13600661 Dec 25 09:08 tsdb

[root@k8s-master2 opt]# mv prometheus-2.15.1.linux-amd64 /usr/local/prometheus
[root@k8s-master2 opt]# cd /usr/local/prometheus

配置监控本机

1
2
3
4
5
6
7
8
9
10
11
12
13
14
[root@k8s-master2 prometheus]# cat prometheus.yml
...
# A scrape configuration containing exactly one endpoint to scrape:
# Here it's Prometheus itself.
scrape_configs:
# The job name is added as a label `job=<job_name>` to any timeseries scraped from this config.
- job_name: 'prometheus'

# metrics_path defaults to '/metrics'
# scheme defaults to 'http'.
# 监控实例 本机:9090 启动服务后监听9090端口
static_configs:
- targets: ['localhost:9090']
...

启动参数

1
2
3
[root@k8s-master2 prometheus]# ./prometheus --help
--storage.tsdb.path="data/" # 数据存储目录,默认当前目录data 可以指定
--storage.tsdb.retention.time=STORAGE.TSDB.RETENTION.TIME # 数据过期清理时间,默认保存15天

启动服务

1
2
3
[root@k8s-master2 prometheus]# ./prometheus --config.file="prometheus.yml" 
...
level=info ts=2020-01-02T06:53:28.186Z caller=main.go:617 msg="Server is ready to receive web requests."
1
2
# 查看页面
http://47.240.13.206:9090/graph

1
2
3
4
5
6
7
8
9
alert:                  管理告警规则
graph: 通过PromQL查询数据
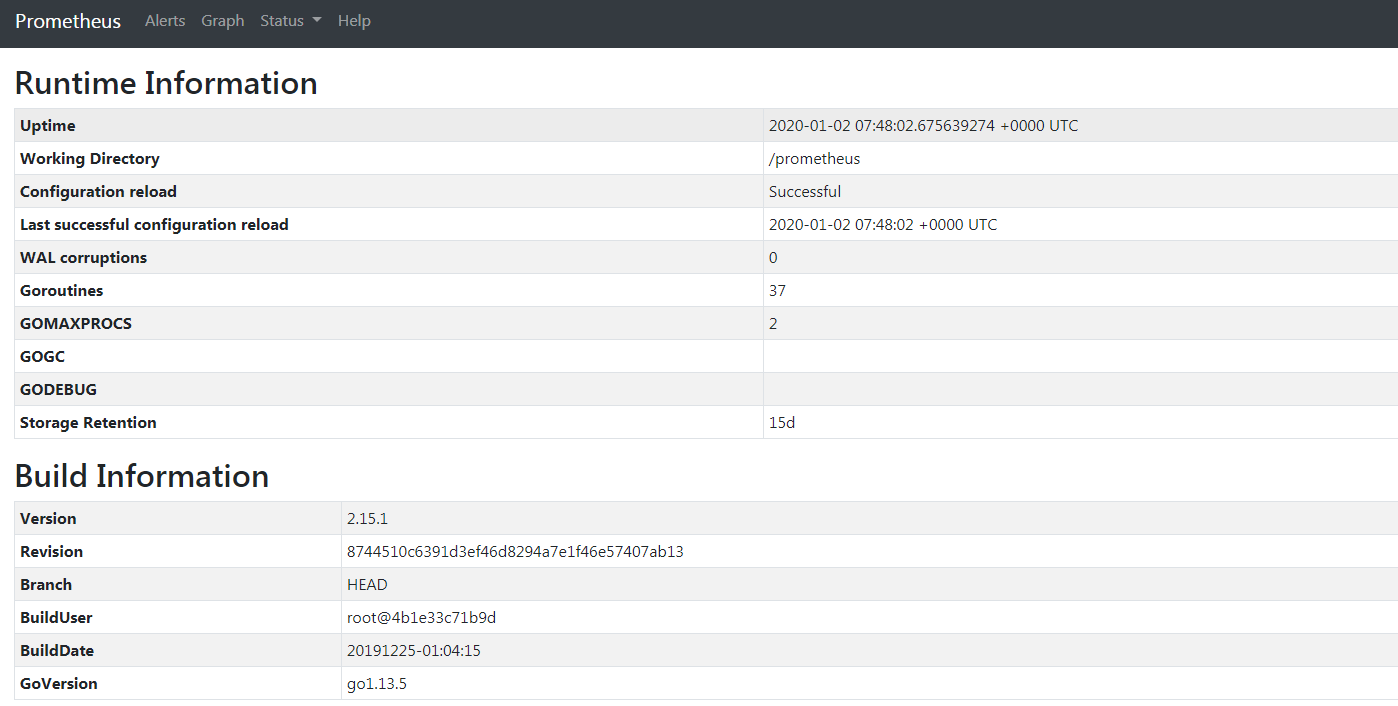
status: 查看当前运行环境
Runtime Information: 运行状态
Command-Line Flags: 命令行日志
Configuration: 配置信息
rules: 角色,定义监控指标的告警规则
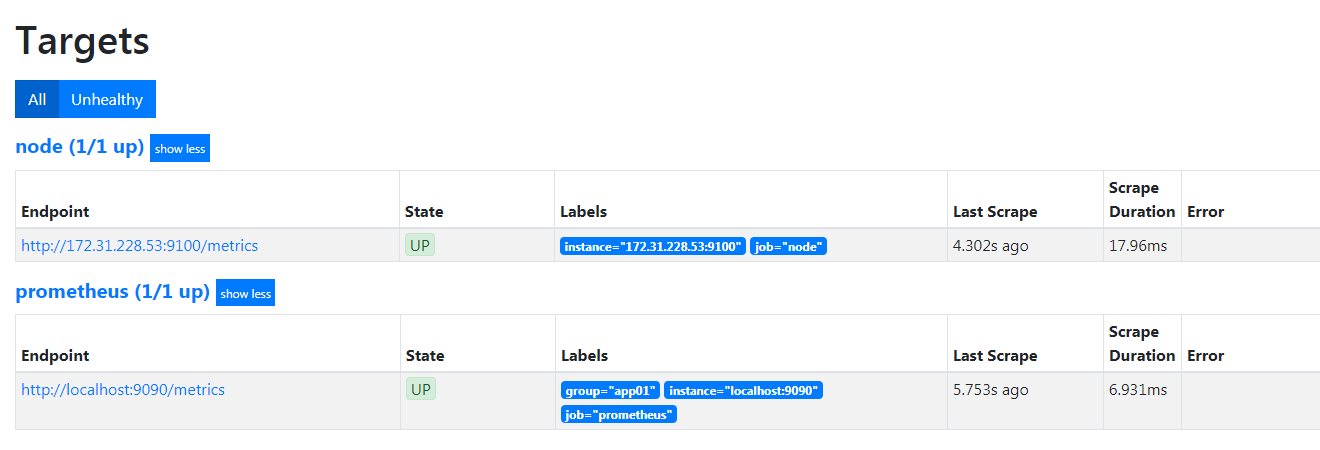
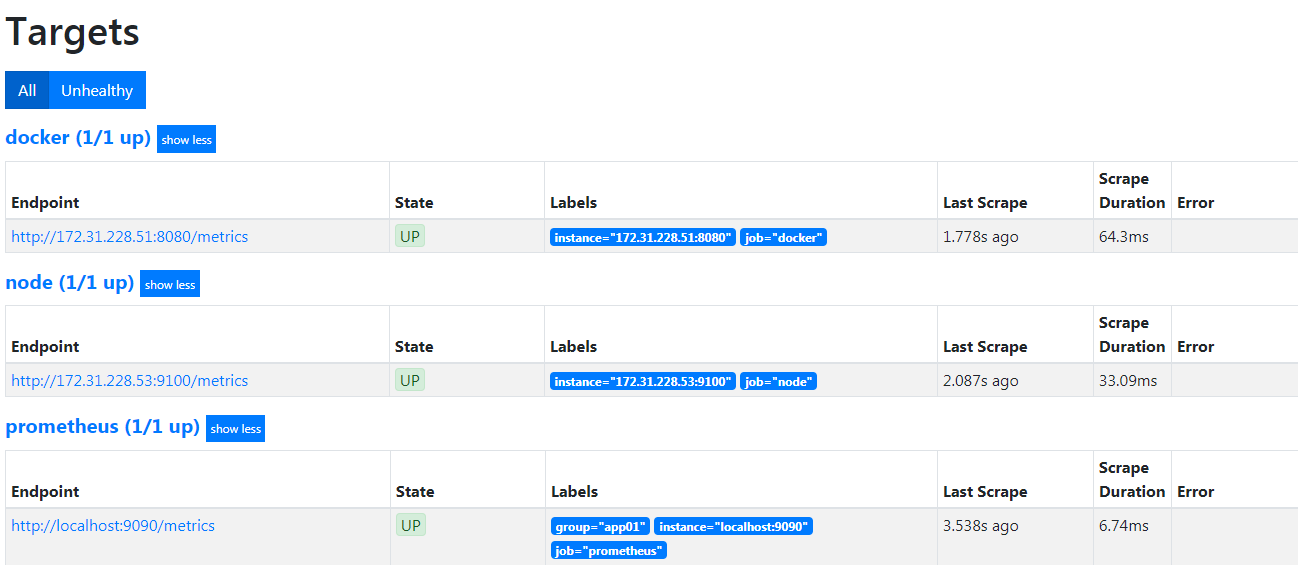
Targets: 当前被纳入监控的主机信息
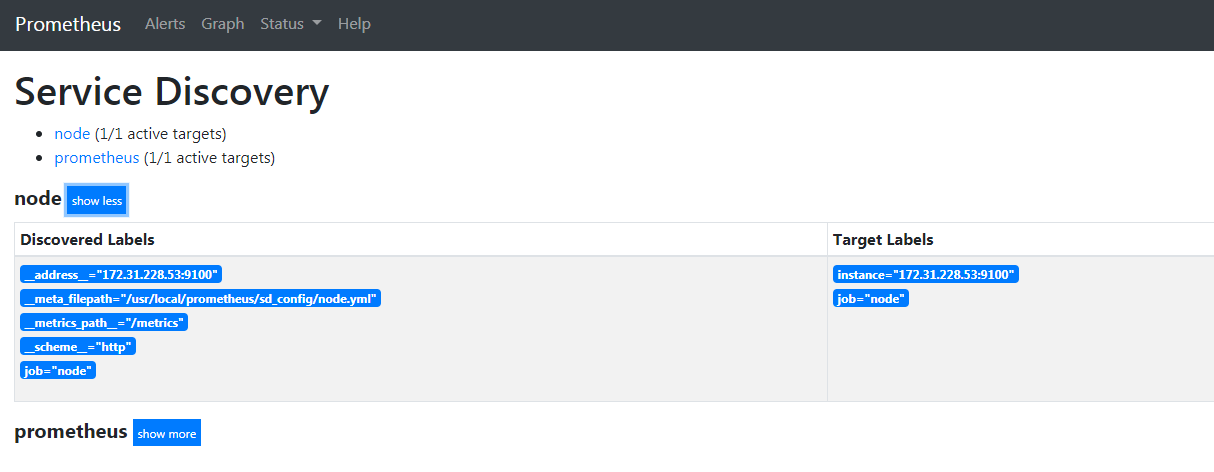
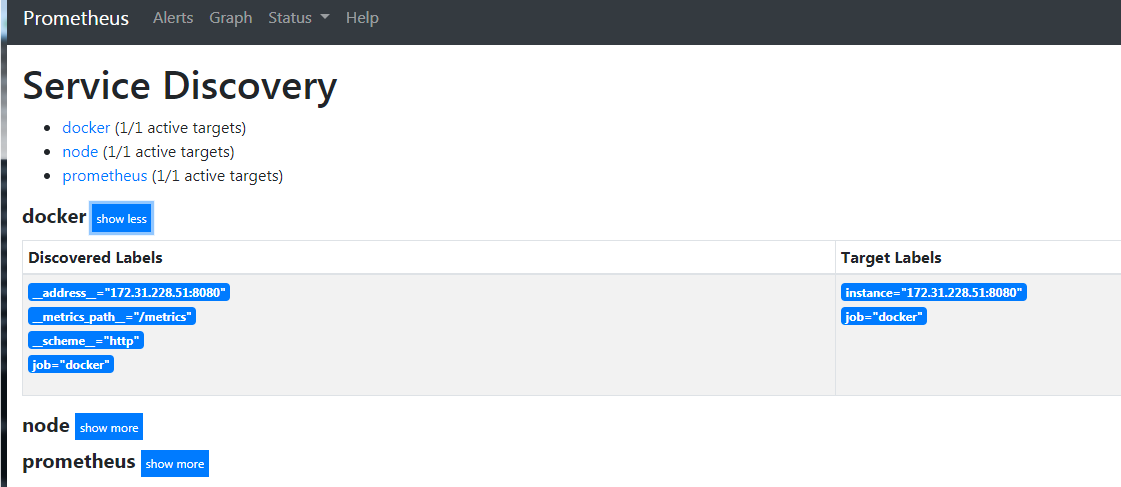
Service Discovery: 服务发现,动态配置监控目标

配置系统服务管理

systemd服务管理配置文件

1
2
3
4
5
6
7
8
9
10
11
12
13
14
15
[root@k8s-master2 ~]# cd /usr/lib/systemd/system
[root@k8s-master2 system]# cp sshd.service prometheus.service

[root@k8s-master2 system]# vim prometheus.service

[Unit]
Description=prometheus server daemon

[Service]
Restart=on-failure
ExecStart=/usr/local/prometheus/prometheus --config.file=/usr/local/prometheus/prometheus.yml

[Install]
WantedBy=multi-user.target
~
1
2
3
4
5
6
7
8
9
10
[root@k8s-master2 system]# systemctl start prometheus

[root@k8s-master2 system]# ps -ef|grep prometheus
root 8472 1 1 15:22 ? 00:00:00 /usr/local/prometheus/prometheus --config.file=/usr/local/prometheus/prometheus.yml
root 8670 23429 0 15:22 pts/1 00:00:00 grep --color=auto prometheus

[root@k8s-master2 system]# systemctl stop prometheus

[root@k8s-master2 system]# ps -ef|grep prometheus
root 8788 23429 0 15:22 pts/1 00:00:00 grep --color=auto prometheus

Prometheus Docker部署

Docker部署:

1
2
https://prometheus.io/docs/prometheus/latest/installation/
1. 确保服务端主机安装了docker服务
1
2
3
4
5
6
7
8
9
# 使用刚才二进制部署的配置文件挂载到容器中 
docker run \
-p 9090:9090 \
-v /usr/local/prometheus/prometheus.yml:/etc/prometheus/prometheus.yml \
prom/prometheus

[root@k8s-master2 system]# docker ps
CONTAINER ID IMAGE COMMAND CREATED STATUS PORTS NAMES
f71fadc4fbdb prom/prometheus "/bin/prometheus --c…" 4 seconds ago Up 3 seconds 0.0.0.0:9090->9090/tcp mystifying_zhukovsky
1
2
3
# 容器放在后台运行 
[root@k8s-master2 prometheus]# docker run -d -p 9090:9090 -v /usr/local/prometheus/prometheus.yml:/etc/prometheus/prometheus.yml prom/prometheus
02941abc1d318c20965121803d096168a4846994733b9641b2e99c942f016b25

访问本机的监控指标

1
http://47.240.13.206:9090/metrics

Prometheus 配置文件与核心功能

全局配置文件介绍

1
2
# 官方说明
https://prometheus.io/docs/prometheus/latest/configuration/configuration/
1
2
3
4
5
6
7
8
9
10
11
12
13
14
15
16
17
18
19
20
21
22
23
24
25
26
27
28
29
30
31
32
33
34
35
36
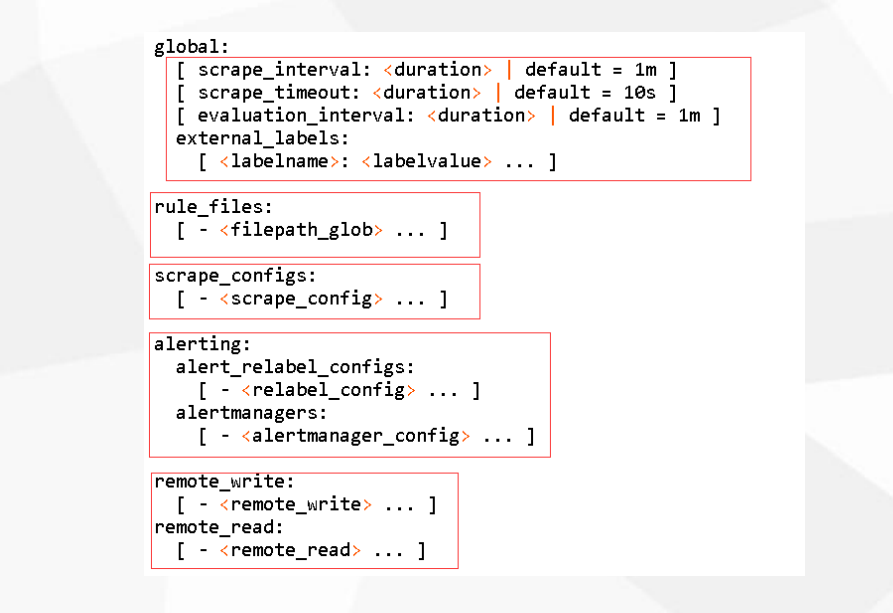
global:
# 采集被监控端数据的时间周期(间隔),默认1分钟
[ scrape_interval: <duration> | default = 1m ]

# 请求metrics的超时时间,默认10秒
[ scrape_timeout: <duration> | default = 10s ]

# 告警评估周期,默认1分钟,执行 rules 的时间间隔。
[ evaluation_interval: <duration> | default = 1m ]

# 额外的属性,会添加到拉取的数据并存到数据库中。
external_labels:
[ <labelname>: <labelvalue> ... ]

# 监控告警规则
rule_files:
[ - <filepath_glob> ... ]

# 配置被监控端指标
scrape_configs:
[ - <scrape_config> ... ]

# 告警配置
alerting:
alert_relabel_configs:
[ - <relabel_config> ... ]
alertmanagers:
[ - <alertmanager_config> ... ]

# 远程存储 write
remote_write:
[ - <remote_write> ... ]

# 远程存储 read
remote_read:
[ - <remote_read> ... ]

配置采集目标 scrape_configs

1
2
3
参考:
https://www.jianshu.com/p/fb5c82de935d
https://prometheus.io/docs/prometheus/latest/configuration/configuration/#job_name
1
2
3
4
5
6
7
8
9
10
11
12
13
14
15
16
17
18
19
20
21
22
23
24
25
26
27
28
29
30
31
32
33
34
35
36
37
38
39
40
41
42
43
44
45
46
47
48
49
50
51
52
53
54
55
56
57
58
59
60
61
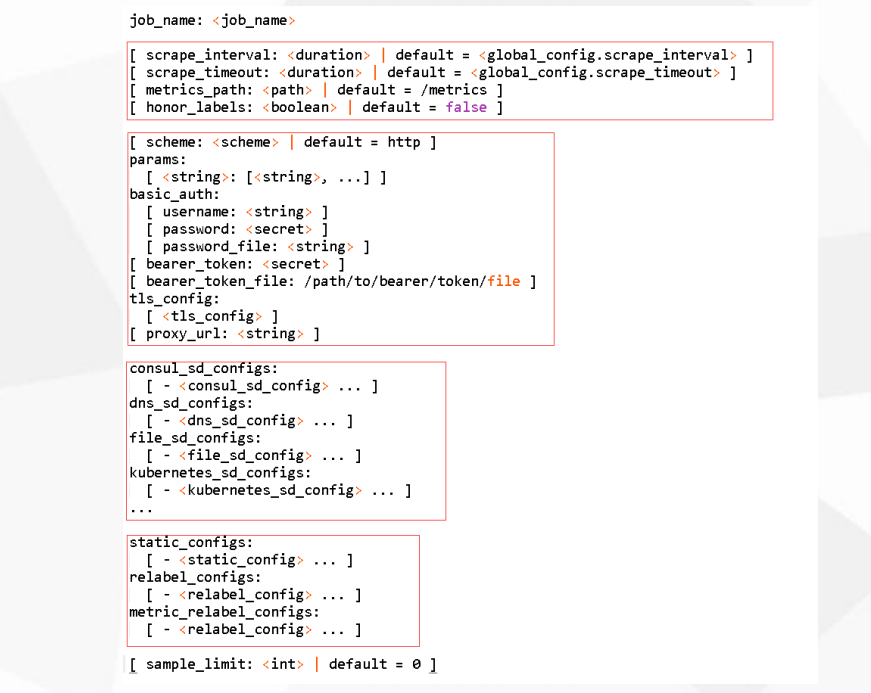
# 作业
job_name: <job_name>
- job_name: 'prometheus'

# job作业的采集时间间隔,默认使用全局配置
[ scrape_interval: <duration> | default = <global_config.scrape_interval> ]
# 抓取此job时,每次抓取超时时间,默认使用全局配置
[ scrape_timeout: <duration> | default = <global_config.scrape_timeout> ]
# 从目标获取指标的HTTP资源路径, 默认是/metrics
[ metrics_path: <path> | default = /metrics ]
# 不覆盖采集标签
[ honor_labels: <boolean> | default = false ]

# 配置用于请求的协议方案,采集目标 是 http 还是https
[ scheme: <scheme> | default = http ]

# 可选的HTTP URL参数.
params:
[ <string>: [<string>, ...] ]
# 基础认证,访问监控端的用户名和密码, password和password_file是互斥的。
basic_auth:
[ username: <string> ]
[ password: <secret> ]
[ password_file: <string> ]
# token 认证
[ bearer_token: <secret> ]
# 配置scrape请求的TLS设置 https证书
tls_config:
[ <tls_config> ]
# 可选的代理URL.可选的代理URL.
[ proxy_url: <string> ]

# 服务发现配置列表 consul
consul_sd_configs:
[ - <consul_sd_config> ... ]
# 服务发现配置列表 DNS
dns_sd_configs:
[ - <dns_sd_config> ... ]
# 服务发现配置列表 k8s
kubernetes_sd_configs:
[ - <kubernetes_sd_config> ... ]
# 服务发现配置列表 文件
file_sd_configs:
[ - <file_sd_config> ... ]
...


# 静态配置被监控端
static_configs:
[ - <static_config> ... ]
# 在数据采集之前对标签进行重新标记
relabel_configs:
[ - <relabel_config> ... ]
# 在数据采集之后重新标记
metric_relabel_configs:
[ - <relabel_config> ... ]

# 对每个将被接受的样本数量的每次抓取限制。
# 如果在度量重新标记后存在超过此数量的样本,则整个抓取将被视为失败。 0表示没有限制。
[ sample_limit: <int> | default = 0 ]
...

重新标记 relabel_configs

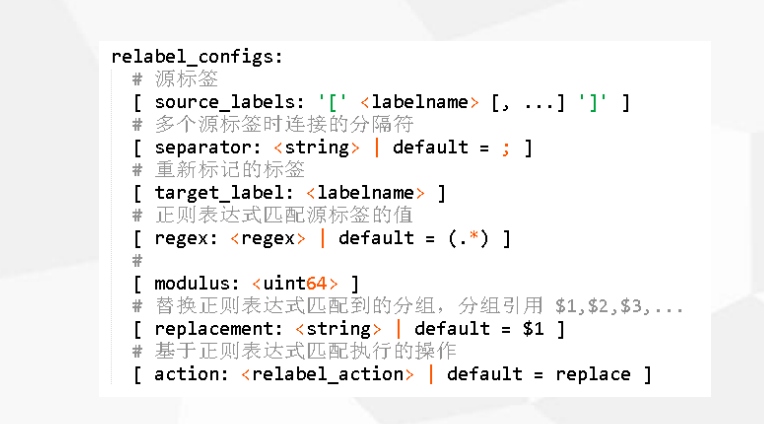
  1. relabel_configs :允许在采集之前对任何目标及其标签进行修改
  2. 重新标签的意义? 优化标签
    • 重命名标签名
    • 删除标签
    • 过滤目标

relabel_configs 配置选项

1
2
3
4
5
6
7
8
9
10
11
12
13
14
15
16
17
18
19
20
21
# 源标签
[ source_labels: '[' <labelname> [, ...] ']' ]

# 分隔符放置在连接的源标签值之间。
[ separator: <string> | default = ; ]

# 重新标记的标签
# 替换操作是强制性的。 正则表达式捕获组可用。
[ target_label: <labelname> ]

# 正则表达式匹配源标签的值
[ regex: <regex> | default = (.*) ]

# 采用源标签值的散列的模数。
[ modulus: <uint64> ]

# 如果正则表达式匹配,则执行正则表达式替换的替换值。 正则表达式捕获组可用。
[ replacement: <string> | default = $1 ]

# 基于正则表达式匹配执行的操作。
[ action: <relabel_action> | default = replace ]#

实例,查看一组服务器的cpu使用率

根据标签聚合

1
2
3
# 用户和系统CPU花费的时间 
# 度量指标名称
process_cpu_seconds_total

增加一组服务器机房标签

1
2
3
4
5
6
7
8
9
10
11
12
13
14
15
16
17
18
19
20
21
22
23
24
25
26
27
28
29
30
31
# 比如通过idc区分机房
# 增加标签

[root@k8s-master2 prometheus]# vim prometheus.yml
scrape_configs:
# The job name is added as a label `job=<job_name>` to any timeseries scraped from this config.
- job_name: 'prometheus'

# metrics_path defaults to '/metrics'
# scheme defaults to 'http'.
# 监控实例 本机:9090 启动服务后监听9090端口
static_configs:
- targets: ['localhost:9090']
# 实例新增标签
labels:
idc: bj


# 检查配置文件语法
[root@k8s-master2 prometheus]# ./promtool check config prometheus.yml
Checking prometheus.yml
SUCCESS: 0 rule files found


# 热更新
[root@k8s-master2 prometheus]# ps -ef|grep prometheus
root 15513 1 0 17:03 ? 00:00:02 /usr/local/prometheus/prometheus --config.file=/usr/local/prometheus/prometheus.yml
root 15573 2714 0 18:01 pts/0 00:00:00 grep --color=auto prometheus
[root@k8s-master2 prometheus]# kill -hup 15513

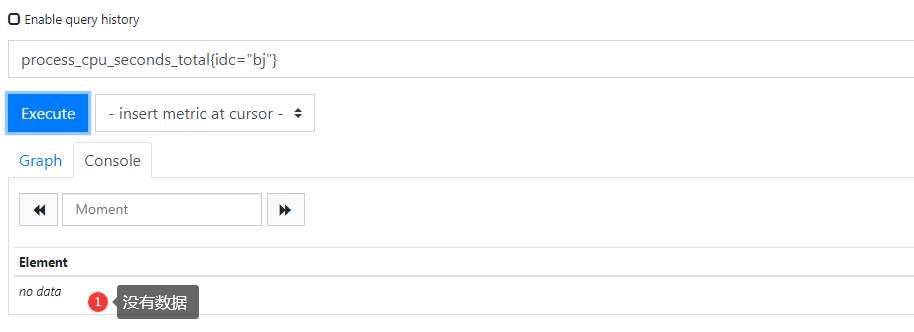
# 有了这标签之后,不同机房的服务器就可以按照IDC分组查询数据了,相当于mysql表中的一个字段,用来增加维度

通过聚合函数 + 标签查询数据

1
2
# 就可以聚合所有idc=bj标签的实例的cpu数据,然后在相加得到总数
sum(process_cpu_seconds_total{idc="bj"})

重命名标签

1
2
3
4
5
6
7
8
9
10
11
12
13
14
# 修改job_name的值
# prometheus 默认标记 instance="localhost:9090"(targets的值),job="prometheus"(job_name的值)
scrape_configs:
# The job name is added as a label `job=<job_name>` to any timeseries scraped from this config.
- job_name: 'bj'

# metrics_path defaults to '/metrics'
# scheme defaults to 'http'.
# 监控实例 本机:9090 启动服务后监听9090端口
static_configs:
- targets: ['localhost:9090']

[root@k8s-master2 prometheus]# kill -hup 15513
# 过一会采集生效

1
2
3
4
5
6
7
8
9
10
11
12
13
14
15
16
17
18
19
20
21
22
23
24
25
26
27
28
29
# 把job修改成idc 
# relabel重命名

[root@k8s-master2 prometheus]# vim prometheus.yml

scrape_configs:
# The job name is added as a label `job=<job_name>` to any timeseries scraped from this config.
- job_name: 'bj'

# metrics_path defaults to '/metrics'
# scheme defaults to 'http'.
# 监控实例 本机:9090 启动服务后监听9090端口
static_configs:
- targets: ['localhost:9090']
relabel_configs:
- action: replace
source_labels: ['job']
# 正则默认匹配所有
regex: (.*)
replacement: $1
# 赋予新的标签
target_label: idc

[root@k8s-master2 prometheus]# ./promtool check config prometheus.yml
[root@k8s-master2 prometheus]# kill -hup 15513

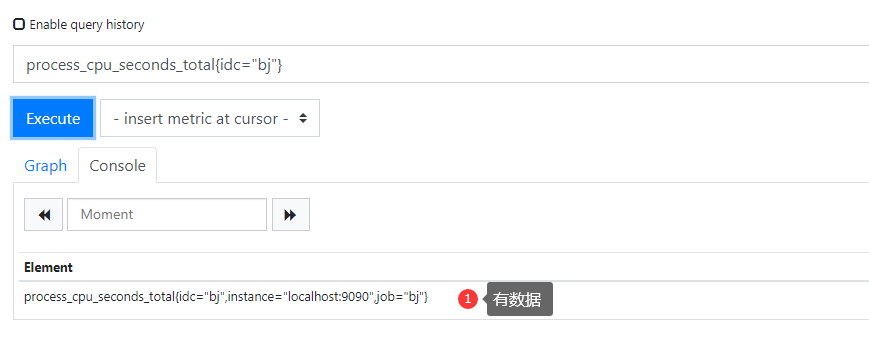
# job 标签并没有被删除,所以还是存在的
# 聚合查询
sum(process_cpu_seconds_total{idc="bj"})

根据标签过滤目标

1
2
3
4
5
6
7
8
9
# <relabel_action>确定要采取的重新签名行动:
replace: 将regex与连接的source_labels匹配。 然后,将target_label设置为replacement,将匹配组引用(${1},${2},...)替换为其值。 如果正则表达式不匹配,则不进行替换。
keep: 删除regex与连接的source_labels不匹配的目标。
drop: 删除regex与连接的source_labels匹配的目标。
hashmod: 将target_label设置为连接的source_labels的哈希模数。
labelmap: 将regex与所有标签名称匹配。 然后将匹配标签的值复制到替换时给出的标签名称,替换为匹配组引用(${1},{2},...)替换为其值。
labeldrop: 将regex与所有标签名称匹配。匹配的任何标签都将从标签集中删除。
labelkeep: 将regex与所有标签名称匹配。任何不匹配的标签都将从标签集中删除。
# 必须小心使用labeldrop和labelkeep,以确保在删除标签后仍然对指标进行唯一标记。
1
2
3
4
5
6
7
8
9
10
11
12
13
14
15
16
17
18
19
20
21
# drop 过滤匹配的标签,如果有这个标签,就不采集这个数据
scrape_configs:
# The job name is added as a label `job=<job_name>` to any timeseries scraped from this config.
- job_name: 'bj'

# metrics_path defaults to '/metrics'
# scheme defaults to 'http'.
# 监控实例 本机:9090 启动服务后监听9090端口
static_configs:
- targets: ['localhost:9090']
relabel_configs:
- action: replace
source_labels: ['job']
# 正则默认匹配所有
regex: (.*)
replacement: $1
# 赋予新的标签
target_label: idc
# 过滤标签,有job标签的实例就不采集数据
- action: drop
source_labels: ['job']

1
2
3
4
# keep 过滤匹配的标签,如果有这个标签,可以采集到数据
# 过滤标签,有job标签的实例采集数据
- action: keep
source_labels: ['job']

删除标签

1
2
3
labeldrop:  将regex与所有标签名称匹配。匹配的任何标签都将从标签集中删除。
labelkeep: 将regex与所有标签名称匹配。任何不匹配的标签都将从标签集中删除。
# 必须小心使用labeldrop和labelkeep,以确保在删除标签后仍然对指标进行唯一标记。
1
2
3
4
# 查询你到的数据将不会再有jop标签

- action: labeldrop
regex: job

1
2
3
4
5
6
7
8
9
10
11
12
13
14
15
16
17
18
19
20
21
22
23
# 测试的配置信息
scrape_configs:
# The job name is added as a label `job=<job_name>` to any timeseries scraped from this config.
- job_name: 'bj'

# metrics_path defaults to '/metrics'
# scheme defaults to 'http'.
# 监控实例 本机:9090 启动服务后监听9090端口
static_configs:
- targets: ['localhost:9090']
relabel_configs:
- action: replace
source_labels: ['job']
# 正则默认匹配所有
regex: (.*)
replacement: $1
# 赋予新的标签
target_label: idc
# 过滤标签,有job标签的实例采集数据
- action: keep
source_labels: ['job']
- action: labeldrop
regex: job

基于文件的服务发现

1
2
3
4
5
6
# 注释下我们的监控配置
# static_configs:
# - targets: ['localhost:9090']

[root@k8s-master2 prometheus]# kill -hup 1566
# 再查看监控目标,当前没有被监控的目标

1
2
3
4
5
6
7
8
9
10
11
12
13
14
15
# 通过服务发现的形式 加入
scrape_configs:
# The job name is added as a label `job=<job_name>` to any timeseries scraped from this config.
- job_name: 'prometheus'

# metrics_path defaults to '/metrics'
# scheme defaults to 'http'.
# 监控实例 本机:9090 启动服务后监听9090端口

file_sd_configs:
- files: ['/usr/local/prometheus/sd_config/*.yml']
# 检查刷新周期 5s读取配置文件
refresh_interval: 5s
# static_configs:
# - targets: ['localhost:9090']
1
2
3
4
5
6
7
8
# 创建目录和yml文件,*.yml可以匹配所有的yml文件
[root@k8s-master2 prometheus]# mkdir -p /usr/local/prometheus/sd_config/
[root@k8s-master2 prometheus]# cd /usr/local/prometheus/sd_config/
[root@k8s-master2 sd_config]# vim test.yml

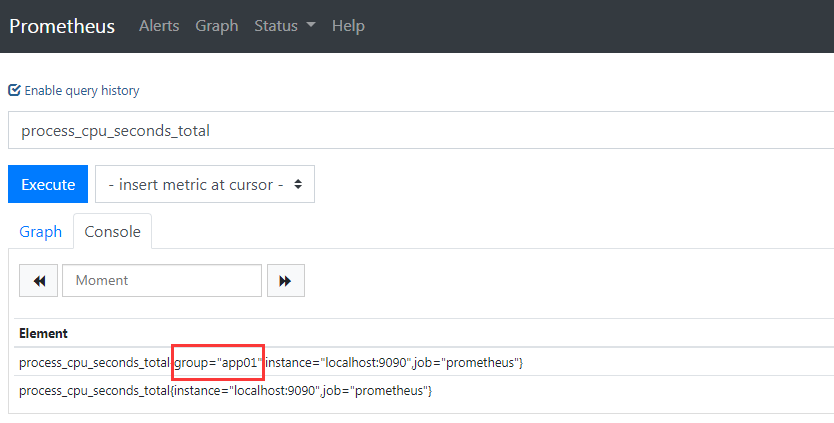
- targets: ['localhost:9090']
labels:
group: app01
1
2
3
4
5
6
# 检查语法并热加载
[root@k8s-master2 prometheus]# ./promtool check config prometheus.yml
Checking prometheus.yml
SUCCESS: 0 rule files found

[root@k8s-master2 prometheus]# kill -hup 1566

监控案例

监控 Linux 服务器

  1. node_exporter:用于*NIX系统监控,使用Go语言编写的收集器。
1
2
3
4
使用文档:https://prometheus.io/docs/guides/node-exporter/
GitHub:https://github.com/prometheus/node_exporter
exporter列表:https://prometheus.io/docs/instrumenting/exporters/
收集指标信息: https://github.com/prometheus/node_exporter

下载解压

1
2
3
4
5
6
7
8
9
10
11
12
13
14
# 在被监控的linux主机 下载 node_exporter
[root@k8s-node2 opt]# https://github.com/prometheus/node_exporter/releases/download/v0.18.1/node_exporter-0.18.1.linux-amd64.tar.gz

[root@k8s-node2 opt]# tar -zxvf node_exporter-0.18.1.linux-amd64.tar.gz
[root@k8s-node2 opt]# mv node_exporter-0.18.1.linux-amd64 /usr/local/node_exporter
[root@k8s-node2 opt]# cd /usr/local/node_exporter

[root@k8s-node2 node_exporter]# ls -l
total 16500
-rw-r--r-- 1 3434 3434 11357 Jun 5 2019 LICENSE
-rwxr-xr-x 1 3434 3434 16878582 Jun 5 2019 node_exporter # 收集器 go语言编写
-rw-r--r-- 1 3434 3434 463 Jun 5 2019 NOTICE

[root@k8s-node2 node_exporter]# ./node_exporter --help

配置系统服务

1
2
3
4
5
6
7
8
9
10
11
12
13
14
15
16
17
18
[root@k8s-node2 node_exporter]# vim /usr/lib/systemd/system/node_exporter.service

[Unit]
Description=node_exporter server daemon

[Service]
Restart=on-failure
ExecStart=/usr/local/node_exporter/node_exporter

[Install]
WantedBy=multi-user.target

[root@k8s-node2 node_exporter]# systemctl daemon-reload
[root@k8s-node2 node_exporter]# ps -ef|grep node_exporter
root 9809 1 0 09:17 ? 00:00:00 /usr/local/node_exporter/node_exporter

[root@k8s-node2 node_exporter]# netstat -tnlp|grep 9100
tcp6 0 0 :::9100 :::* LISTEN 9809/node_exporter

查看暴露的接口

1
2
# node_exporter服务会暴露metrics 
http://47.240.1.178:9100/metrics

配置prometheus监控该实例

1
2
3
4
5
6
7
8
9
10
11
12
13
14
15
16
17
18
19
20
21
22
# 配置一个新的job,并使用服务发现

scrape_configs:
# The job name is added as a label `job=<job_name>` to any timeseries scraped from this config.
- job_name: 'prometheus'

# metrics_path defaults to '/metrics'
# scheme defaults to 'http'.
# 监控实例 本机:9090 启动服务后监听9090端口

file_sd_configs:
- files: ['/usr/local/prometheus/sd_config/*.yml']
# 检查周期
refresh_interval: 5s
# static_configs:
# - targets: ['localhost:9090']

- job_name: 'node'
# 服务发现
file_sd_configs:
- files: ['/usr/local/prometheus/sd_config/*.yml']
refresh_interval: 5s
1
2
3
4
5
6
7
8
9
10
11
[root@k8s-master2 prometheus]# vim sd_config/node.yml

- targets:
- 172.31.228.53:9100

[root@k8s-master2 prometheus]# ./promtool check config prometheus.yml

[root@k8s-master2 prometheus]# ps -ef|grep prometheus
root 1574 1 0 08:56 ? 00:00:03 /usr/local/prometheus/prometheus --config.file=/usr/local/prometheus/prometheus.yml
root 1658 1549 0 09:27 pts/0 00:00:00 grep --color=auto prometheus
[root@k8s-master2 prometheus]# kill -hup 1574

总结

1
2
3
# 增加一个node_exporter监控linux服务器:
1. 在被监控端安装node_exporter 并启动
2. 在服务端配置job和服务发现,配置新实例

PromSQL 获取CPU,内存,硬盘使用率

1
2
3
4
5
6
CPU使用率:
100 - (avg(irate(node_cpu_seconds_total{mode="idle"}[5m])) by (instance) * 100)
内存使用率:
100 - (node_memory_MemFree_bytes+node_memory_Cached_bytes+node_memory_Buffers_bytes) / node_memory_MemTotal_bytes * 100
磁盘使用率:
100 - (node_filesystem_free_bytes{mountpoint="/",fstype=~"ext4|xfs"} / node_filesystem_size_bytes{mountpoint="/",fstype=~"ext4|xfs"} * 100)

CPU使用率

1
2
3
4
5
6
7
8
9
10
11
12
13
14
15
16
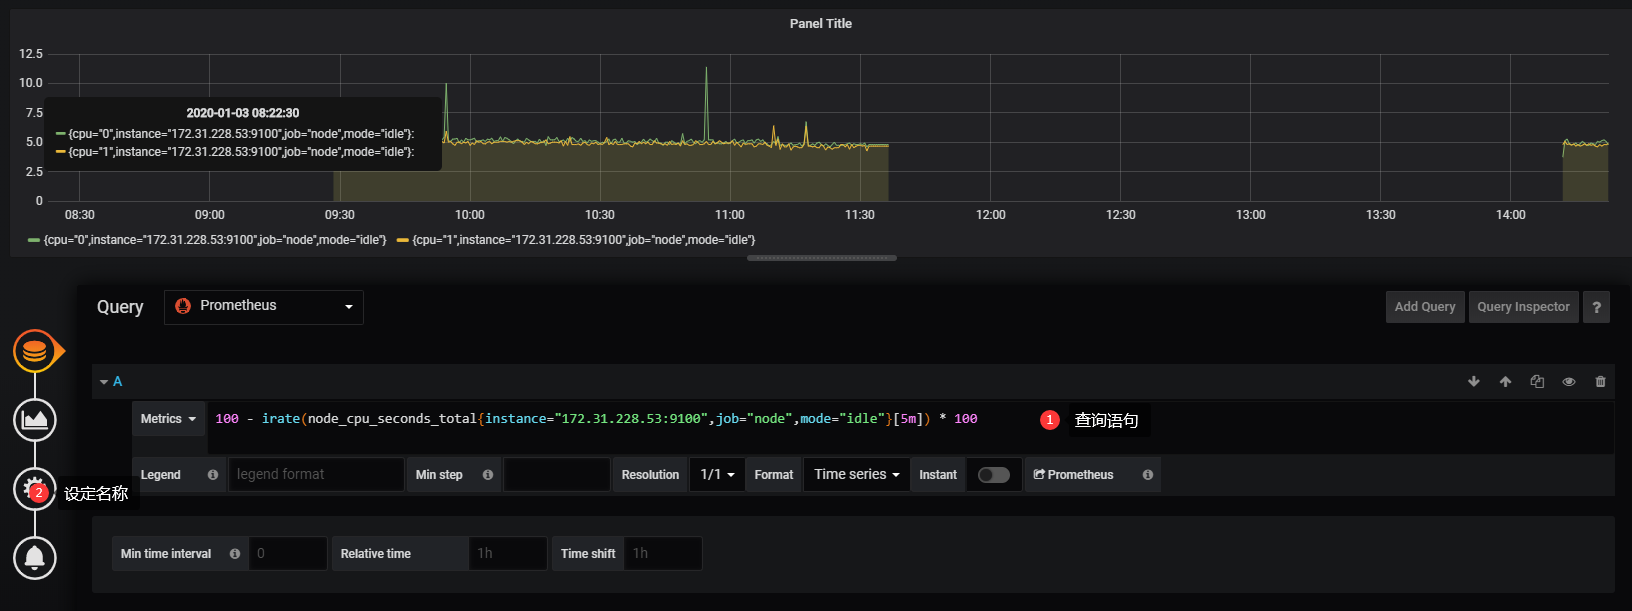
100 - 服务器所有cpu的空闲率 = cpu的使用率
# 语句编写1 先收集 172.31.228.53 的所有cpu idle值
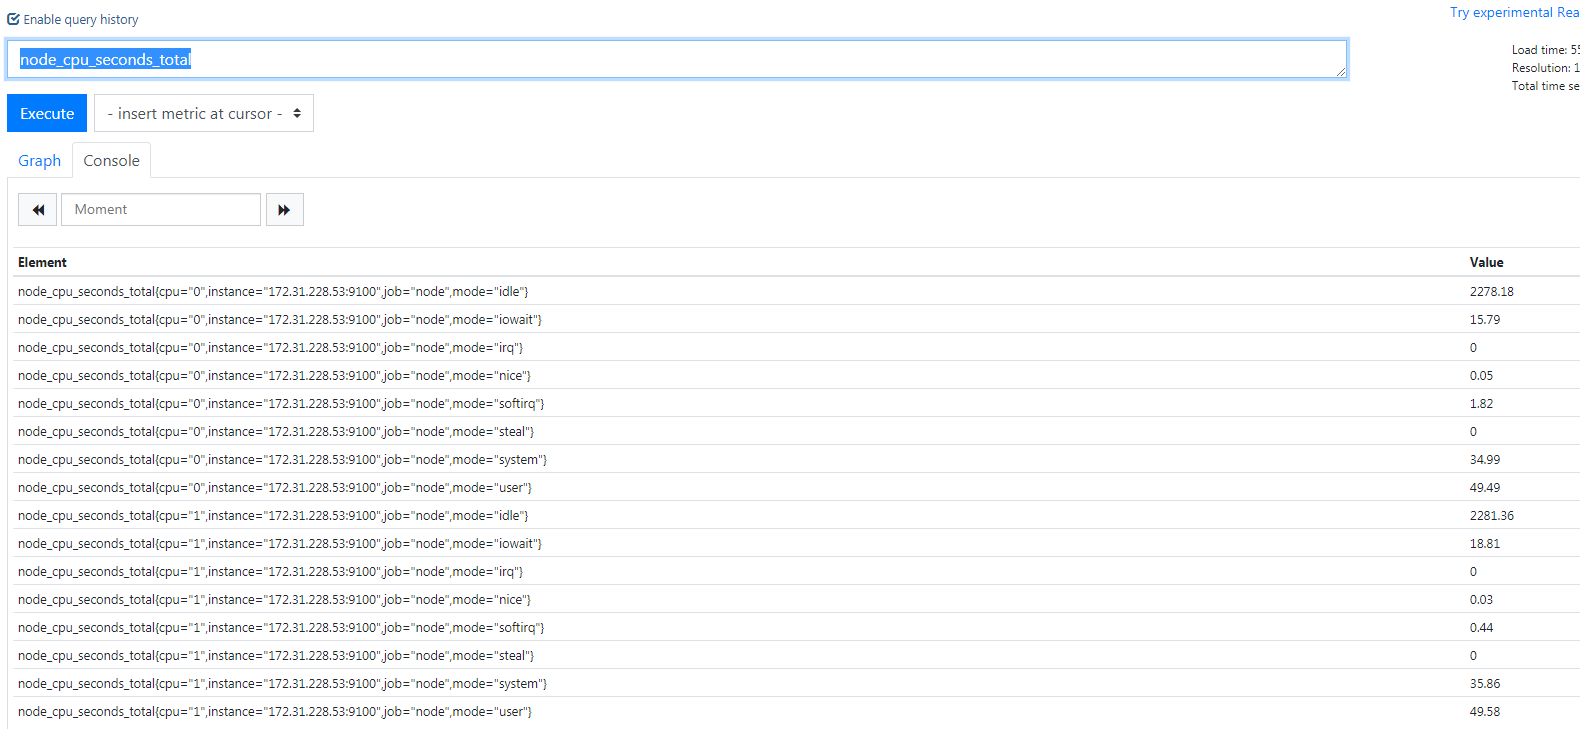
node_cpu_seconds_total{instance="172.31.228.53:9100",job="node",mode="idle"}
# 不统计瞬间,而是使用范围区间去统计
# 统计变化大的数据 需要加时间范围
# 范围向量选择器 []

# 语句编写2 5分钟之内的数据
node_cpu_seconds_total{instance="172.31.228.53:9100",job="node",mode="idle"}[5m]

# 语句编写3 irate 取的是在指定时间范围内的最近两个数据点 来算速率 * 100 得到百分比
irate(node_cpu_seconds_total{instance="172.31.228.53:9100",job="node",mode="idle"}[5m]) * 100

# 语句编写4 100 - 剩余的 就是使用的
# 这个实例在5分钟之内cpu 使用率的 百分比
100 - irate(node_cpu_seconds_total{instance="172.31.228.53:9100",job="node",mode="idle"}[5m]) * 100

内存使用率

1
2
3
4
5
6
7
8
# 剩余内存的统计 =  剩余内存free + 缓存buff/cache   
# node_memory_MemFree_bytes+node_memory_Cached_bytes+node_memory_Buffers_bytes

# 剩余内存百分比 = (剩余内存free + 缓存buff/cache) / 内存总值 * 100
(node_memory_MemFree_bytes+node_memory_Cached_bytes+node_memory_Buffers_bytes) / node_memory_MemTotal_bytes * 100

# 内存使用率
100 - (node_memory_MemFree_bytes+node_memory_Cached_bytes+node_memory_Buffers_bytes) / node_memory_MemTotal_bytes * 100

磁盘使用率

1
2
3
4
5
6
7
8
# 使用正则排除不想统计的分区
node_filesystem_free_bytes{mountpoint="/",fstype=~"ext4|xfs"}

# 剩余百分比 = 磁盘剩余 / 磁盘总数
# 使用百分比 = 100 - 剩余百分比
100 - (node_filesystem_free_bytes{mountpoint="/",fstype=~"ext4|xfs"} / node_filesystem_size_bytes{mountpoint="/",fstype=~"ext4|xfs"} * 100)

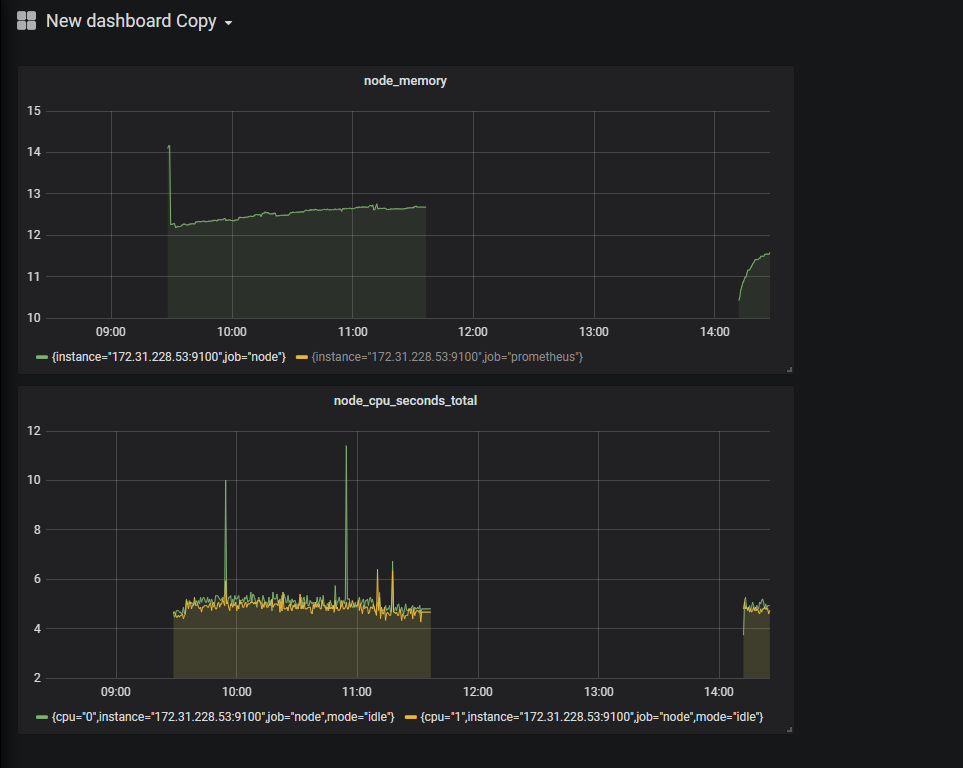
# 后续这些语句要接入 Grafana 中使用图形展示 数据

PromSQL 获取系统服务运行状态

1
2
3
使用systemd收集器,需要再服务启动时候增加参数 
--collector.systemd.unit-whitelist=".+" 从systemd中循环正则匹配单元
--collector.systemd.unit-whitelist="(docker|sshd|nginx).service" 白名单,收集目标
1
2
3
4
5
6
7
8
9
10
11
12
13
14

[root@k8s-node2 node_exporter]# vim /usr/lib/systemd/system/node_exporter.service
[Unit]
Description=node_exporter server daemon

[Service]
Restart=on-failure
ExecStart=/usr/local/node_exporter/node_exporter --collector.systemd --collector.systemd.unit-whitelist=(docker|kubelet|kube-proxy).service

[Install]
WantedBy=multi-user.target

[root@k8s-node2 node_exporter]# systemctl daemon-reload
[root@k8s-node2 node_exporter]# systemctl restart node_exporter
1
2
3
node_systemd_unit_state{name=“docker.service”}                # 只查询docker服务
node_systemd_unit_state{name=“docker.service”,state=“active”} # 返回活动状态,值是1
node_systemd_unit_state{name=“docker.service”} == 1 # 当前服务状态
1
2
3
node_systemd_unit_state{instance="172.31.228.53:9100",job="node",name="docker.service"}
node_systemd_unit_state{instance="172.31.228.53:9100",job="node",name="docker.service"} ==1
node_systemd_unit_state{instance="172.31.228.53:9100",job="node"} == 1

Grafana 与 Prometheus 集成

  1. Grafana是一个开源的度量分析和可视化系统
  2. 它本身不存储数据,只会展示数据库里面的数据
  3. 官网资料
1
2
https://grafana.com/grafana/download
https://grafana.com/dashboards/9276

Grafana 安装

1
2
# 容器安装
[root@k8s-master2 prometheus]# docker run -d --name=grafana -p 3000:3000 grafana/grafana
1
2
# web 默认用户名和密码 admin/admin 进去自己修改
http://47.240.13.206:3000/login

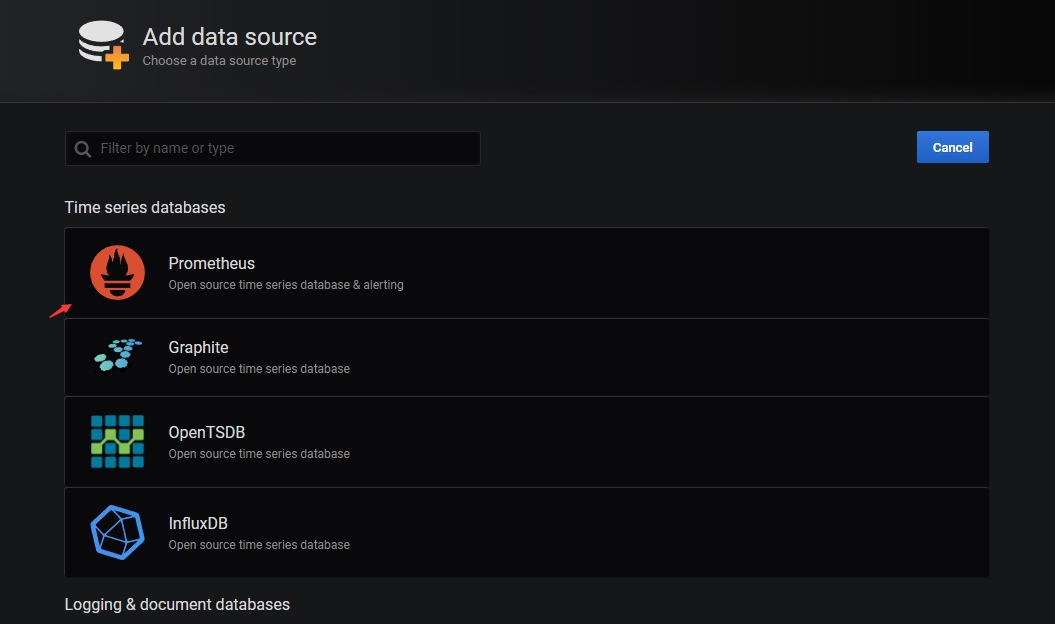
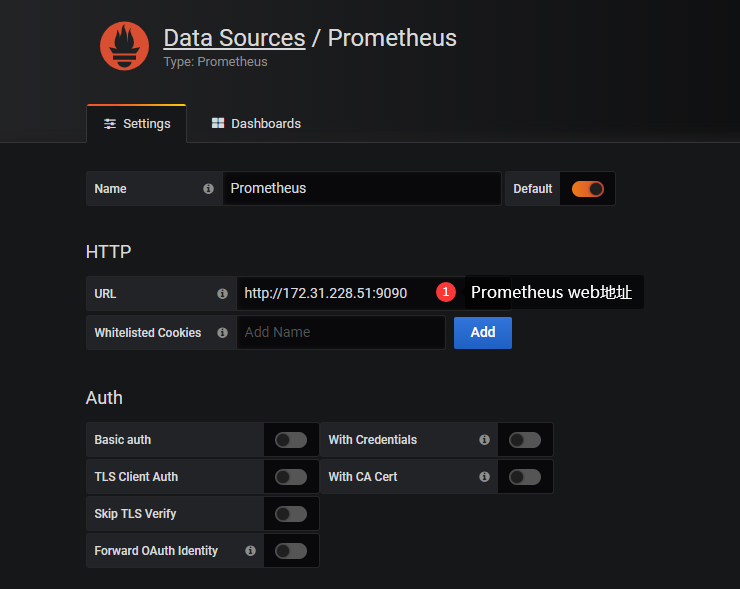
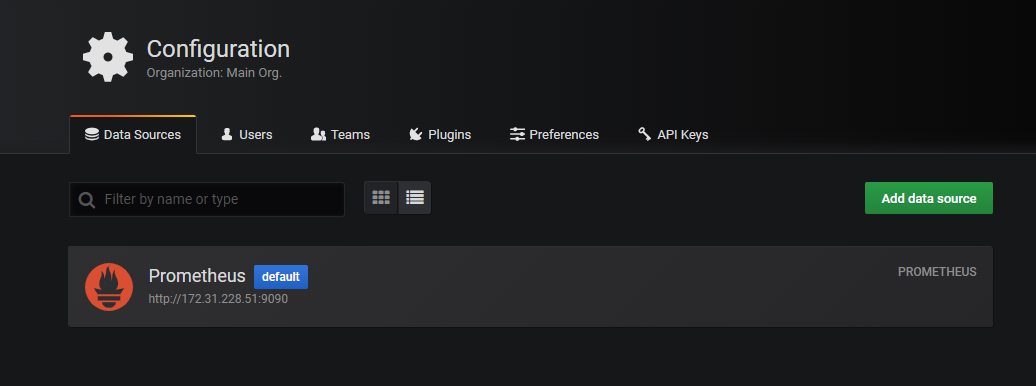
Grafana 添加数据源

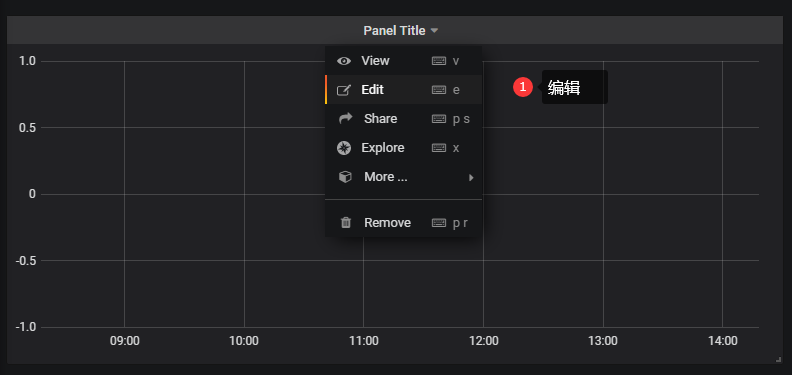
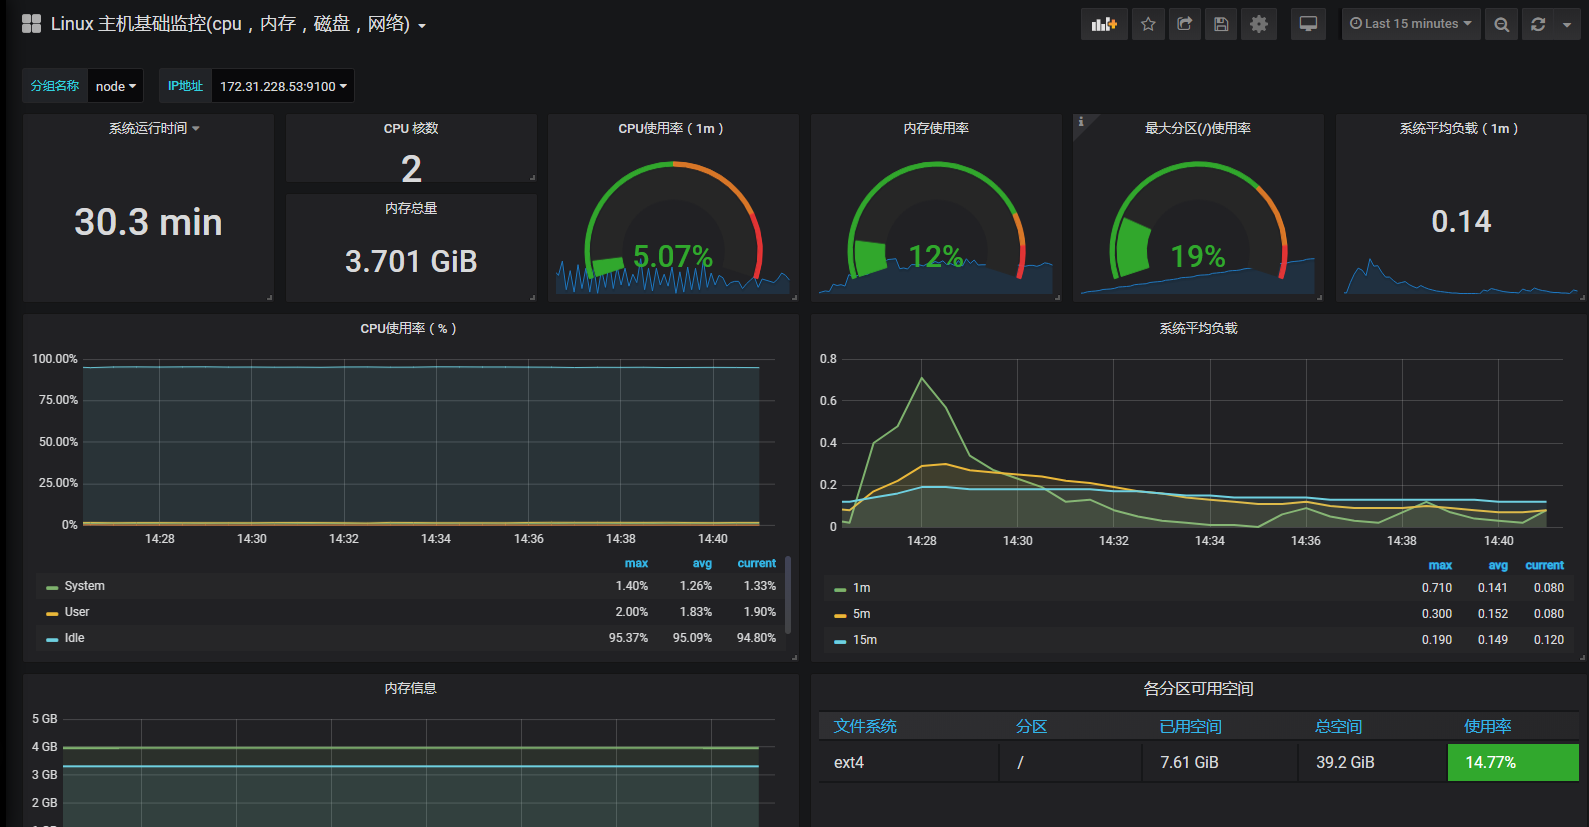
Grafana 可视化展示Linux资源使用率

自己添加数据
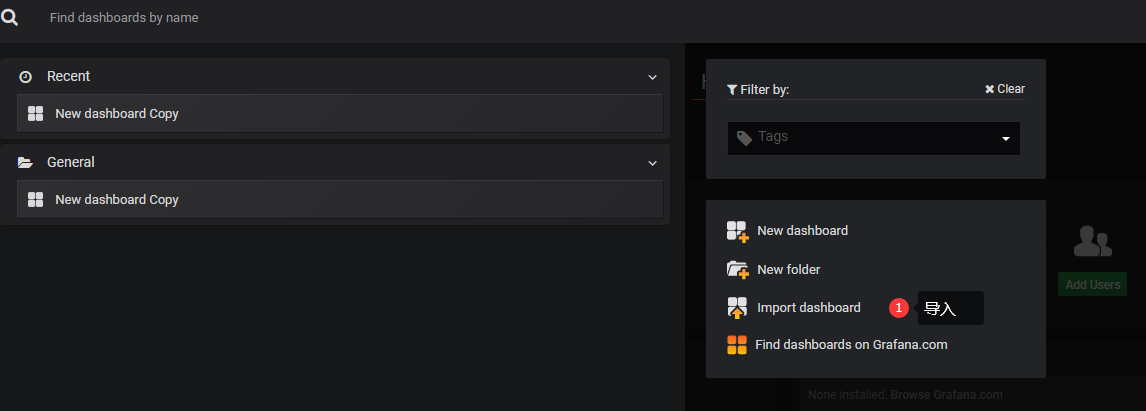
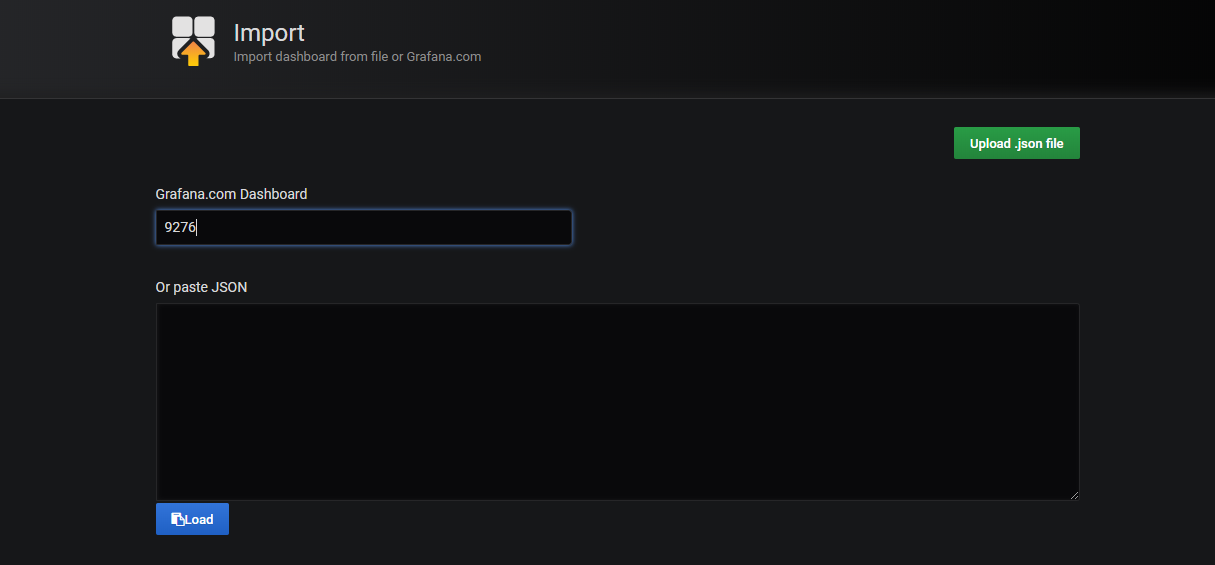
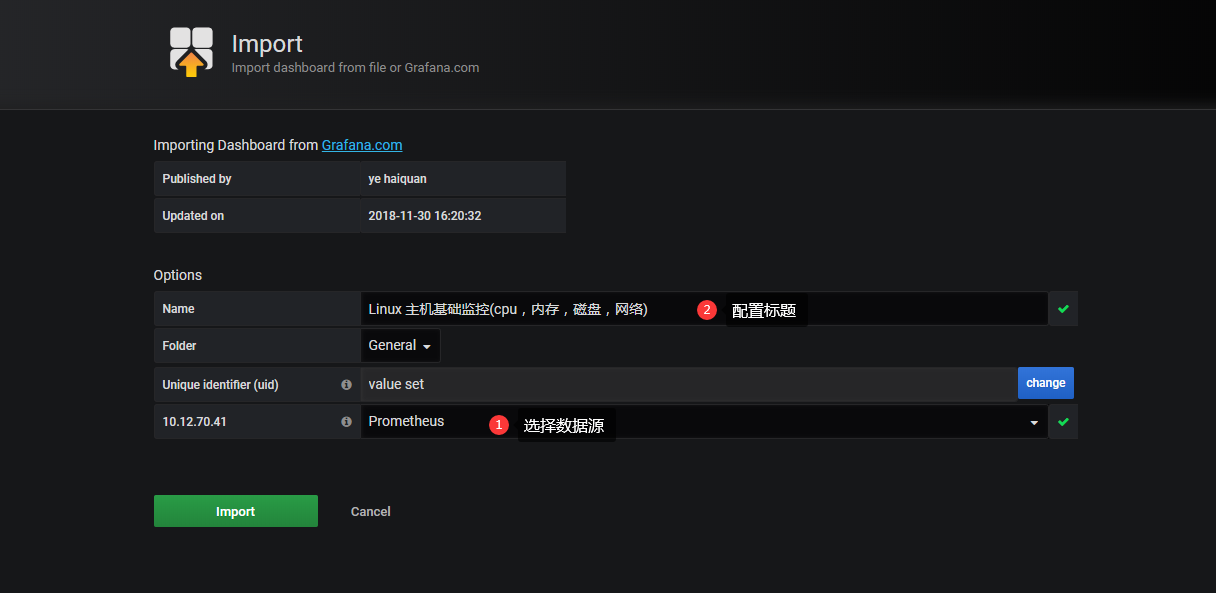
使用 grafana dashboard

1
2
3
4
# 别人绘制好的 我们拿来用
https://grafana.com/grafana/dashboards
# 要使用数据源相应的图表版本 比如含有 prometheus node_exporter
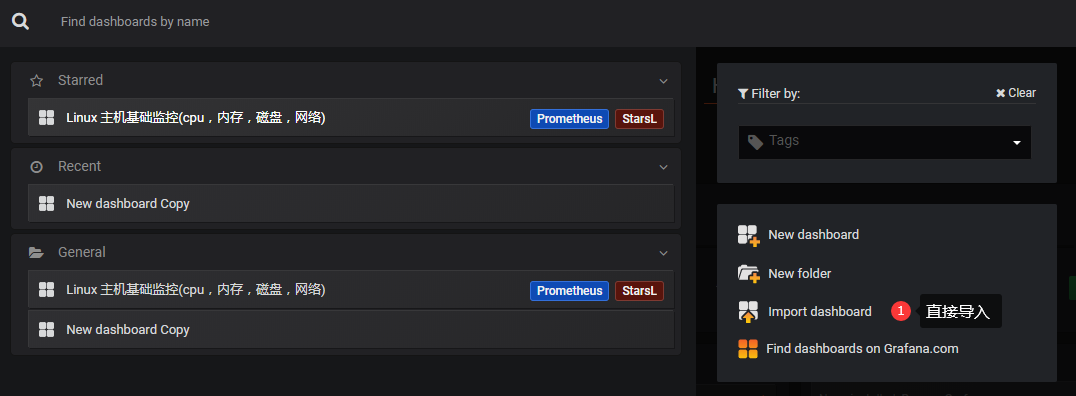
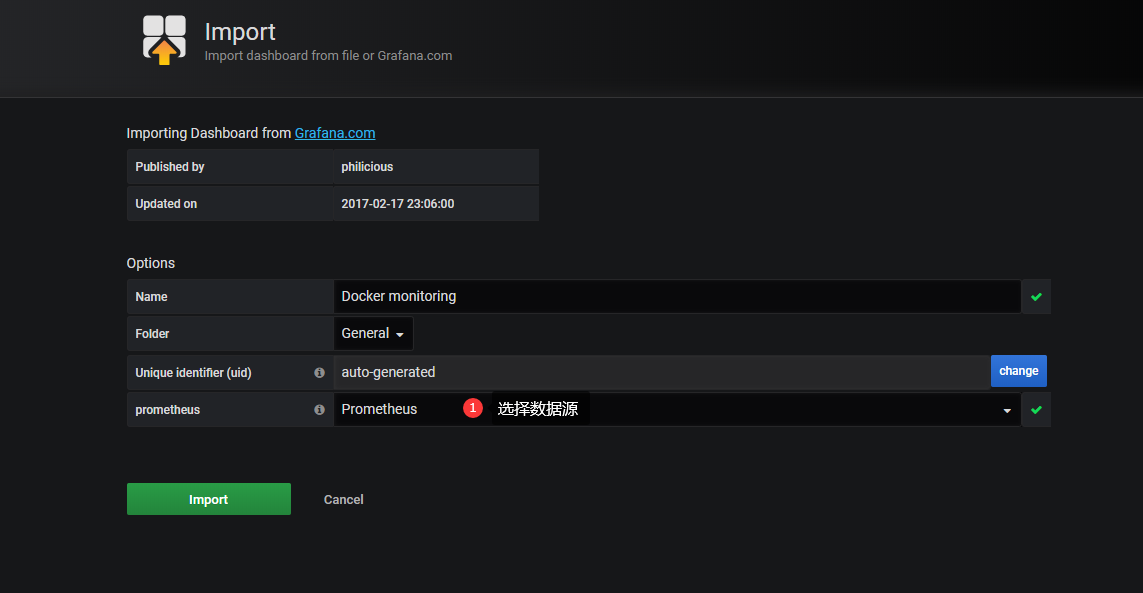
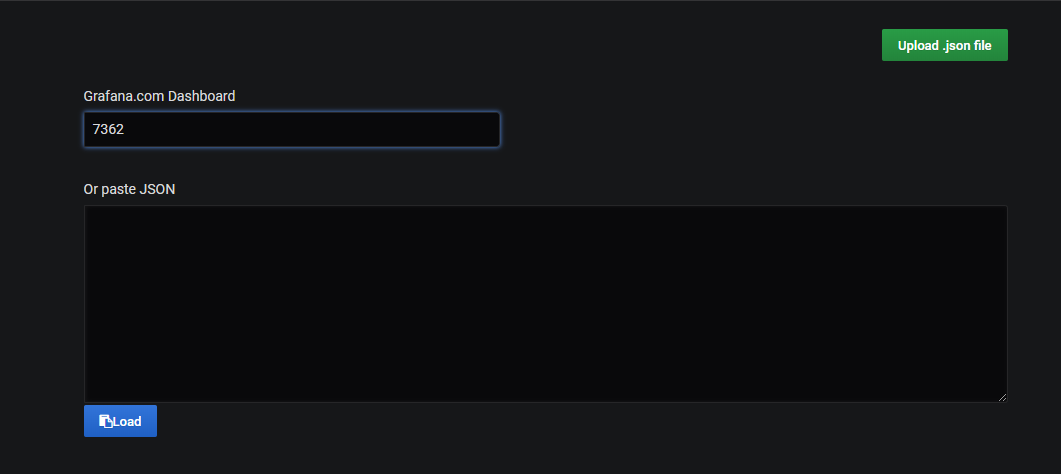
# 使用ID号码导入

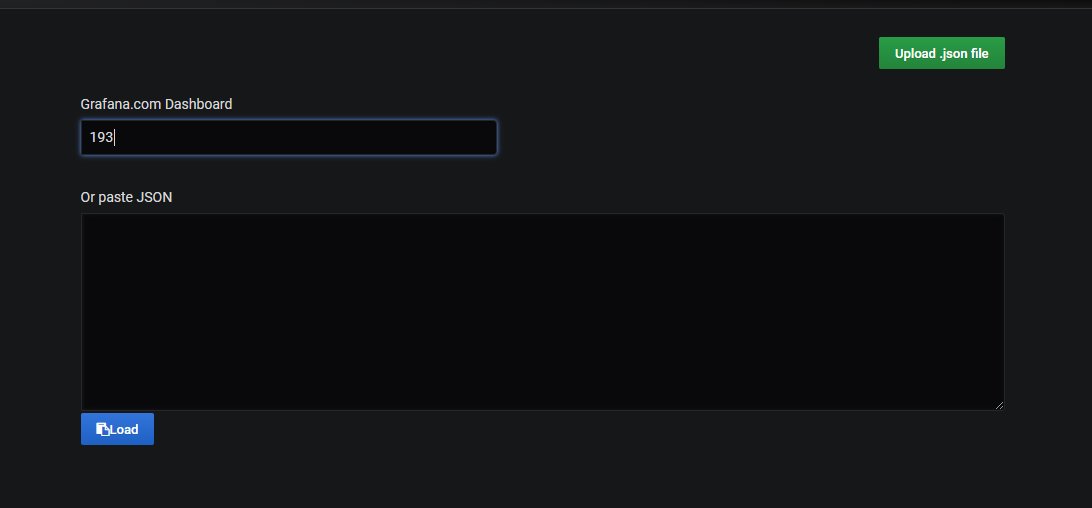
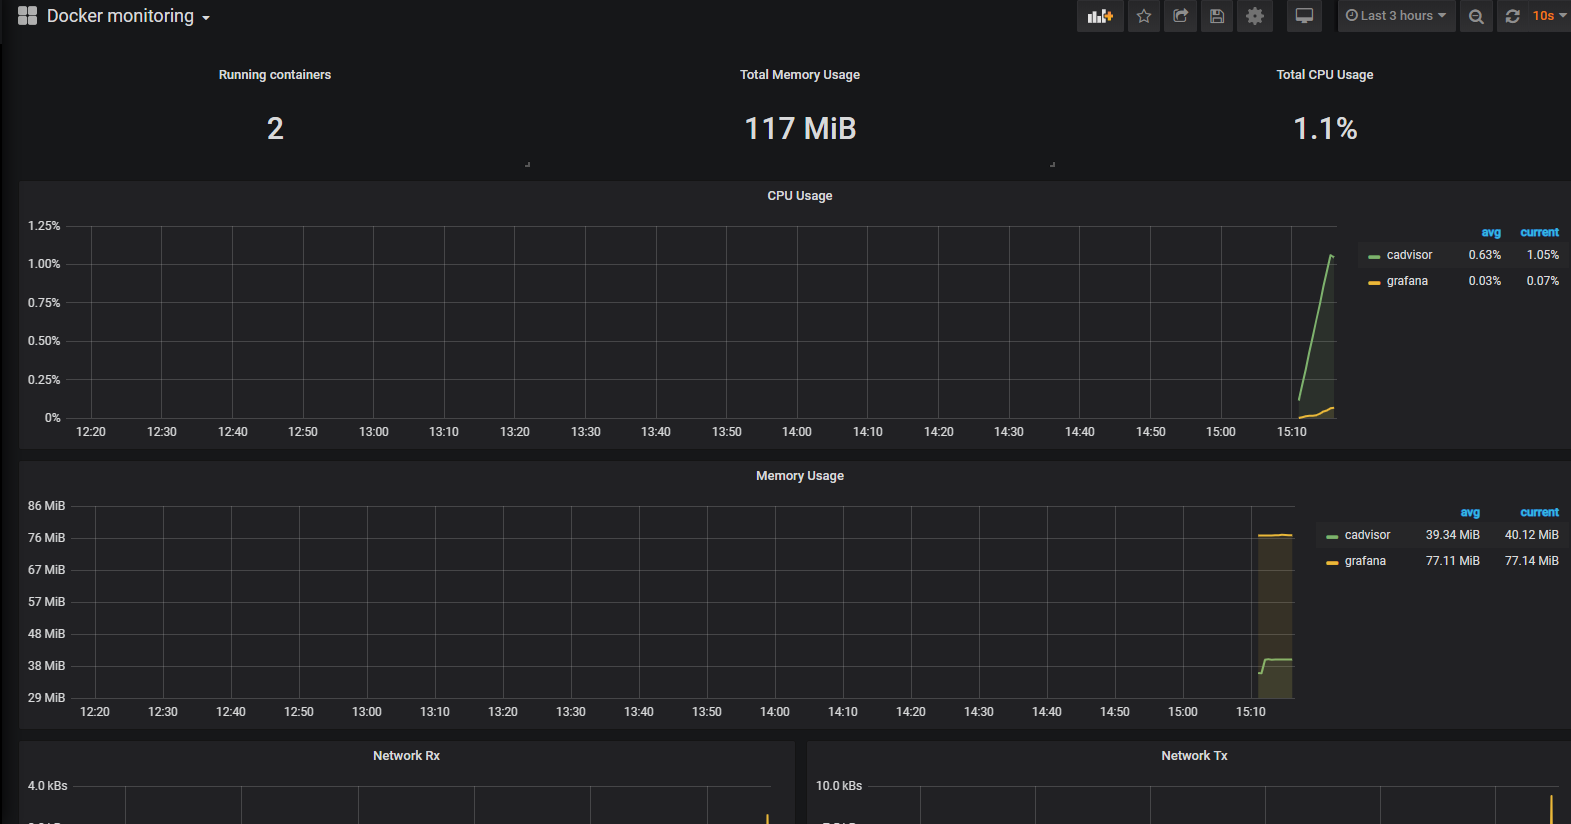
监控 Docker 服务器 与 Grafana 可视化

  1. cAdvisor(Container Advisor)用于收集正在运行的容器资源使用和性能信息。
  2. 和 node_exporter 一样暴露接口地址
  3. 官方资料:
1
2
https://github.com/google/cadvisor
https://grafana.com/dashboards/193

部署 cAdvisor

1
2
3
4
5
6
7
8
9
10
11
12
13
14
15
16
# 部署镜像在本地 
docker run \
--volume=/:/rootfs:ro \
--volume=/var/run:/var/run:ro \
--volume=/sys:/sys:ro \
--volume=/var/lib/docker/:/var/lib/docker:ro \
--volume=/dev/disk/:/dev/disk:ro \
--publish=8080:8080 \
--detach=true \
--name=cadvisor \
gcr.io/google-containers/cadvisor:latest

[root@k8s-master2 ~]# docker ps
CONTAINER ID IMAGE COMMAND CREATED STATUS PORTS NAMES
05e96381c5d6 gcr.io/google-containers/cadvisor:latest "/usr/bin/cadvisor -…" 6 seconds ago Up 5 seconds (health: starting) 0.0.0.0:8080->8080/tcp cadvisor
c439fe2d68aa grafana/grafana "/run.sh" 3 hours ago Up 39 minutes 0.0.0.0:3000->3000/tcp grafana
1
2
3
# 访问接口 ip:8080
# 会去采集这台服务器上所有docker容器的指标
http://47.240.13.206:8080/metrics

cAdvisor 对接 prometheus

1
2
3
4
5
6
7
8
9
10
[root@k8s-master2 ~]# vim /usr/local/prometheus/prometheus.yml 
# 把监控的url加入进来
scrape_configs:
...
- job_name: 'docker'
static_configs:
- targets: ['172.31.228.51:8080']

[root@k8s-master2 prometheus]# ./promtool check config prometheus.yml
[root@k8s-master2 prometheus]# kill -hup 1559

Grafana 数据展示

1
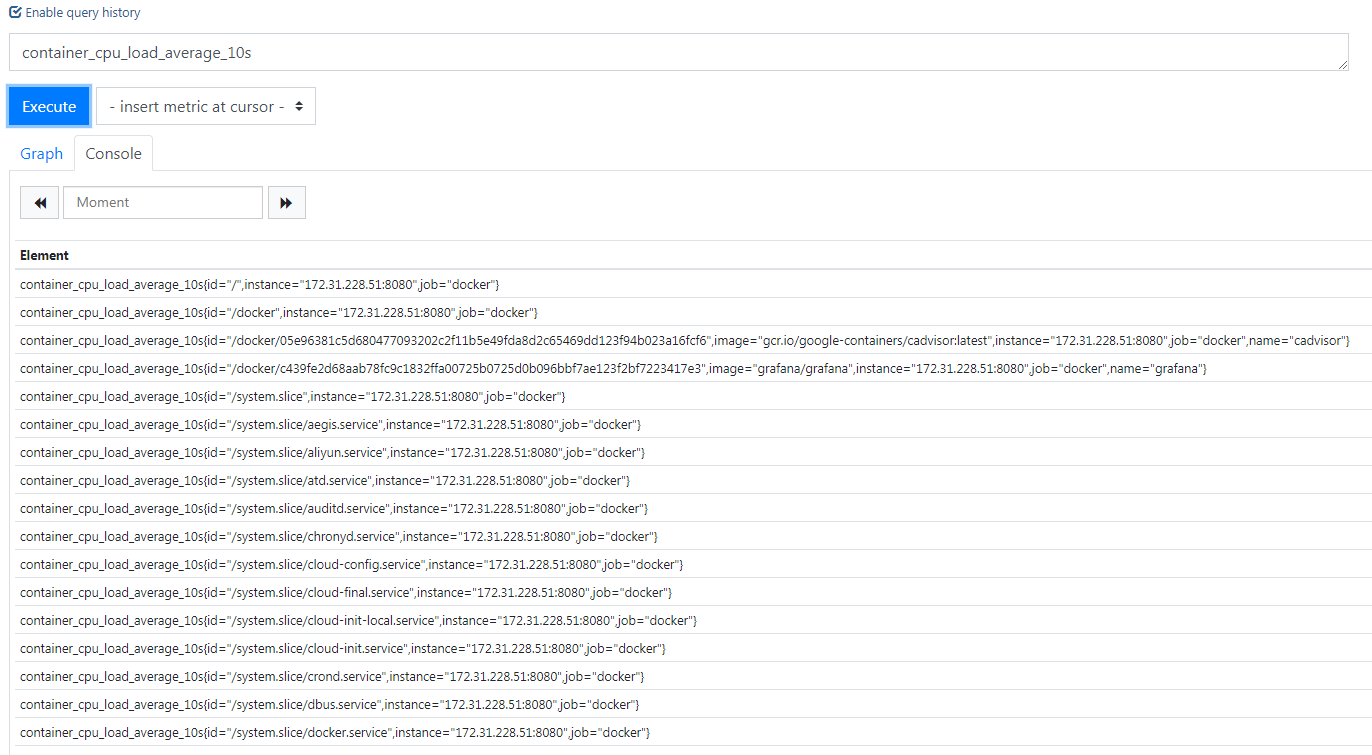
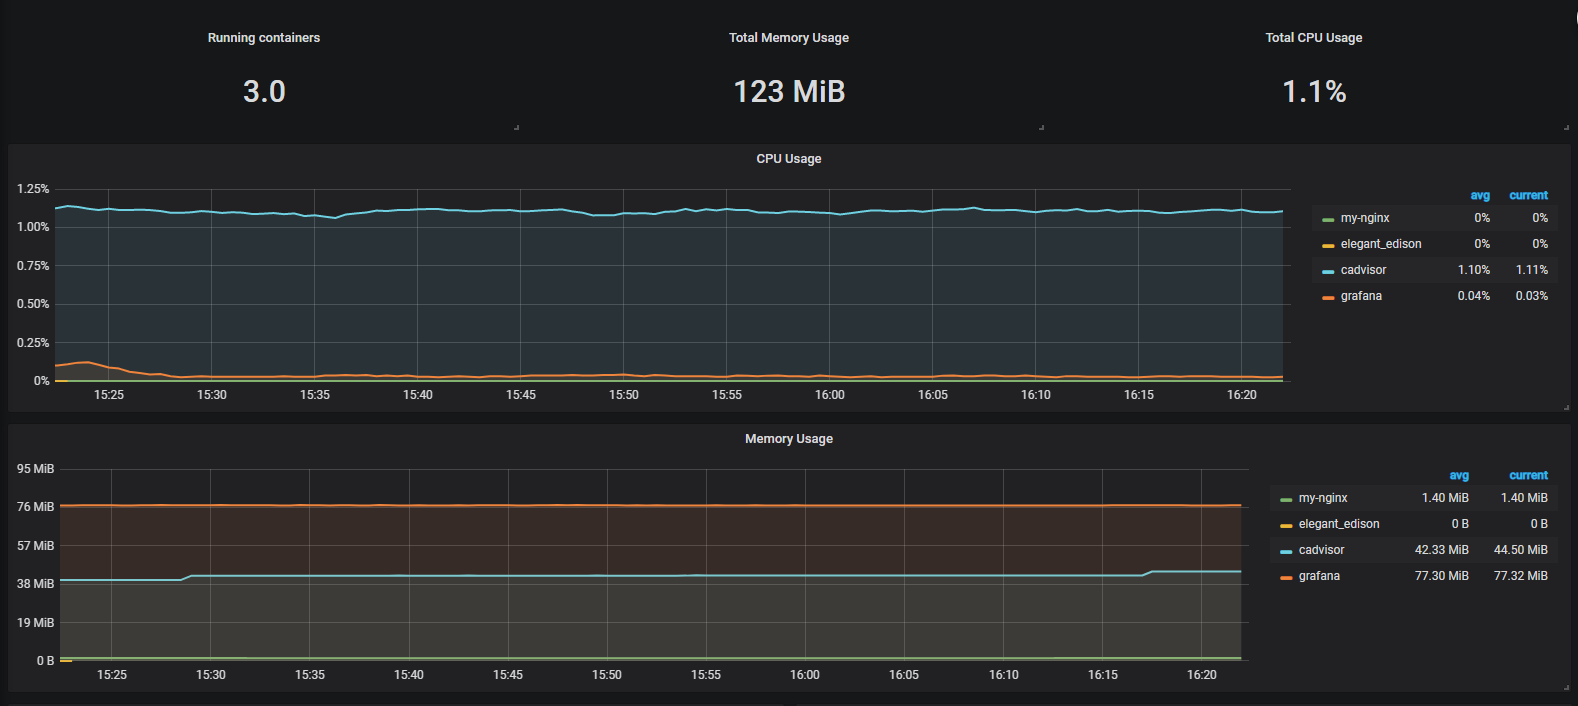
# 采集的都是容器的资源指标

1
2
3
# 再启动一个 nginx 容器 
[root@k8s-master2 prometheus]# docker run -d --name my-nginx nginx:1.16
5ac9c98f64a6103c8a44e0c3bc616c82ec0751e47649866f3513352177b2c883

监控 MySQL 服务器与 Grafana 可视化

  1. mysql_exporter:用于收集MySQL性能信息
  2. 官方资料
1
2
https://github.com/prometheus/mysqld_exporter
https://grafana.com/dashboards/7362

下载 mysql_exporter

1
2
3
4
5
6
7
8
9
10
11
12
13
14
# 需要在要被监控的mysql服务主机上下载部署
# 每个应用都由不同的采集exporter,暴露的端口也不同
https://prometheus.io/download/

# 版本要求
Prometheus exporter for MySQL server metrics.
Supported MySQL & MariaDB versions: 5.5 and up.
# 不是所有的采集都支持 小于 5.6版本
NOTE: Not all collection methods are supported on MySQL/MariaDB < 5.6

[root@k8s-node2 opt]# wget https://github.com/prometheus/mysqld_exporter/releases/download/v0.12.1/mysqld_exporter-0.12.1.linux-amd64.tar.gz
[root@k8s-node2 opt]# tar -zxvf mysqld_exporter-0.12.1.linux-amd64.tar.gz
[root@k8s-node2 opt]# mv mysqld_exporter-0.12.1.linux-amd64 /usr/local/mysqld_exporter
[root@k8s-node2 opt]# cd /usr/local/mysqld_exporter/

配置连接本地实例

1
2
3
4
5
6
7
8
9
10
11
12
13
14
15
16
17
18
19
20
21
[root@k8s-node2 mysqld_exporter]# mysql
Welcome to the MariaDB monitor. Commands end with ; or \g.
Your MariaDB connection id is 2
Server version: 5.5.64-MariaDB MariaDB Server

Copyright (c) 2000, 2018, Oracle, MariaDB Corporation Ab and others.

Type 'help;' or '\h' for help. Type '\c' to clear the current input statement.

MariaDB [(none)]>

# 创建用户并授权
MariaDB [(none)]> CREATE USER 'exporter'@'localhost' IDENTIFIED BY '123456' ;
MariaDB [(none)]> GRANT PROCESS, REPLICATION CLIENT, SELECT ON *.* TO 'exporter'@'localhost';

# 创建用户配置文件
[root@k8s-node2 mysqld_exporter]# vim .my.cnf

[client]
user=exporter
password=123456

启动 mysqld_exporter 服务

1
2
3
4
5
6
7
8
9
10
11
12
13
14
15
16
17
18
19
20
21
22
./mysqld_exporter --config.my-cnf=.my.cnf 

# 增加系统服务配置
[root@k8s-node2 local]# vim /usr/lib/systemd/system/mysqld_exporter.service

[Unit]
Description=mysqld_exporter server daemon

[Service]
Restart=on-failure
ExecStart=/usr/local/mysqld_exporter/mysqld_exporter --config.my-cnf=/usr/local/mysqld_exporter/.my.cnf

[Install]
WantedBy=multi-user.target

[root@k8s-node2 local]# ps -ef|grep mysqld_exporter

[root@k8s-node2 local]# netstat -tnlp | grep 9104
tcp6 0 0 :::9104 :::* LISTEN 4286/mysqld_exporte

# web
http://47.240.1.178:9104/metrics

配置 prometheus 监控mysqld实例

1
2
3
4
5
6
7
8
[root@k8s-master2 prometheus]# vim prometheus.yml 

- job_name: 'mysql'
static_configs:
- targets: ['172.31.228.53:9104']

[root@k8s-master2 prometheus]# ./promtool check config prometheus.yml
[root@k8s-master2 prometheus]# kill -hup 1559

Grafana 数据展示

1
2
3
4
5
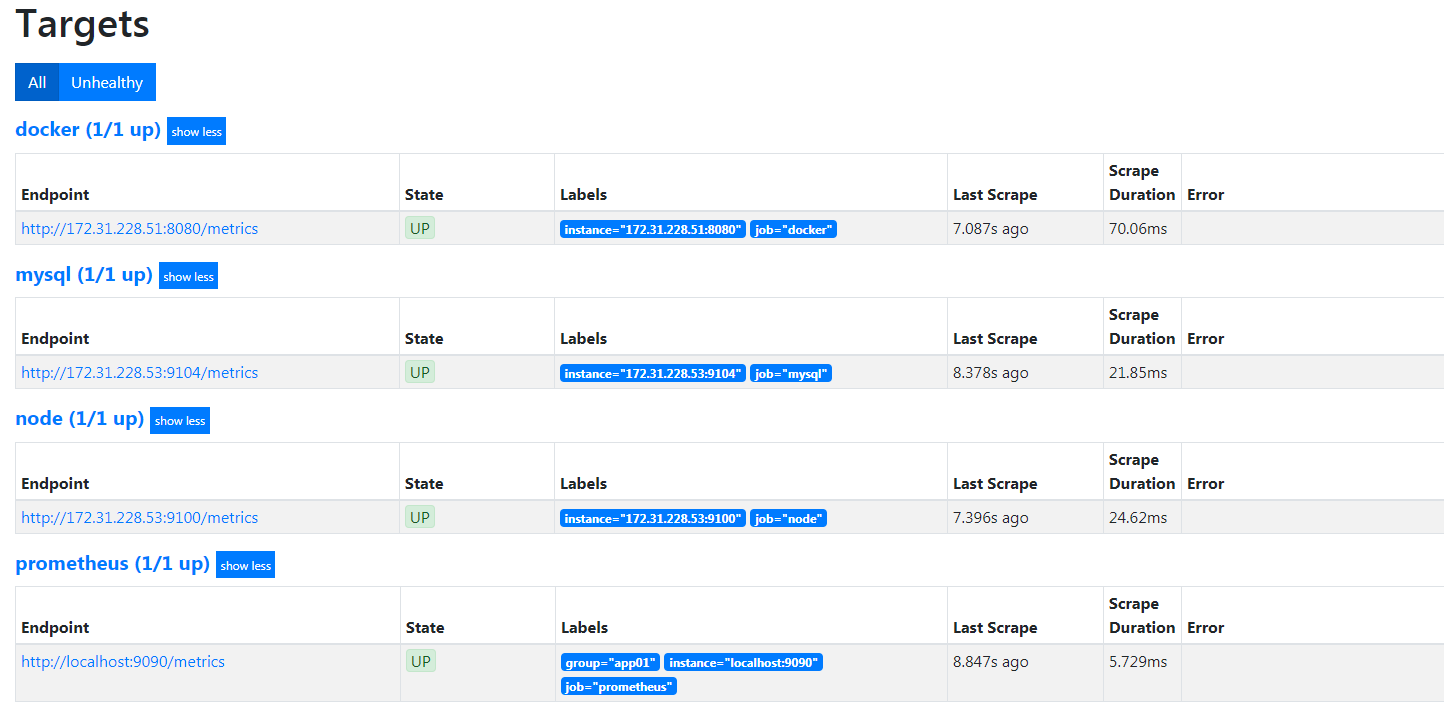
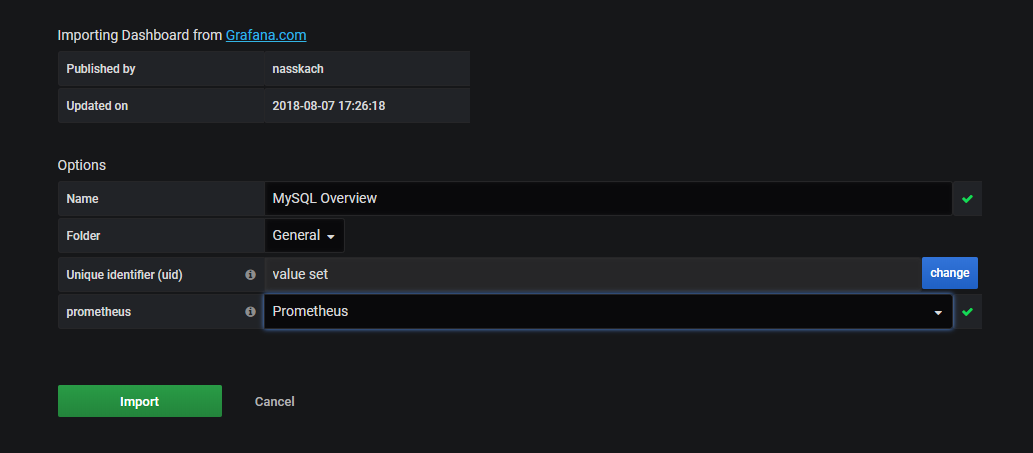
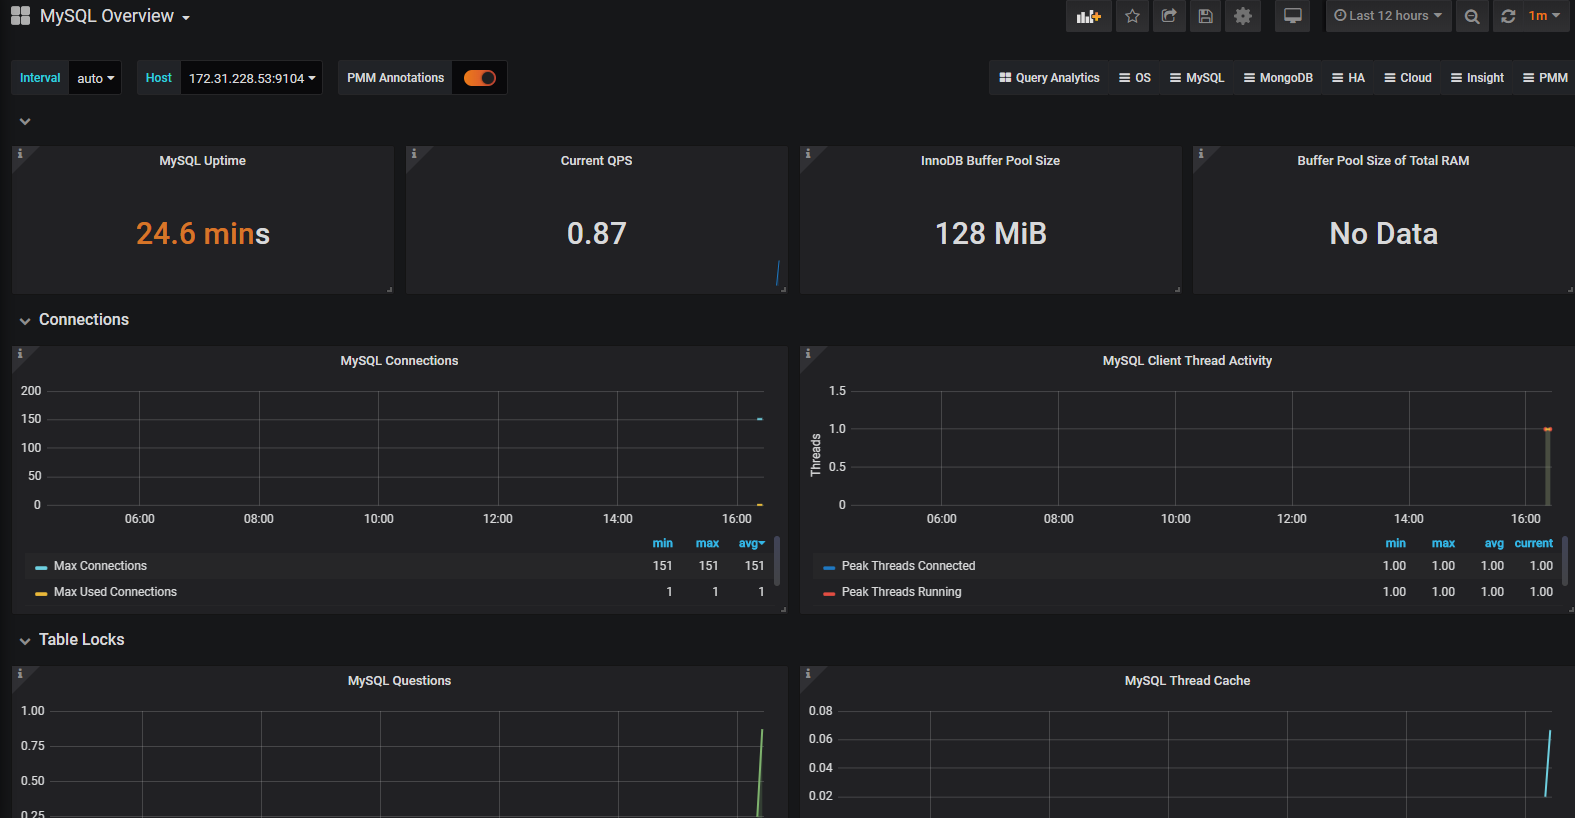
https://grafana.com/dashboards/7362
# 经常关注的点
# 1. mysql连接数
# 2. 增删改查次数
# 3. 内存的使用环境

小总结

1
2
3
4
5
6
1. 不管是监控node资源 还是 mysql服务,都需要先下载对应的 exporter
2. 然后去 prometheus 配置文件中增加配置
3. 使用模板接入到 Grafana
4. 在Grafana中再去筛选想要的数据,和自定义监控点
5. 进程监控 Process-exporter
https://www.cnblogs.com/bigberg/p/10174222.html

报警神器 AlertManager

部署 AlertManager

  1. 官网资料
1
2
3
4
地址1:https://prometheus.io/download/
地址2:https://github.com/prometheus/alertmanager/releases
1. 可以不在 prometheus 服务端继承 AlertManager
2. 只要他们之间可以通信即可
1
2
[root@k8s-master2 opt]# wget https://github.com/prometheus/alertmanager/releases/download/v0.20.0/alertmanager-0.20.0.linux-amd64.tar.gz
[root@k8s-master2 opt]# tar -zxvf alertmanager-0.20.0.linux-amd64.tar.gz
1
2
管理-报警媒介类型-Email
1. QQ邮箱开启SNMP和一个授权码,填写发件人密码时需要设置授权码为密码

配置 Alertmanager

1
2
3
4
5
6
7
8
9
10
11
12
13
14
15
16
17
18
19
20
21
22
23
24
25
26
27
28
29
30
31
32
33
34
35
36
[root@k8s-master2 alertmanager-0.20.0.linux-amd64]# vim alertmanager.yml 
# 学习的时候 先把抑制 关闭了

global:
# 解析超时时间
resolve_timeout: 5m
# 邮件客户端
smtp_smarthost: 'smtp.qq.com:465'
smtp_from: '365042337@qq.com'
smtp_auth_username: '365042337@qq.com'
smtp_auth_password: 'jtebrxpgcuyjcafi'
smtp_require_tls: false

route:
# 告警分配
group_by: ['alertname']
group_wait: 10s
group_interval: 10s
# 重复告警间隔 默认1小时 实际应用20-30分钟最好
repeat_interval: 1m
# 接收着
receiver: 'mail'

receivers:
# 告警发送给谁
- name: 'mail'
email_configs:
- to: '365042337@qq.com'

#inhibit_rules:
# 告警抑制
# - source_match:
# severity: 'critical'
# target_match:
# severity: 'warning'
# equal: ['alertname', 'dev', 'instance']
1
2
3
4
5
6
7
8
9
# 检查语法
[root@k8s-master2 alertmanager-0.20.0.linux-amd64]# ./amtool check-config alertmanager.yml
Checking 'alertmanager.yml' SUCCESS
Found:
- global config
- route
- 0 inhibit rules
- 1 receivers
- 0 templates

启动 alertmanager

1
[root@k8s-master2 alertmanager-0.20.0.linux-amd64]# ./alertmanager --config.file=alertmanager.yml

配置 Prometheus 与 Alertmanager 通信

1
2
3
4
5
6
7
8
9
10
11
12
13
14
# Alertmanager configuration
alerting:
alertmanagers:
- static_configs:
- targets:
- 127.0.0.1:9093

rule_files:
# 告警规则文件
- "rules/*.yml"
# - "second_rules.yml"

# 检查配置文件语法
[root@k8s-master2 prometheus]# ./promtool check config prometheus.yml

在 Prometheus 中创建告警规则

1
2
3
4
5
6
7
8
9
10
11
12
13
14
15
16
17
18
19
20
21
22
23
24
25
26
[root@k8s-master2 prometheus]# mkdir rules

# up 指标 判断所有job的状态
# up = 1 是正常 = 0 是失败
# [root@k8s-node2 local]# systemctl stop mysqld_exporter 故意停止一个mysql的 agent

[root@k8s-master2 rules]# vim test.yml

groups:
# 一组监控
- name: general.rules
rules:

# Alert for any instance that is unreachable for >5 minutes.
# 告警名称
- alert: InstanceDown
expr: up == 0
# 告警持续时间
for: 1m
labels:
# 告警级别
severity: error
# 告警内容
annotations:
summary: "Instance {{ $labels.instance }} down 停止工作"
description: "{{ $labels.instance }} of job {{ $labels.job }} 已经停止5分钟."

1
2
3
4
5
6
7
# 重新加载配置 启动
[root@k8s-master2 prometheus]# ./promtool check config prometheus.yml
Checking prometheus.yml
SUCCESS: 1 rule files found

Checking rules/test.yml
SUCCESS: 1 rules found

验证告警

1
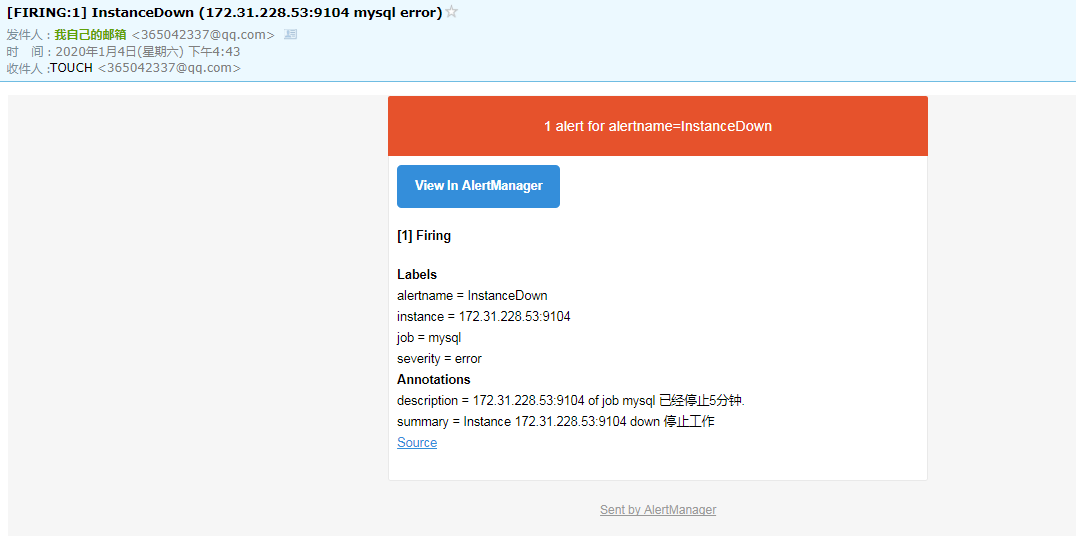
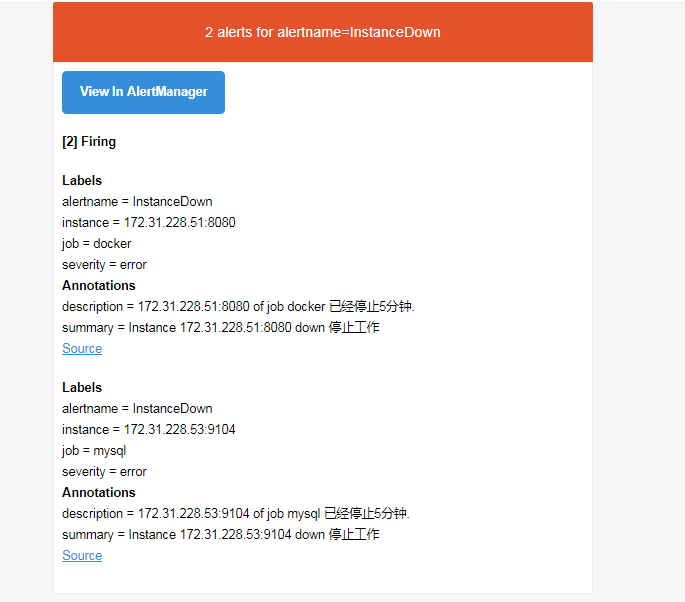
# 我们已经配置了告警规则,而且有一个mysql的服务我们设置了错误状态 等待告警发送过来

再来关闭docker的客户端监控

1
2
3
4
5
[root@k8s-master2 alertmanager-0.20.0.linux-amd64]# docker ps
CONTAINER ID IMAGE COMMAND CREATED STATUS PORTS NAMES
05e96381c5d6 gcr.io/google-containers/cadvisor:latest "/usr/bin/cadvisor -…" 26 hours ago Up About an hour (healthy) 0.0.0.0:8080->8080/tcp cadvisor
c439fe2d68aa grafana/grafana "/run.sh" 29 hours ago Up About an hour 0.0.0.0:3000->3000/tcp grafana
[root@k8s-master2 alertmanager-0.20.0.linux-amd64]# docker stop 05e96381c5d6
1
2
3
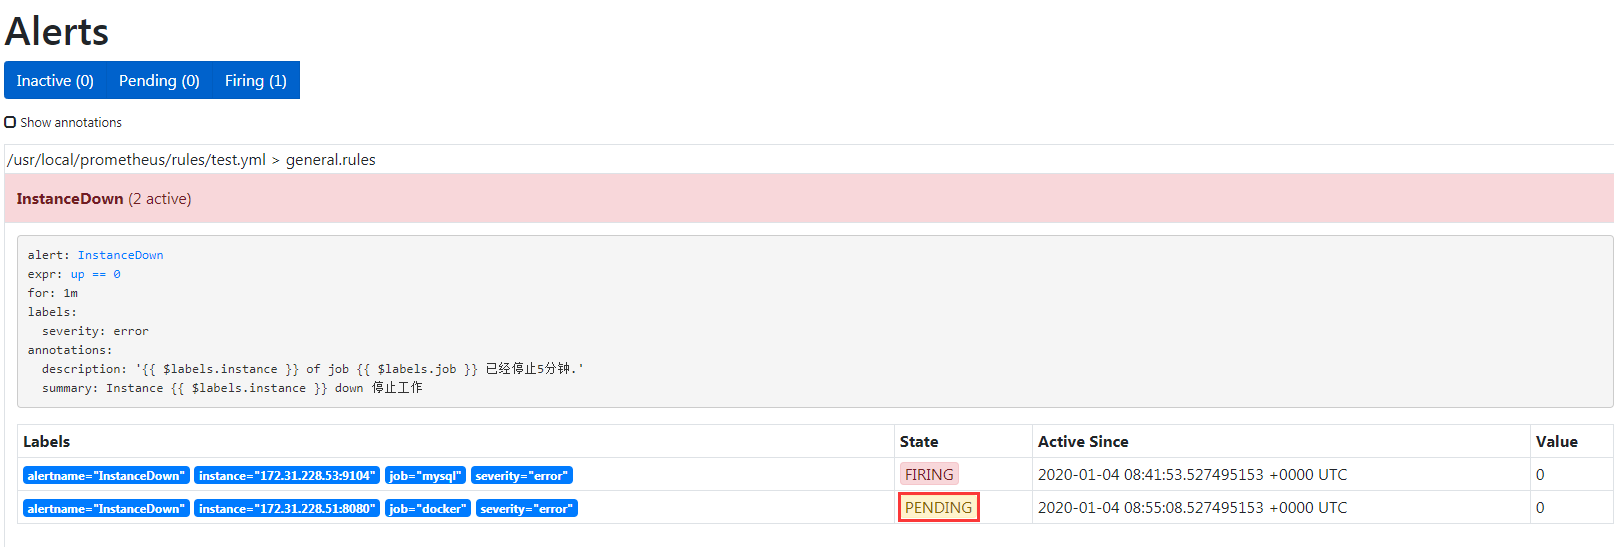
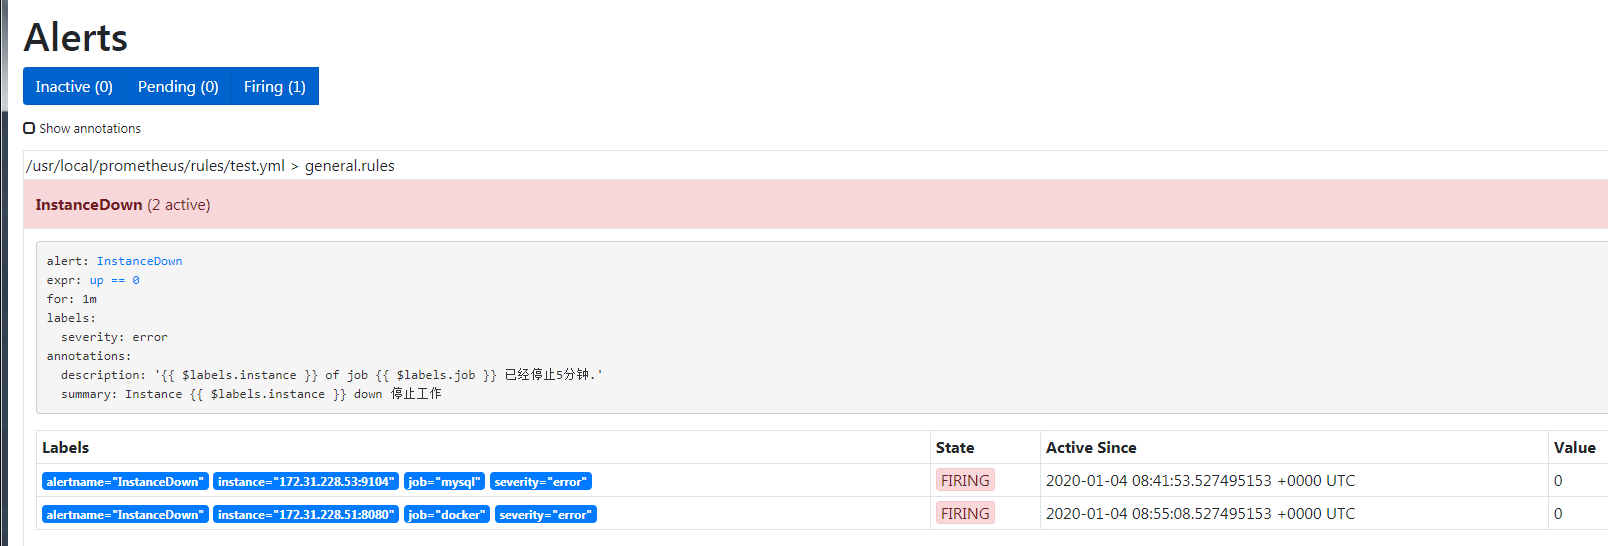
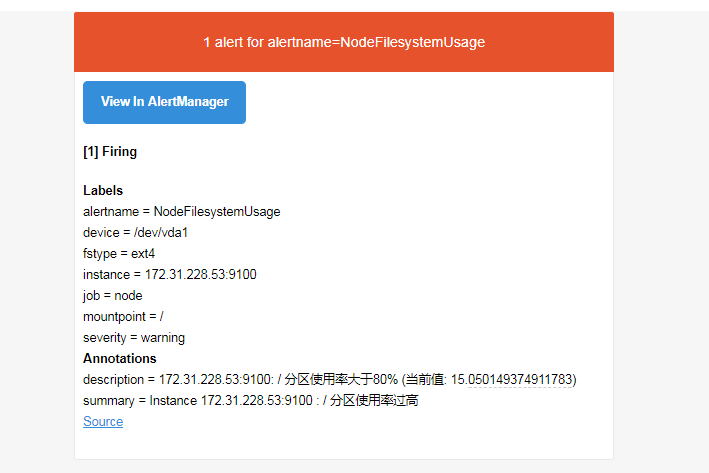
# 新触发了一个告警
# 监控状态 会随着告警时间 改变
# 两个同类告警 会被合并

告警方式支持

1
https://prometheus.io/docs/alerting/configuration/

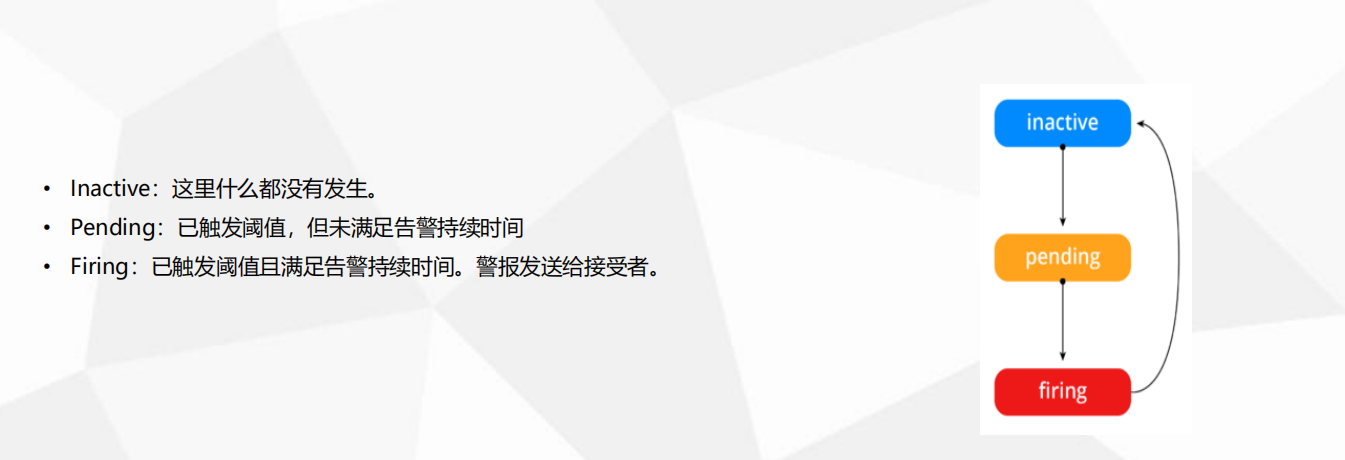
告警状态

告警分配

1
1. 告警分配 到指定接收组

告警收敛(分组,抑制,静默)

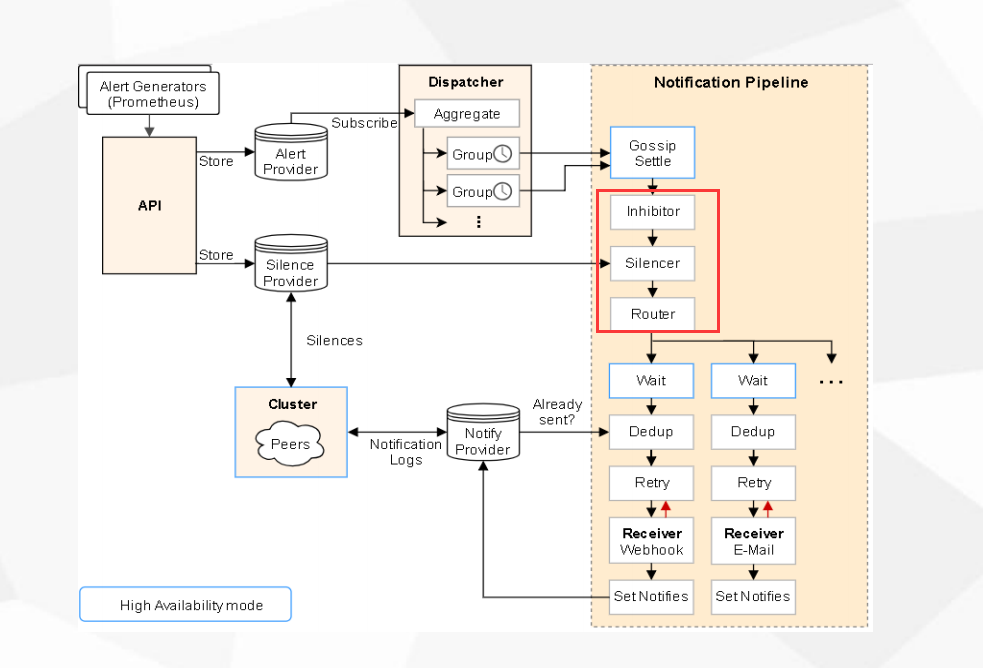
1
2
3
分组(group):      将类似性质的警报分类为单个通知
抑制(Inhibition): 当警报发出后,停止重复发送由此警报引发的其他警报
静默(Silences): 是一种简单的特定时间静音提醒的机制

分组

1
2
3
4
5
6
7
8
9
10
11
12
13
14
15
16
17
18
19
20
21
22
23
24
25
26
27
# 10台服务器 如果都发生故障 通过分组 只发送一条通知
# 分组的依据:

[root@k8s-master2 alertmanager-0.20.0.linux-amd64]# vim /opt/alertmanager-0.20.0.linux-amd64/alertmanager.yml

route:
# 告警分配 默认
group_by: ['alertname']


[root@k8s-master2 rules]# vim /usr/local/prometheus/rules/test.yml
- alert: InstanceDown

# 1. 减少告警消息的数量
# 2. 同类告警聚合,方便排查问题

route:
# 告警分组依据
group_by: ['alertname']
# 分组发送等待时间
group_wait: 10s
# 发送告警间隔
group_interval: 10s
# 重复告警间隔 默认1小时 实际应用20-30分钟最好
repeat_interval: 20m
# 接收者
receiver: 'mail'

抑制

1
2
3
1. 一个告警产生,其他告警无需再发
2. 比如mysql的主从挂了 mysql服务器挂了 ,从层次来看, 服务器挂了的优先级更高,就不用去排查主从了
3. 直接发送服务器挂了的通知,不发送主从的问题通知了
1
2
3
4
5
6
7
8
9
10
11
12
[root@k8s-master2 alertmanager-0.20.0.linux-amd64]# vim /opt/alertmanager-0.20.0.linux-amd64/alertmanager.yml

inhibit_rules:
告警抑制
- source_match:
# 告警的级别 critical 危险
severity: 'critical'
target_match:
# 被抑制的告警级别 warning
severity: 'warning'
# 必须 有这三个标签
equal: ['alertname', 'dev', 'instance']
1
2
3
4
5
6
7
8
9
10
11
12
13
14
15
16
17
18
# 磁盘 80%的使用率 warning 
# 服务器访问不到 critical
# equal: ['alertname', 'dev', 'instance'] 标签, instance=服务器 id=mysql-a
# 在这样一套机器上 出现了 两个状态 那么会发送 critical ,不会触发 warning的告警

inhibit_rules:
告警抑制
- source_match:
# 告警的级别 critical 危险
severity: 'critical'
target_match:
# 被抑制的告警级别 warning
severity: 'warning'
# 必须 有这三个标签
equal: ['id', 'instance']

1. 消除冗余的告警
2. 收到关键告警,方便排查

静默

1
2
3
4
5
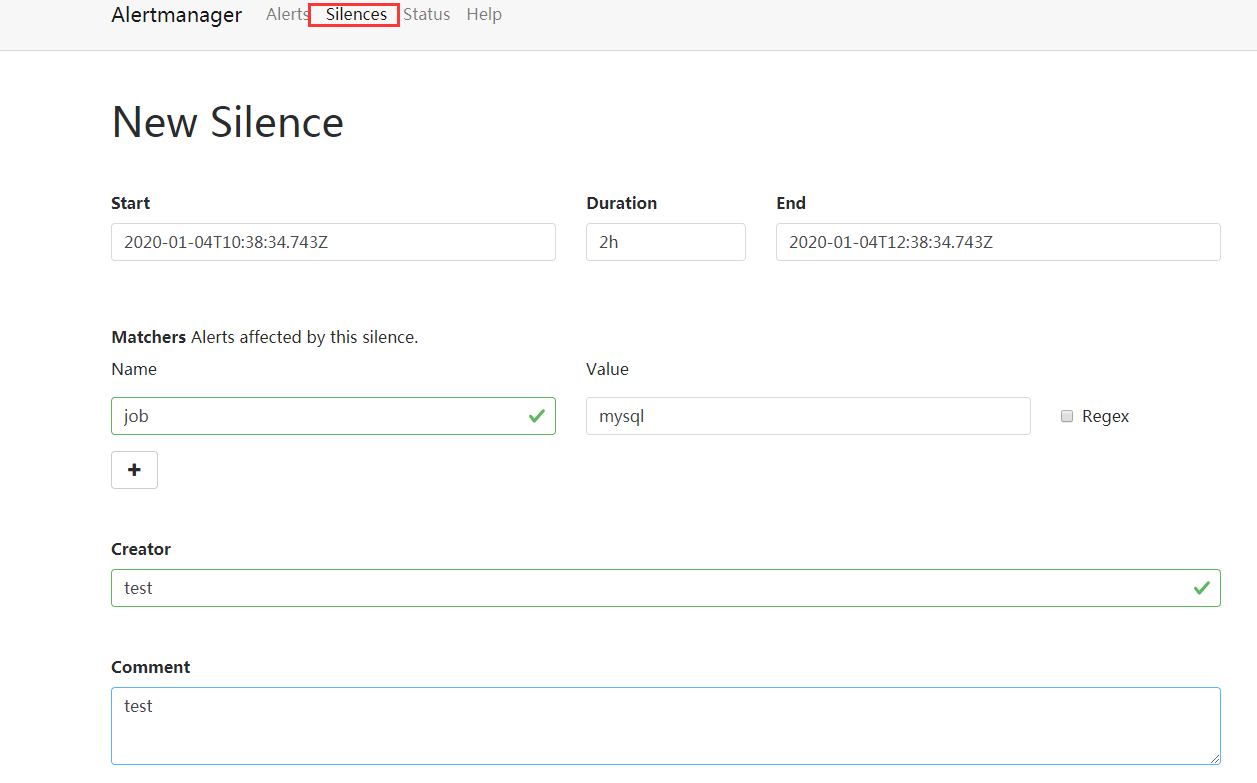
1. 比如服务升级,一个时间内不用监控告警,可以配置静默减少,报警邮件
2. 静默的配置页面 端口是 9093
http://47.240.13.206:9093/#/alerts
# 在这个页面添加
http://47.240.13.206:9093/#/silences
  1. 按照标签匹配,在一段时间内(维护时间),不设定告警邮件的发送

Prometheus一条告警怎么触发的 ?

报警处理流程如下

  1. Prometheus Server 监控目标主机上暴露的http接口(这里假设接口A),通过上述Promethes配置的’scrape_interval’定义的时间间隔,定期采集目标主机上监控数据。
  2. 当接口A不可用的时候,Server端会持续的尝试从接口中取数据,直到”scrape_timeout”时间后停止尝试。这时候把接口的状态变为“DOWN”。
  3. Prometheus同时根据配置的”evaluation_interval”的时间间隔,定期(默认1min)的对Alert Rule进行评估;当到达评估周期的时候,发现接口A为DOWN,即UP=0为真,激活Alert,进入“PENDING”状态,并记录当前active的时间;
  4. 当下一个alert rule的评估周期到来的时候,发现UP=0继续为真,然后判断警报Active的时间是否已经超出rule里的‘for’ 持续时间,如果未超出,则进入下一个评估周期;如果时间超出,则alert的状态变为“FIRING”;同时调用Alertmanager接口,发送相关报警数据。
  5. AlertManager收到报警数据后,会将警报信息进行分组,然后根据alertmanager配置的“group_wait”时间先进行等待。等wait时间过后再发送报警信息。
  6. 属于同一个Alert Group的警报,在等待的过程中可能进入新的alert,如果之前的报警已经成功发出,那么间隔“group_interval”的时间间隔后再重新发送报警信息。比如配置的是邮件报警,那么同属一个group的报警信息会汇总在一个邮件里进行发送。
  7. 如果Alert Group里的警报一直没发生变化并且已经成功发送,等待‘repeat_interval’时间间隔之后再重复发送相同的报警邮件;如果之前的警报没有成功发送,则相当于触发第6条条件,则需要等待group_interval时间间隔后重复发送。
    同时最后至于警报信息具体发给谁,满足什么样的条件下指定警报接收人,设置不同报警发送频率,这里有alertmanager的route路由规则进行配置。
1
2
3
4
5
6
7
8
9
10
11
12
13
14
15
16
17
18
19
20
21
22
23
24
25
26
27
28
29
30
31
32
33
34
35
36
1. 采集数据
# 全局配置 也 可以在 job中单独配置
# my global config
global:
scrape_interval: 15s 采集周期
evaluation_interval: 15s 评估告警周期,看是否到达阈值
scrape_timeout is set to the global default (10s). 采集超时时间


2. prometheus 判断采集的数据 是否到达阈值 ,有判断时间
[root@k8s-master2 rules]# vim /usr/local/prometheus/rules/test.yml
- alert: InstanceDown
expr: up == 0
# 告警持续时间
for: 1m
labels:
# 告警级别
severity: error
# 告警内容
annotations:
summary: "Instance {{ $labels.instance }} down 停止工作"
description: "{{ $labels.instance }} of job {{ $labels.job }} 已经停止5分钟."

3. 如果1分钟持续=0 就发送给 alertmanager
先找分组: 这个也有等待时间
route:
# 告警分组依据
group_by: ['alertname']
# 分组发送等待时间
group_wait: 10s
# 发送告警间隔
group_interval: 10s
# 重复告警间隔 默认1小时 实际应用20-30分钟最好
repeat_interval: 20m
# 接收者
receiver: 'mail'

编写告警规则案例

1
2
3
# cpu使用率 要对所有的分区做统计
# 先在浏览器测试通过再使用
100 - (node_filesystem_free_bytes{fstype=~"ext4|xfs"} / node_filesystem_size_bytes{fstype=~"ext4|xfs"} * 100)
1
2
3
4
5
6
7
8
9
10
11
12
13
14
15
16
17
18
19
20
21
22
23
24
25
26
27
28
29
30
31
# 当前值: {{ value }}  
[root@k8s-master2 etc]# cd /usr/local/prometheus/rules/
[root@k8s-master2 rules]# cp test.yml node.yml

[root@k8s-master2 prometheus]# vim rules/node.yml
groups:
# 一组监控
- name: node.rules
rules:

# Alert for any instance that is unreachable for >5 minutes.
# 告警名称
- alert: NodeFilesystemUsage
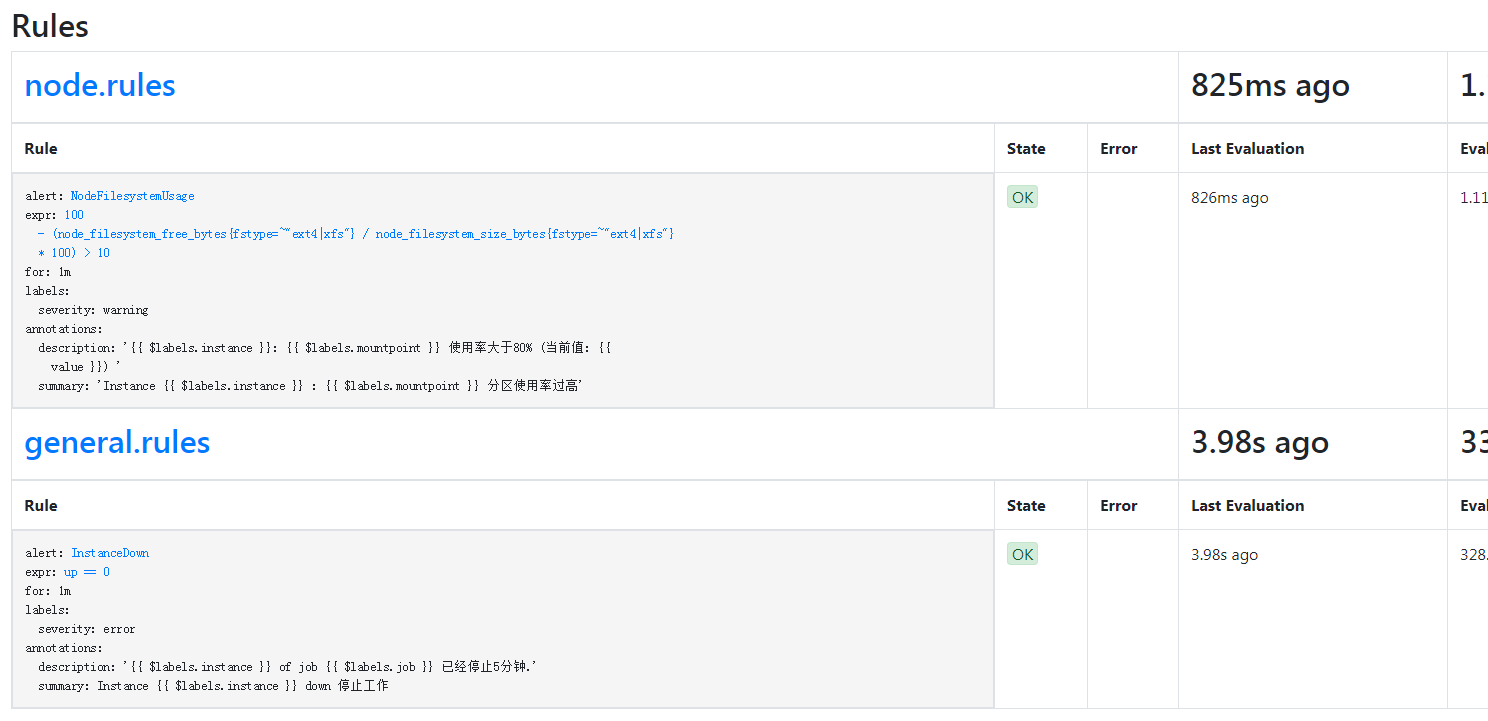
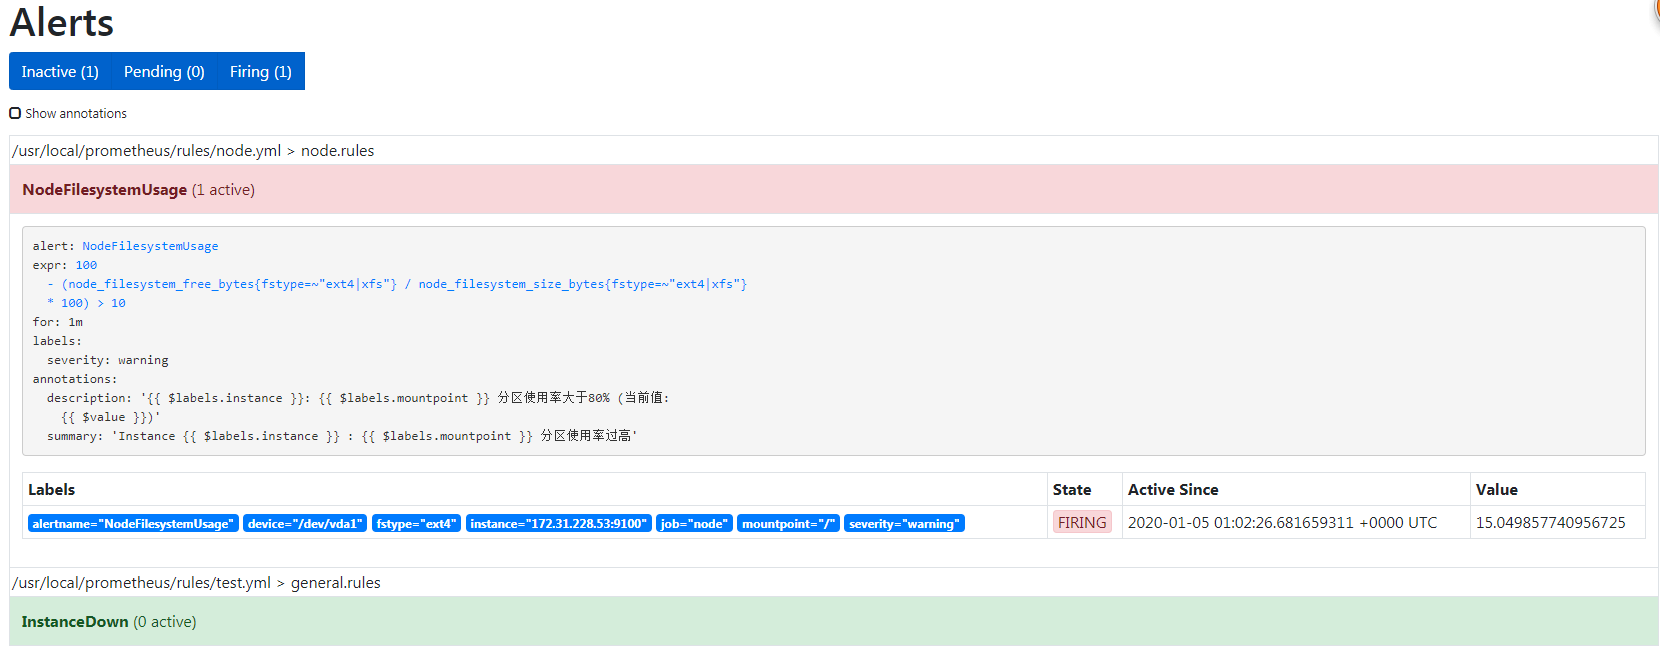
expr: 100 - (node_filesystem_free_bytes{fstype=~"ext4|xfs"} / node_filesystem_size_bytes{fstype=~"ext4|xfs"} * 100) > 10
# 告警持续时间
for: 1m
labels:
# 告警级别
severity: warning
# 告警内容
annotations:
summary: "Instance {{ $labels.instance }} : {{ $labels.mountpoint }} 分区使用率过高"
description: "{{ $labels.instance }}: {{ $labels.mountpoint }} 使用率大于80% (当前值: {{ $value }}) "


[root@k8s-master2 prometheus]# ./promtool check config prometheus.yml
[root@k8s-master2 prometheus]# ps -ef|grep prome
root 1584 1 0 08:41 ? 00:00:04 /usr/local/prometheus/prometheus --config.file=/usr/local/prometheus/prometheus.yml
root 3636 1624 0 09:02 pts/1 00:00:00 grep --color=auto prome
[root@k8s-master2 prometheus]# kill -hup 1584

1
2
3
4
5
6
7
8
9
10
11
12
13
14
15
16
17
18
19
20
21
22
23
24
25
26
27
28
29
30
31
32
33
34
35
36
37
38
39
40
41
42
43
44
45
# 加上cpu和内存
[root@k8s-master2 prometheus]# vi rules/node.yml

groups:
# 一组监控
- name: node.rules
rules:

# Alert for any instance that is unreachable for >5 minutes.
# 告警名称
- alert: NodeFilesystemUsage
expr: 100 - (node_filesystem_free_bytes{fstype=~"ext4|xfs"} / node_filesystem_size_bytes{fstype=~"ext4|xfs"} * 100) > 10
# 告警持续时间
for: 1m
labels:
# 告警级别
severity: warning
# 告警内容
annotations:
summary: "Instance {{ $labels.instance }} : {{ $labels.mountpoint }} 分区使用率过高"
description: "{{ $labels.instance }}: {{ $labels.mountpoint }} 分区使用率大于80% (当前值: {{ $value }})"

- alert: NodeCpuUsage
expr: 100 - (avg(irate(node_cpu_seconds_total{mode="idle"}[5m])) by (instance) * 100) > 1
# 告警持续时间
for: 1m
labels:
# 告警级别
severity: warning
# 告警内容
annotations:
summary: "Instance {{ $labels.instance }} : CPU使用过高 "
description: "{{ $labels.instance }}: CPU使用率大于60% (当前值: {{ $value }})"

- alert: NodeMemUsage
expr: 100 - (node_memory_MemFree_bytes+node_memory_Cached_bytes+node_memory_Buffers_bytes) / node_memory_MemTotal_bytes * 100 > 10
# 告警持续时间
for: 1m
labels:
# 告警级别
severity: warning
# 告警内容
annotations:
summary: "Instance {{ $labels.instance }} : 内存使用过高 "
description: "{{ $labels.instance }}: 内存使用率大于80% (当前值: {{ $value }})"