11 Isito 微服务治理


Service Mesh

  1. Service Mesh 的中文译为 “服务网格” ,是一个用于处理服务和服务之间通信的基础设施层,它负责为构建复杂的云原生应用传递可靠的网络请求,并为服务通信实现了微服务所需的基本组件功能。
  2. 例如服务发现、负载均衡、监控、流量管理、访问控制等。
  3. 在实践中,服务网格通常实现为一组和应用程序部署在一起的轻量级的网络代理,但对应用程序来说是透明的。
1
2
3
4
1. 基于通信
2. 传递可靠的网络请求 -> 网络转发
3. 实现微服务的通信服务,提供组件 -> 服务发现、负载均衡、监控、流量管理、访问控制
4. 网络代理
1
2
3
4
5
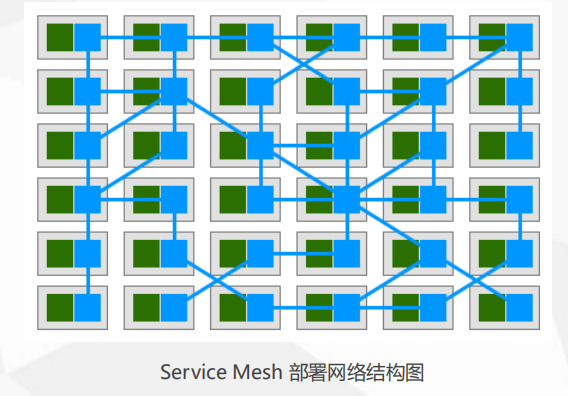
#  图中:
1. 绿色代表应用
2. 蓝色代表服务网络代理
3. 所有访问绿色应用的流量 都要被蓝色的网络代理转发
4. 访问绿色应用都要进出这个网络代理,他们组成的这个大型的服务网络叫做 “服务网格”
1
2
3
4
5
6
7
8
9
10
11
12
# 传统的网络代理
-> node1
用户 -> Nginx -> node2
-> node3
# 用户访问的流量都会经过Nginx,Nginx可以实现 WAF 白名单 限流
# Nginx 拿到了所有的访问流量,所有的进出都可以看到 实现的功能比较简单
# 如果有多套服务的情况下 Nginx就要不断的更新配置
# 微服务的组件更多 那么Nginx的集中管理就会出现较为复杂的问题

# Service Mesh
# 与这条代理模式类似,相当于一个分布式代理,管理代理策略,每一个服务都会绑定一个代理
# 从一对多改为一对一,1个代理服务1组应用,就成为一个 "服务网格"

1
2
3
4
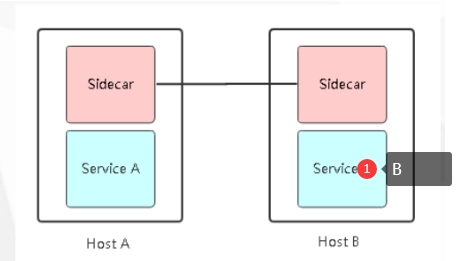
1. 治理能力独立(Sidecar) 
2. 应用程序无感知
3. 服务通信的基础设施层
4. 解耦应用程序的重试/超时、监控、追踪和服务发现
1
2
3
4
# Sidecar 就是一个网络代理,如果ServiceA 要访问 ServiceB ,都需要经过 SidecarA -> SidecarB -> ServiceB
# 需要集中的对所有 Sidecar代理 下发策略并管理的控制面板
# 服务通信的基础设施层:服务发现、负载均衡、监控、流量管理、访问控制
# Sidecar 独立服务,让应用服务之间通过Sidecar对外,拿到链路追踪

Istio 概述

  1. Isito是Service Mesh的产品化落地,是目前最受欢迎的服务网格,功能丰富、成熟度高。
  2. Linkerd是世界上第一个服务网格类的产品。

1
2
官网:
https://istio.io/
1
2
3
4
5
6
7
8
9
10
11
12
13
14
15
16
17
18
19
20
21
22
23
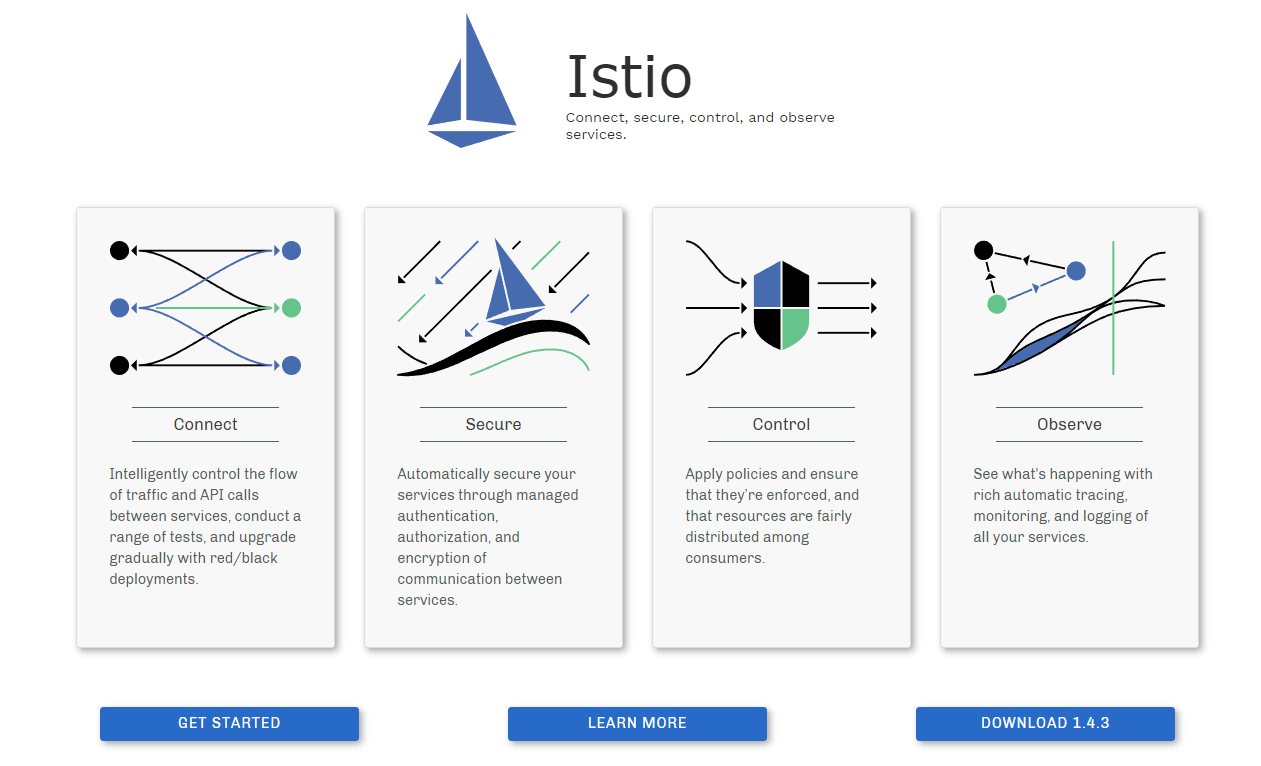
1. 连接(Connect) 
- 流量管理
- 负载均衡
- 灰度发布
# 控制数据流量传输

2. 安全(Secure)
- 认证
- 鉴权
# 用户到服务之间访问
# 服务到服务之间传输

3. 控制(Control)
- 限流
- ACL(访问控制列表)
# 控制每秒最大请求
# 可以访问谁,不可以访问谁

4. 观察(Observe)
- 监控
- 调用链
# 收集流量信息、日志、qps
# 服务之间相互调用链

Istio 与 K8S

1
2
3
4
5
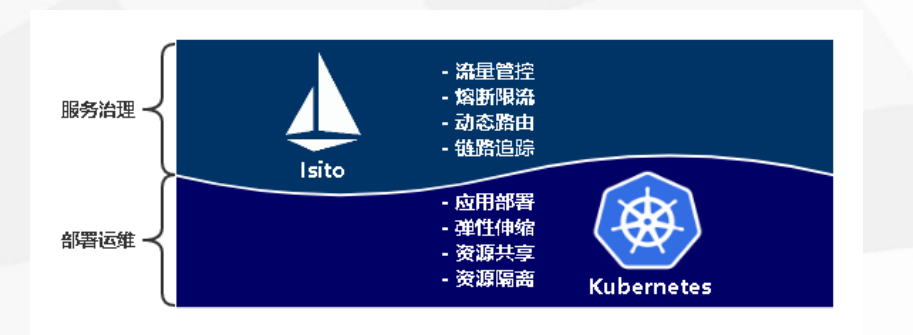
# 微服务链路监控系统 Pinpoint 可以拿到微服务产生的一些流量数据,但是比较有限
# Istio 全面的接管了 k8s与微服务内部之间的流量数据收集和更多的组件功能(流量管控waf,限流,链路追踪)
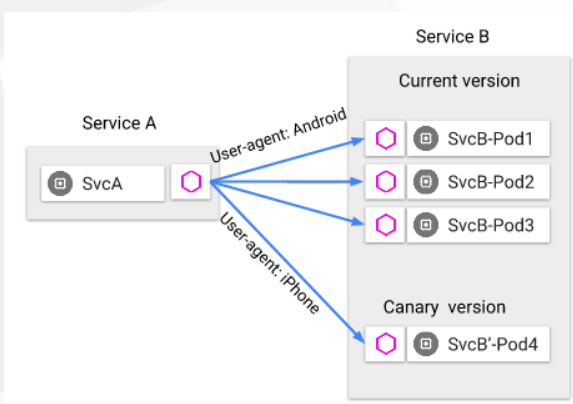
# 动态路由:灰度发布,按照特定用户,按照流量可以转发到不同的实例版本
# 链路追踪:下一个订单都经过哪些服务,都可以有拓扑图展示
# k8s作为服务部署的基础组件,istio作为服务之间内部的管理组件,两者完美结合

Isito 架构与组件

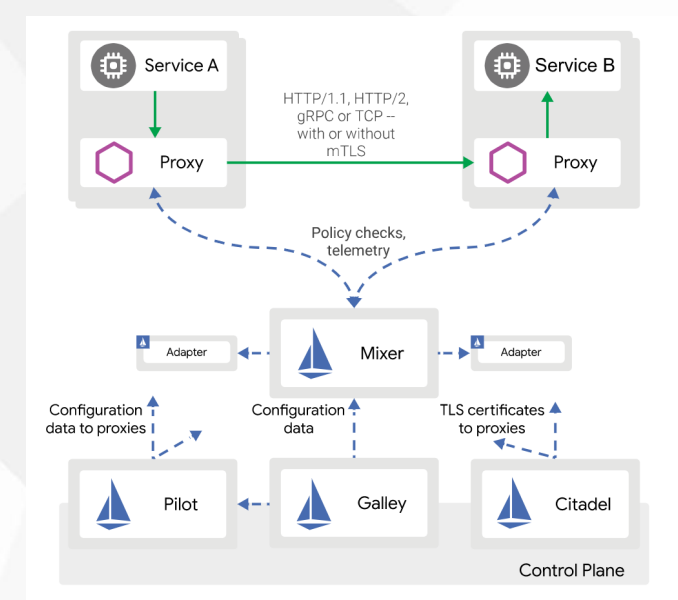
数据平面:

  1. 由一组代理组成,这些代理微服务所有网络通信,并接收和实施来自Mixer的策略。
  2. Proxy:负责高效转发与策略实现。实现:Envoy(与nginx类似)

控制平面:

  1. 管理和配置代理来路由流量。此外,通过mixer实施策略与收集来自边车代理的数据。
  2. Mixer:适配组件,数据平面与控制平面通过它交互,为Proxy提供策略和数据上报。
  3. Pilot:策略配置组件,为Proxy提供服务发现、智能路由、错误处理等。
  4. Citadel:安全组件,提供证书生成下发、加密通信、访问控制。
  5. Galley:配置管理、验证、分发。

Istio 基本概念

  1. Istio 有 4 个配置资源,落地所有流量管理需求(实现上面Istio的功能):
1
2
3
4
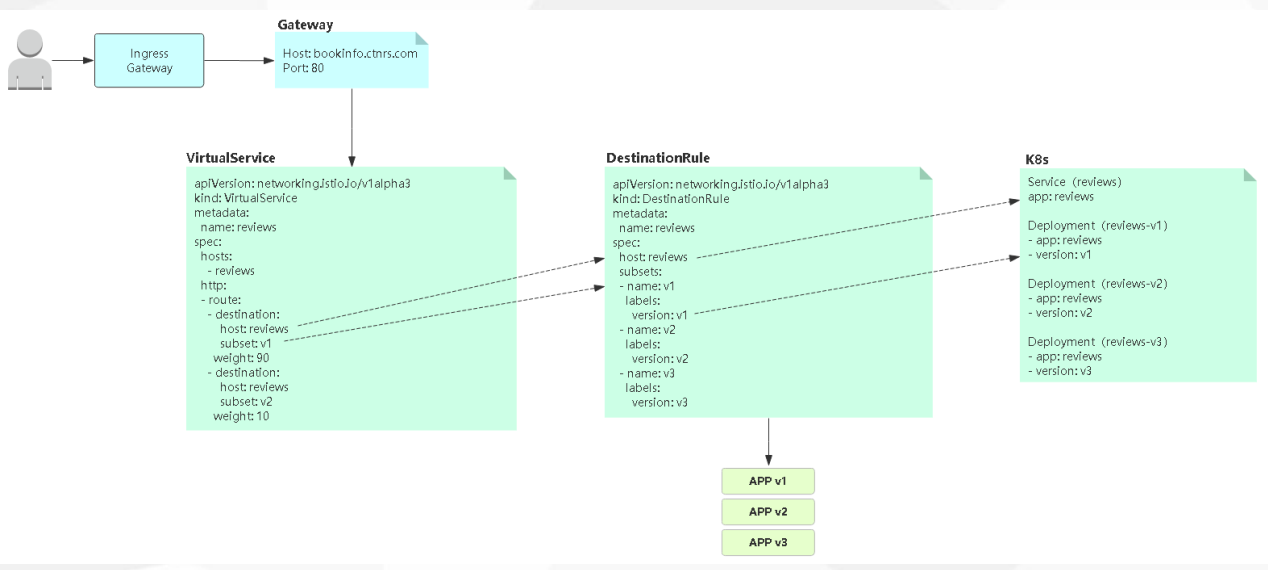
1. VirtualService:  实现服务请求路由规则的功能。 转发规则
2. DestinationRule: 实现目标服务的负载均衡、服务发现、故障处理和故障注入的功能。
3. Gateway: 让服务网格内的服务,可以被全世界看到。 暴露应用
4. ServiceEntry : 让服务网格内的服务,可以看到外面的世界。 默认情况下服务网格的服务只能相互访问,可以与没有安装Sidecar服务通信。

在 Kubernetes 部署 Istio

1
2
3
4
5
6
7
8
9
10
11
12
13
14
15
16
17
18
19
20
21
22
23
24
25
26
27
28
29
30
31
32
33
34
35
36
37
38
39
40
41
42
43
44
45
46
47
48
49
50
51
52
53
54
55
56
57
58
59
60
61
62
63
64
65
66
67
68
69
70
71
72
73
74
75
76
77
78
79
80
81
82
83
84
85
86
87
88
89
90
91
92
93
94
95
96
97
98
99
100
101
102
103
104
105
106
107
108
109
110
111
112
113
114
115
116
117
118
# istioctl 暂时不支持 helm v3的部署
[root@k8s-master1 opt]# wget https://github.com/istio/istio/releases/download/1.4.2/istio-1.4.2-linux.tar.gz
[root@k8s-master1 opt]# tar zxvf istio-1.4.2-linux.tar.gz
[root@k8s-master1 opt]# cd istio-1.4.2
[root@k8s-master1 istio-1.4.2]# mv bin/istioctl /usr/bin

# 部署类型
[root@k8s-master1 istio-1.4.2]# istioctl profile list
Istio configuration profiles:
sds # 更全面
default # 默认,不指定任何类型 基本核心组件都有
demo # 所有的都有,还有附加组件,promethues、grafana、网格可视化、链路跟踪等
minimal # 最小化
remote

# 部署
[root@k8s-master1 istio-1.4.2]# istioctl manifest apply --set profile=demo
# 形成资源清单
Preparing manifests for these components:
- Policy
- Galley
- CoreDNS
- Grafana
- EgressGateway
- Kiali
- PrometheusOperator
- IngressGateway
- Cni
- Pilot
- Injector
- Citadel
- Tracing
- Telemetry
- Prometheus
- NodeAgent
- Base
- CertManager

Applying manifest for component Base
Finished applying manifest for component Base
Applying manifest for component IngressGateway
Applying manifest for component Galley
Applying manifest for component Citadel
Applying manifest for component EgressGateway
Applying manifest for component Prometheus
Applying manifest for component Policy
Applying manifest for component Pilot
Applying manifest for component Telemetry
Applying manifest for component Tracing
Applying manifest for component Kiali
Applying manifest for component Injector
Applying manifest for component Grafana
Finished applying manifest for component Citadel
Finished applying manifest for component Prometheus
Finished applying manifest for component Galley
Finished applying manifest for component Policy
Finished applying manifest for component Injector
Finished applying manifest for component Kiali
Finished applying manifest for component Tracing
Finished applying manifest for component Pilot
Finished applying manifest for component EgressGateway
Finished applying manifest for component IngressGateway
Finished applying manifest for component Grafana
Finished applying manifest for component Telemetry

Component Grafana installed successfully:
=========================================

Component EgressGateway installed successfully:
===============================================

Component Policy installed successfully:
========================================

Component Galley installed successfully:
========================================

Component CoreDNS installed successfully:
=========================================

Component IngressGateway installed successfully:
================================================

Component Cni installed successfully:
=====================================

Component Kiali installed successfully:
=======================================

Component PrometheusOperator installed successfully:
====================================================

Component Citadel installed successfully:
=========================================

Component Tracing installed successfully:
=========================================

Component Pilot installed successfully:
=======================================

Component Injector installed successfully:
==========================================

Component Base installed successfully:
======================================

Component CertManager installed successfully:
=============================================

Component Telemetry installed successfully:
===========================================

Component Prometheus installed successfully:
============================================

Component NodeAgent installed successfully:
===========================================
1
2
3
4
5
6
7
8
9
10
11
12
13
14
15
16
17
18
19
20
21
22
# 在k8s里面查看 , 如果网络不好的话 就需要自己下载好镜像,在各个节点上提前准备好
[root@k8s-master1 istio-1.4.2]# kubectl get deploy -n istio-system -o yaml|grep image

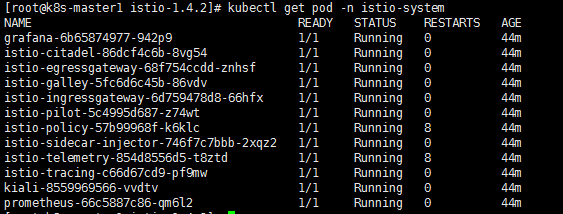
[root@k8s-master1 istio-1.4.2]# kubectl get pod -n istio-system
NAME READY STATUS RESTARTS AGE
grafana-6b65874977-942p9 1/1 Running 0 45m
istio-citadel-86dcf4c6b-8vg54 1/1 Running 0 45m # 安全
istio-egressgateway-68f754ccdd-znhsf 1/1 Running 0 45m # 出的 gateway
istio-galley-5fc6d6c45b-86vdv 1/1 Running 0 45m
istio-ingressgateway-6d759478d8-66hfx 1/1 Running 0 45m # 进的 gateway
istio-pilot-5c4995d687-z74wt 1/1 Running 0 45m # 策略分发
istio-policy-57b99968f-k6klc 1/1 Running 8 45m
istio-sidecar-injector-746f7c7bbb-2xqz2 1/1 Running 0 45m # 为每个pod 注册代理
istio-telemetry-854d8556d5-t8ztd 1/1 Running 8 45m
istio-tracing-c66d67cd9-pf9mw 1/1 Running 0 45m
kiali-8559969566-vvdtv 1/1 Running 0 45m # 可视化网格
prometheus-66c5887c86-qm6l2 1/1 Running 0 45m

[root@k8s-master1 istio-1.4.2]# kubectl get svc -n istio-system

卸载:
[root@k8s-master1 istio-1.4.2]# istioctl manifest generate --set profile=demo | kubectl delete -f -

Sidercar 注入

1
2
3
4
5
6
7
8
9
10
11
12
13
14
15
16
17
18
19
20
21
22
23
24
25
26
27
28
29
30
31
32
# 查看实例
[root@k8s-master1 istio-1.4.2]# cd samples/
[root@k8s-master1 samples]# ls -l
total 72
drwxr-xr-x 7 root root 4096 Dec 7 04:54 bookinfo
drwxr-xr-x 2 root root 4096 Dec 7 04:54 certs
drwxr-xr-x 2 root root 4096 Dec 7 04:54 custom-bootstrap
drwxr-xr-x 2 root root 4096 Dec 7 04:54 external
drwxr-xr-x 2 root root 4096 Dec 7 04:54 fortio
drwxr-xr-x 2 root root 4096 Dec 7 04:54 health-check
drwxr-xr-x 3 root root 4096 Dec 7 04:54 helloworld
drwxr-xr-x 4 root root 4096 Dec 7 04:54 httpbin # http web 小实例
drwxr-xr-x 2 root root 4096 Dec 7 04:54 https
drwxr-xr-x 2 root root 4096 Dec 7 04:54 kubernetes-blog
drwxr-xr-x 2 root root 4096 Dec 7 04:54 multicluster
drwxr-xr-x 2 root root 4096 Dec 7 04:54 operator
drwxr-xr-x 2 root root 4096 Dec 7 04:54 rawvm
-rw-r--r-- 1 root root 98 Dec 7 04:54 README.md
drwxr-xr-x 3 root root 4096 Dec 7 04:54 security
drwxr-xr-x 4 root root 4096 Dec 7 04:54 sleep
drwxr-xr-x 3 root root 4096 Dec 7 04:54 tcp-echo
drwxr-xr-x 2 root root 4096 Dec 7 04:54 websockets

[root@k8s-master1 samples]# cd httpbin/
[root@k8s-master1 httpbin]# ls -l
-rw-r--r-- 1 root root 474 Dec 7 04:54 httpbin-gateway.yaml
-rw-r--r-- 1 root root 1415 Dec 7 04:54 httpbin-nodeport.yaml
-rw-r--r-- 1 root root 1445 Dec 7 04:54 httpbin-vault.yaml
-rw-r--r-- 1 root root 1498 Dec 7 04:54 httpbin.yaml
drwxr-xr-x 2 root root 4096 Dec 7 04:54 policy
-rw-r--r-- 1 root root 1726 Dec 7 04:54 README.md
drwxr-xr-x 2 root root 4096 Dec 7 04:54 sample-client

部署 httpbin Web示例

1
2
3
4
5
6
7
8
9
10
11
12
13
14
15
16
17
18
19
20
21
22
23
24
25
26
27
28
29
30
31
32
33
34
35
36
37
38
39
40
41
42
43
44
45
46
47
48
49
50
51
52
53
54
55
56
57
58
59
[root@k8s-master1 httpbin]# vim httpbin-nodeport.yaml 

apiVersion: v1
kind: Service
metadata:
name: httpbin
labels:
app: httpbin
spec:
type: NodePort
ports:
- name: http
port: 8000
targetPort: 80
selector:
app: httpbin
---
apiVersion: apps/v1
kind: Deployment
metadata:
name: httpbin
spec:
replicas: 1
selector:
matchLabels:
app: httpbin
version: v1
template:
metadata:
labels:
app: httpbin
version: v1
spec:
containers:
- image: docker.io/kennethreitz/httpbin
imagePullPolicy: IfNotPresent
name: httpbin
ports:
- containerPort: 80

[root@k8s-master1 httpbin]# kubectl apply -f httpbin-nodeport.yaml
service/httpbin created
deployment.apps/httpbin created

# 和之前一样的访问web
[root@k8s-master1 httpbin]# kubectl get pods,svc,ep
NAME READY STATUS RESTARTS AGE
pod/httpbin-768b999cb5-pfp8j 1/1 Running 0 99s

NAME TYPE CLUSTER-IP EXTERNAL-IP PORT(S) AGE
service/httpbin NodePort 10.0.0.124 <none> 8000:30991/TCP 99s
service/kubernetes ClusterIP 10.0.0.1 <none> 443/TCP 3h27m

NAME ENDPOINTS AGE
endpoints/httpbin 10.244.1.6:80 99s
endpoints/kubernetes 172.31.228.67:6443 3h27m

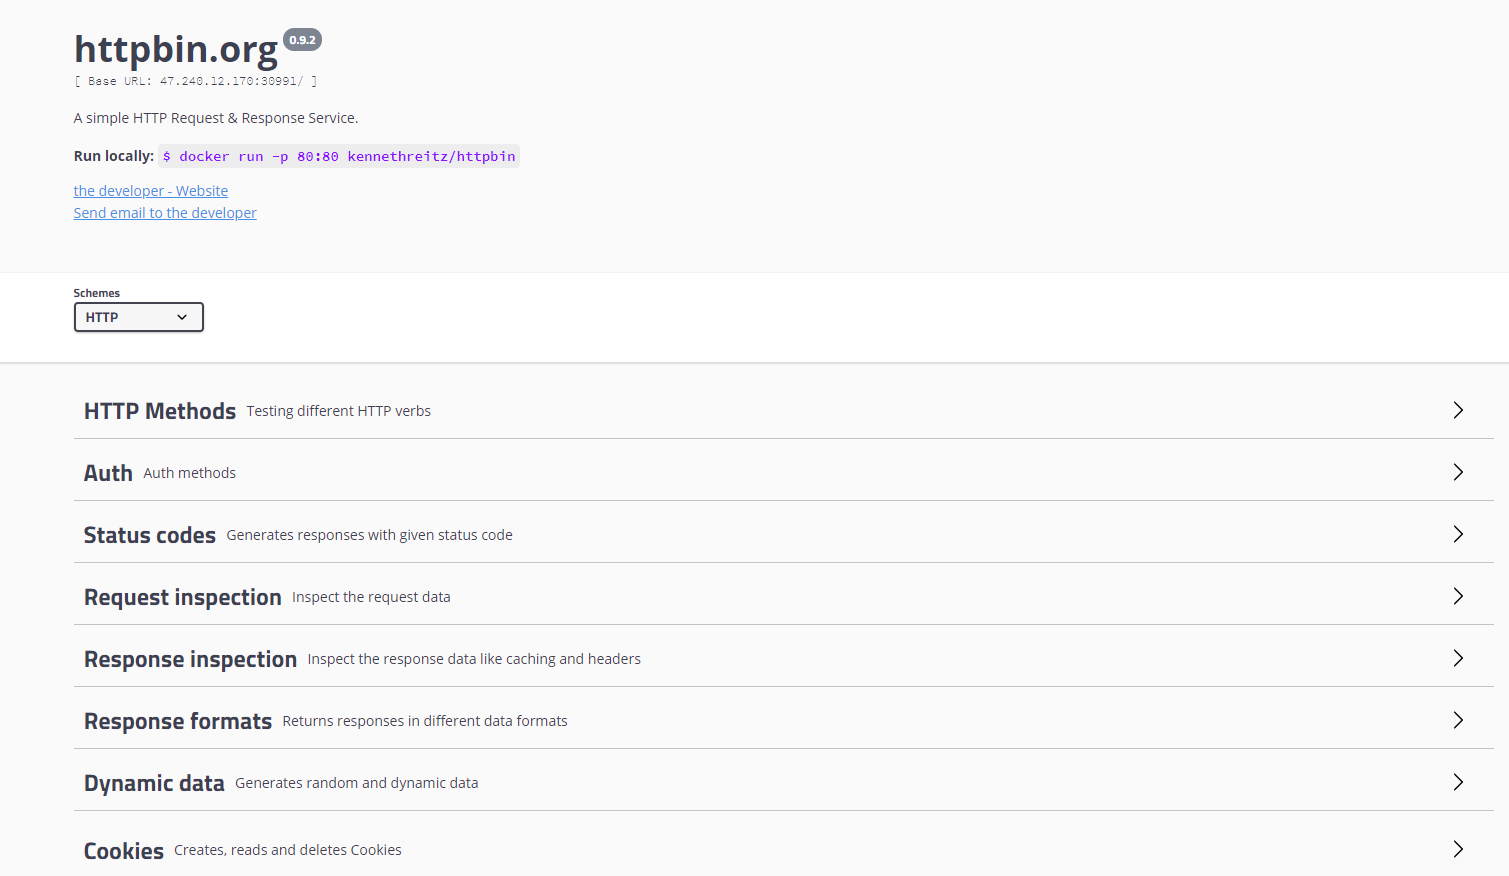
# http://47.240.12.170:30991/
# nodeip+nodeport

手动注入 Sidercar

1
2
3
4
5
6
7
8
9
10
11
12
13
14
15
16
17
18
19
# Sidercar 就是 istio 的 proxy 

[root@k8s-master1 httpbin]# kubectl apply -f <(istioctl kube-inject -f httpbin-nodeport.yaml)
service/httpbin unchanged
deployment.apps/httpbin configured

[root@k8s-master1 httpbin]# kubectl get pods
NAME READY STATUS RESTARTS AGE
httpbin-5c8ff7878b-h7fzf 2/2 Running 0 4m2s


# 或者
istioctl kube-inject -f httpbin-nodeport.yaml |kubectl apply -f -

# 自动注入
# 为命名空间打标签 这个命名空间就会被 istio感知 这个命名空间下的pod都会被注入
kubectl label namespace default istio-injection=enabled
kubectl apply -f httpbin-gateway.yaml
NodePort访问地址:http://nodeip:nodeport
1
2
3
4
5
6
7
8
9
10
11
12
13
14
15
16
17
18
19
20
21
22
23
24
25
26
27
28
29
30
31
32
33
34
35
36
37
38
39
# istio 自身的管控进出流量
Gateway根据流入流出方向分为:
1. IngressGateway:接收外部访问,并将流量转发到网格内的服务。
2. EgressGateway:网格内服务访问外部应用。
# 使用istio自身网关访问
# VirtualService 定义路由规则 类似nginx的虚拟主机概念

[root@k8s-master1 httpbin]# vim httpbin-gateway.yaml

apiVersion: networking.istio.io/v1alpha3
kind: Gateway
metadata:
name: httpbin-gateway
spec:
selector:
istio: ingressgateway
servers:
- port:
number: 80
name: http
protocol: HTTP
hosts:
- "*"
---
apiVersion: networking.istio.io/v1alpha3
kind: VirtualService
metadata:
name: httpbin
spec:
hosts:
- "*"
gateways:
- httpbin-gateway
http:
- route:
- destination:
host: httpbin
port:
number: 8000
1
2
3
4
5
6
7
8
9
10
11
12
13
14
15
16
17
18
19
20
21
22
23
24
25
26
27
28
29
30
31
32
33
34
35
36
37
38
39
40
41
42
[root@k8s-master1 httpbin]# kubectl apply -f httpbin-gateway.yaml 
gateway.networking.istio.io/httpbin-gateway created
virtualservice.networking.istio.io/httpbin created

[root@k8s-master1 httpbin]# kubectl get gateway
NAME AGE
httpbin-gateway 18s

# 找到端口和方式
[root@k8s-master1 httpbin]# kubectl get pods -n istio-system
NAME READY STATUS RESTARTS AGE
grafana-6b65874977-942p9 1/1 Running 0 136m
istio-citadel-86dcf4c6b-8vg54 1/1 Running 0 137m
istio-egressgateway-68f754ccdd-znhsf 1/1 Running 0 137m # 内部访问外部
istio-galley-5fc6d6c45b-86vdv 1/1 Running 0 137m
istio-ingressgateway-6d759478d8-66hfx 1/1 Running 0 137m # 外部访问内部
istio-pilot-5c4995d687-z74wt 1/1 Running 0 137m
istio-policy-57b99968f-k6klc 1/1 Running 8 137m
istio-sidecar-injector-746f7c7bbb-2xqz2 1/1 Running 0 137m
istio-telemetry-854d8556d5-t8ztd 1/1 Running 8 137m
istio-tracing-c66d67cd9-pf9mw 1/1 Running 0 137m
kiali-8559969566-vvdtv 1/1 Running 0

[root@k8s-master1 httpbin]# vim httpbin-gateway.yaml

host: httpbin # k8s service名字

# ingressgateway 也是个svc
[root@k8s-master1 httpbin]# kubectl get svc -n istio-system
istio-ingressgateway LoadBalancer 10.0.0.248 <pending> 15020:30088/TCP,80:31713/TCP,443:31409/TCP,15029:30683/TCP,15030:32202/TCP,15031:30249/TCP,15032:30552/TCP,15443:31498/TCP 139m

# LoadBalancer 对接公有云的LB 类型
# 没人为这个LoadBalancer 创建LB 但是生成了SVC 所以这个的暴露端口就是 80:31713 443:31409

# istio-ingressgateway 相当于 istio自己的一套 ingress
# istio-ingressgateway -> istio-proxy 帮我们拿到流量去做处理

# 请求: nodeip + 31713 -> ingressgateway(负载) -> istio-proxy -> httpbin -> pod
# 请求: nodeip + 30991 -> k8s svc nodeport -> pod

# 日志
[root@k8s-master1 httpbin]# kubectl logs istio-ingressgateway-6d759478d8-66hfx -n istio-system

服务网关 Gateway

  1. Gateway为网格内服务提供负载均衡器,提供以下功能: Envoy
    • L4-L7的负载均衡
    • 对外的mTLS
  2. Gateway根据流入流出方向分为:
    • IngressGateway:接收外部访问,并将流量转发到网格内的服务。
    • EgressGateway:网格内服务访问外部应用。

部署 bookinfo 微服务示例
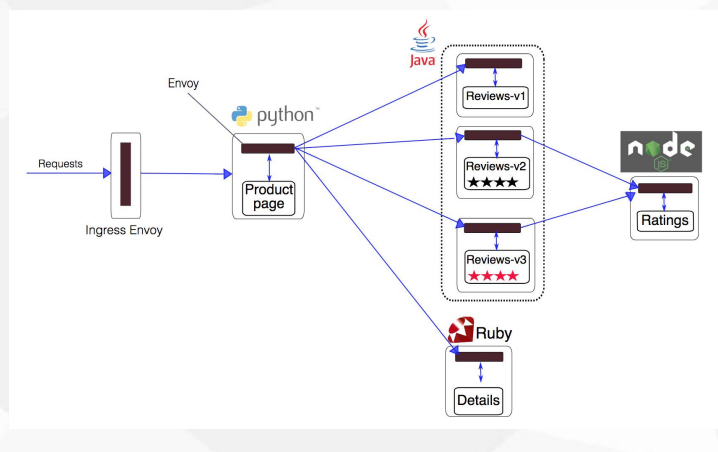
Bookinfo 应用分为四个单独的微服务

  1. productpage :productpage 微服务会调用 details 和reviews 两个微服务,用来生成页面。
  2. details :这个微服务包含了书籍的信息。
  3. reviews :这个微服务包含了书籍相关的评论。它还会调用ratings 微服务。
  4. ratings :ratings 微服务中包含了由书籍评价组成的评级信息。

reviews 微服务有 3 个版本

  1. v1 版本不会调用 ratings 服务。
  2. v2 版本会调用 ratings 服务,并使用 5个黑色五角星 来显示评分信息。
  3. v3 版本会调用 ratings 服务,并使用 5个红色五角星 来显示评分信息。

部署 bookinfo

1
2
3
4
5
6
7
8
9
10
11
12
13
14
15
16
17
18
19
20
21
22
23
24
25
26
27
28
29
30
31
32
33
34
35
36
37
38
39
40
41
42
43
# 创建命名空间
[root@k8s-master1 httpbin]# kubectl create ns bookinfo

# 自动注入 Sidercar
# 为命名空间打标签 这个命名空间就会被 istio感知 这个命名空间下的pod都会被注入
[root@k8s-master1 httpbin]# kubectl label namespace bookinfo istio-injection=enabled

# 创建 bookinfo 一定要确保每个pod的2个镜像都创建成功 Running状态
[root@k8s-master1 httpbin]# cd /opt/istio-1.4.2/samples/bookinfo/
[root@k8s-master1 httpbin]# kubectl apply -f platform/kube/bookinfo.yaml -n bookinfo

[root@k8s-master1 bookinfo]# kubectl get pod -n bookinfo -o wide
NAME READY STATUS RESTARTS AGE IP NODE NOMINATED NODE READINESS GATES
details-v1-78d78fbddf-k242n 2/2 Running 0 7m1s 10.244.1.8 k8s-node1 <none> <none>
productpage-v1-596598f447-fw8qn 2/2 Running 0 7m 10.244.0.8 k8s-node2 <none> <none>
ratings-v1-6c9dbf6b45-v2nrz 2/2 Running 0 7m1s 10.244.2.7 k8s-master1 <none> <none>
reviews-v1-7bb8ffd9b6-d26cg 2/2 Running 0 7m1s 10.244.2.8 k8s-master1 <none> <none>
reviews-v2-d7d75fff8-lfwdj 2/2 Running 0 7m1s 10.244.1.9 k8s-node1 <none> <none>
reviews-v3-68964bc4c8-zvtwf 2/2 Running 0 7m1s 10.244.2.9 k8s-master1 <none> <none>

# gateway网关,需要替换微服务的gateway,需要开发支持,这里面定义了跳转
# 通过ingressgateway 暴露服务
[root@k8s-master1 bookinfo]# kubectl apply -f networking/bookinfo-gateway.yaml -n bookinfo

[root@k8s-master1 bookinfo]# kubectl get svc -n istio-system|grep istio-ingressgateway
istio-ingressgateway LoadBalancer 10.0.0.248 <pending> 15020:30088/TCP,80:31713/TCP,443:31409/TCP,15029:30683/TCP,15030:32202/TCP,15031:30249/TCP,15032:30552/TCP,15443:31498/TCP 5h27m

[root@k8s-master1 bookinfo]# kubectl get svc -n bookinfo
NAME TYPE CLUSTER-IP EXTERNAL-IP PORT(S) AGE
details ClusterIP 10.0.0.149 <none> 9080/TCP 13m
productpage ClusterIP 10.0.0.62 <none> 9080/TCP 13m
ratings ClusterIP 10.0.0.118 <none> 9080/TCP 13m
reviews ClusterIP 10.0.0.184 <none> 9080/TCP 13m


# 访问地址:
http://47.240.12.170:31713/productpage

# 刷新会轮旋3个版本的reviews,都在工作
...
reviews-v1-7bb8ffd9b6-d26cg 2/2 Running 0 7m1s 10.244.2.8 k8s-master1 <none> <none>
reviews-v2-d7d75fff8-lfwdj 2/2 Running 0 7m1s 10.244.1.9 k8s-node1 <none> <none>
reviews-v3-68964bc4c8-zvtwf 2/2 Running 0 7m1s 10.244.2.9 k8s-master1 <none> <none>

通过域名分流

1
2
配置hosts
47.240.15.208 grafana.ctnrs.com kiali.ctnrs.com tracing.ctnrs.com httpbin.ctnrs.com bookinfo.ctnrs.com
1
2
3
4
5
6
7
8
9
10
11
12
13
14
15
16
17
18
19
20
21
22
23
24
25
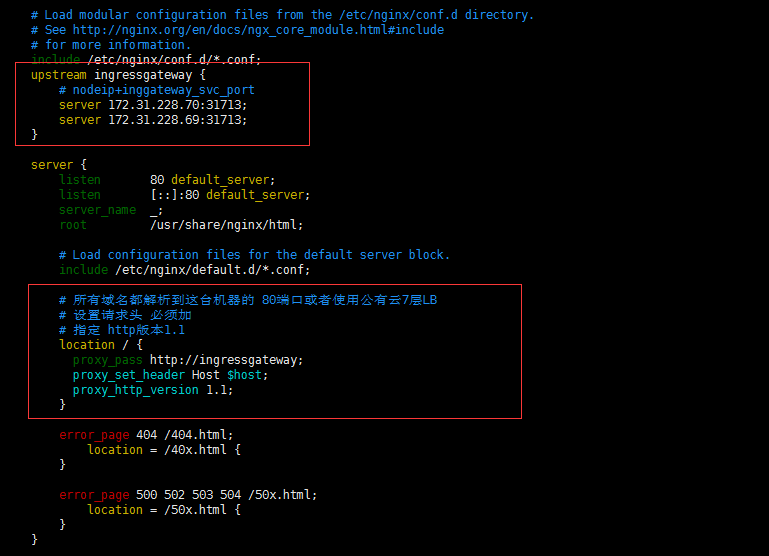
# 增加LB nginx 作为流量的统一入口 -> ingressgateway 
# 找其中一个node节点安装
# 当前的ingressgateway 的svc是以 nodeport方式暴露的 那么现在所有的node节点都可以访问到
[root@k8s-node2 ~]# yum install nginx -y

upstream ingressgateway {
# nodeip+inggateway_svc_port
server 172.31.228.70:31713;
server 172.31.228.69:31713;
}
...
# 所有域名都解析到这台机器的 80端口或者使用公有云7层LB
# 设置请求头 必须加
# 指定 http版本1.1
location / {
proxy_pass http://ingressgateway;
proxy_set_header Host $host;
proxy_http_version 1.1;
}

[root@k8s-node2 ~]# systemctl restart nginx
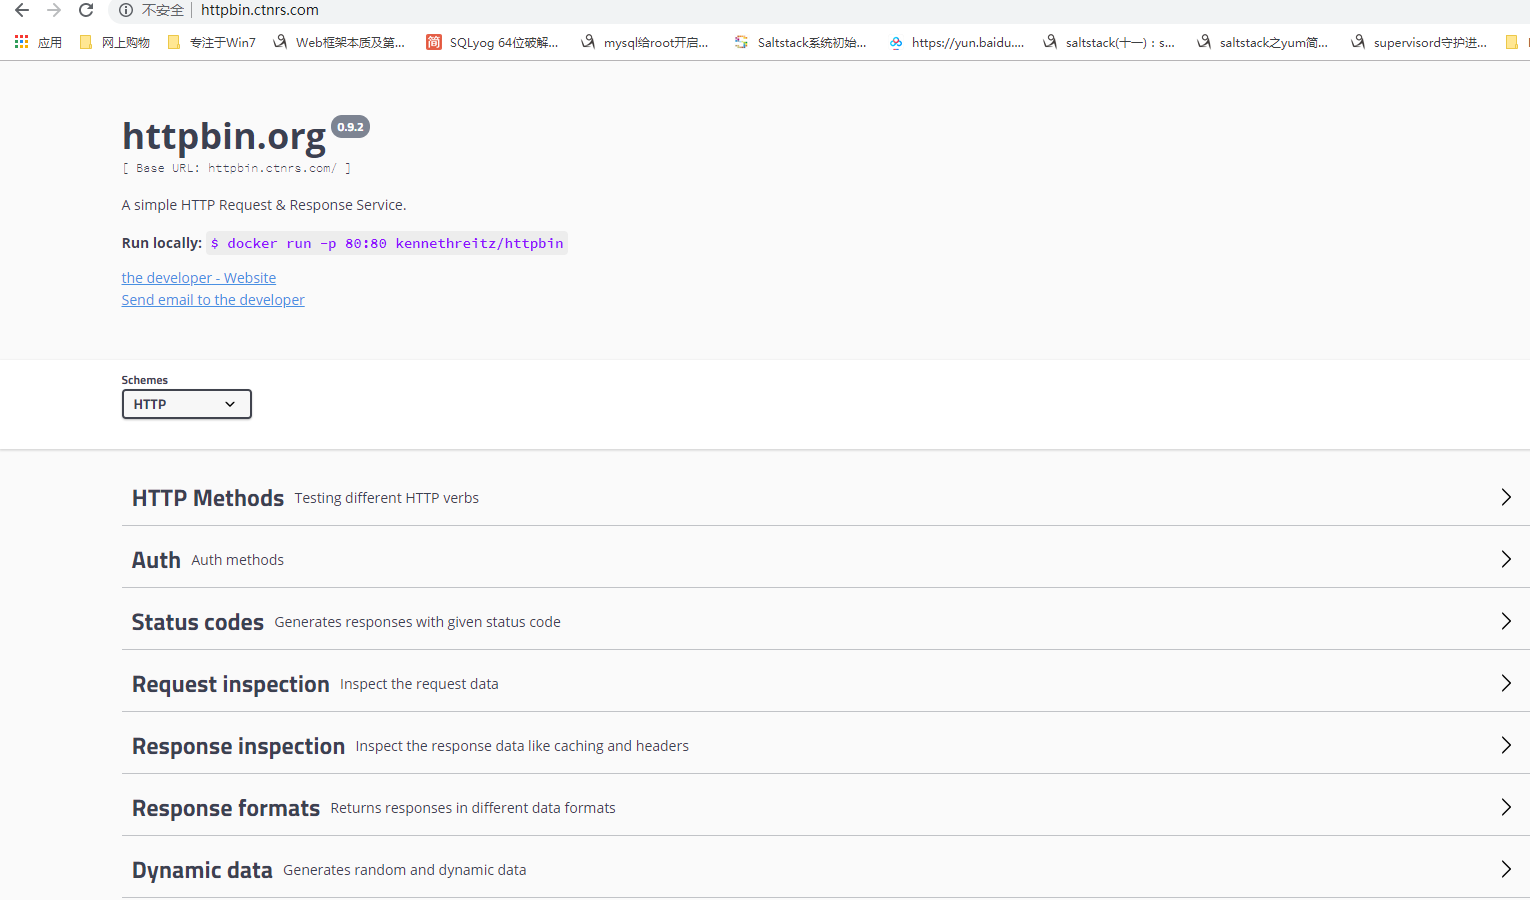
# 访问 http://httpbin.ctnrs.com -> 47.240.15.208 -> 172.31.228.70 nginx -> server 172.31.228.69/70:31713
# 但是这个时候 不管访问哪个域名 都会到 httpbin的页面
# 必须匹配url bookinfo.ctnrs.com/productpage
# 这样并不是用域名做分流,默认还是 httpbin的页面

1
2
3
4
5
6
7
8
9
10
11
# 修改 ingressgateway的 host 
# 如果是用域名区分,以后host那就不能用* 必须用域名区分

[root@k8s-master1 samples]# vim httpbin/httpbin-gateway.yaml
...
hosts:
- "httpbin.ctnrs.com"
[root@k8s-master1 samples]# kubectl apply -f httpbin/httpbin-gateway.yaml

http://httpbin.ctnrs.com 只有这个能访问到了 httpbin
http://bookinfo.ctnrs.com 无法再默认访问到 httpbin
1
2
3
4
5
6
7
8
9
10
11
12
13
14
15
16
17
# 修改 bookinfo 

[root@k8s-master1 samples]# vim bookinfo/networking/bookinfo-gateway.yaml
...
apiVersion: networking.istio.io/v1alpha3
kind: VirtualService
metadata:
name: bookinfo
spec:
hosts:
- "bookinfo.ctnrs.com"
...

[root@k8s-master1 samples]# kubectl apply -f bookinfo/networking/bookinfo-gateway.yaml -n bookinfo

# web访问:
http://bookinfo.ctnrs.com/productpage

Istio 实现灰度发布

1. 主流发布方案:

1
2
3
4
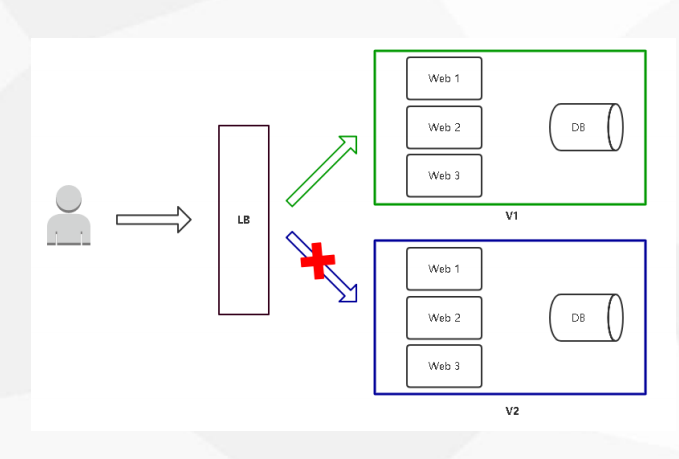
1. 蓝绿发布
2. 灰度发布(金丝雀发布)
3. A/B Test
4. 滚动发布
1
1. 都是为新旧业务切换,保证平滑切换

蓝绿发布

蓝绿发布

  1. 项目逻辑上分为AB组,在项目升级时,首先把A组从负
  2. 载均衡中摘除,进行新版本的部署。B组仍然继续提供服务。
  3. A组升级完成上线,B组从负载均衡中摘除。
  4. 特点:
- 策略简单
- 升级/回滚速度快
- 用户无感知,平滑过渡
  1. 缺点:
- 需要两倍以上服务器资源
- 短时间内浪费一定资源成本

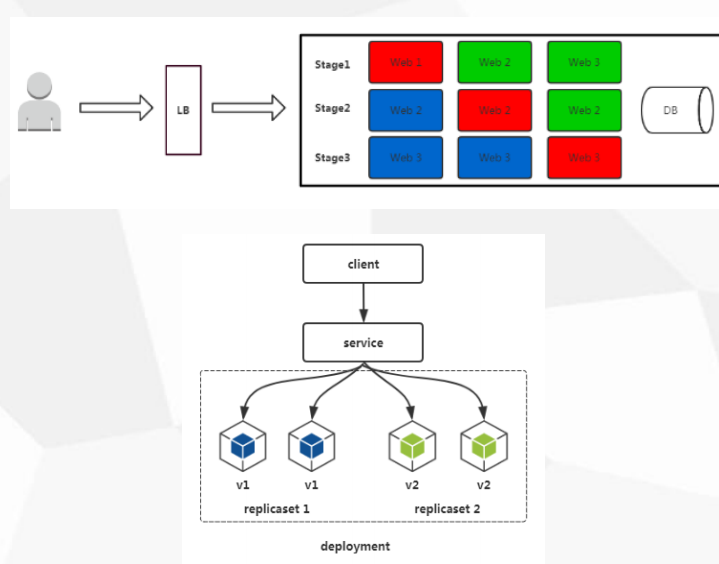
滚动发布

滚动发布

  1. 每次只升级一个或多个服务,升级完成后加入生产环境,不断执行这个过程,直到集群中的全部旧版升级新版本。
  2. Kubernetes的默认发布策略。
  3. 特点:
    • 用户无感知,平滑过渡
  4. 缺点:
    • 部署周期长
    • 发布策略较复杂
    • 不易回滚
    • 有问题影响范围大

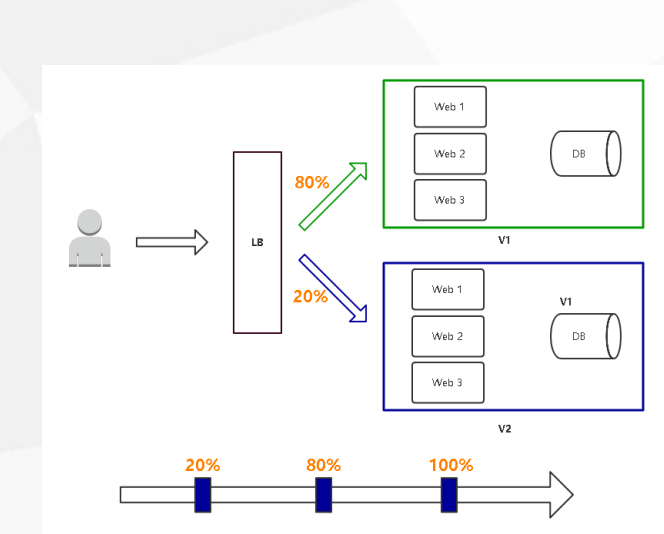
灰度发布(金丝雀发布)

灰度发布(金丝雀发布)

  1. 只升级部分服务,即让一部分用户继续用老版本,一部分用户开始用新版本,如果用户对新版本没有什么意见,那么逐步扩大范围,把所有用户都迁移到新版本上面来。
  2. 特点:
    • 保证整体系统稳定性
    • 用户无感知,平滑过渡
  3. 缺点:
    • 自动化要求高

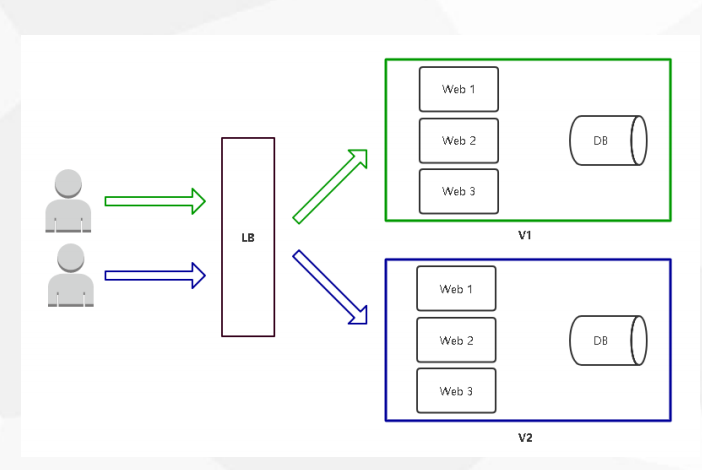
灰度发布 A/B Test

A/B Test

  1. 灰度发布的一种方式,主要对特定用户采样后,对收集到的反馈数据做相关对比,然后根据比对结果作出决策。
  2. 用来测试应用功能表现的方法,侧重应用的可用性,受欢迎程度等,最后决定是否升级。

基于权重的路由(金丝雀发布)
任务

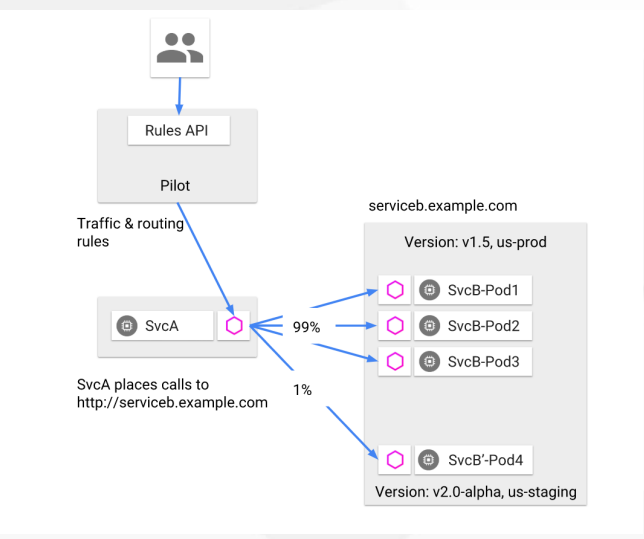
  1. 流量全部发送到reviews v1版本(不带五角星)
  2. 将90%的流量发送到reviews v1版本,另外10%的流量发送到reviews v2版本(5个黑色五角星),最后完全切换到v2版本
  3. 将50%的流量发送到v2版本,另外50%的流量发送到v3版本(5个红色五角星)
1
2
3
4
5
6
7
8
9
10
11
12
13
14
15
16
17
18
19
20
21
22
23
24
25
26
27
kubectl apply -f networking/virtual-service-all-v1.yaml -n bookinfo
kubectl apply -f networking/destination-rule-all.yaml -n bookinfo

kubectl apply -f networking/virtual-service-reviews-90-10.yaml -n bookinfo

kubectl apply -f networking/virtual-service-reviews-v2-v3.yaml -n bookinfo

# 完全切换 v3
[root@k8s-master1 bookinfo]# vim networking/virtual-service-reviews-v2-v3.yaml

apiVersion: networking.istio.io/v1alpha3
kind: VirtualService
metadata:
name: reviews
spec:
hosts:
- reviews
http:
- route:
- destination:
host: reviews
subset: v2
weight: 0
- destination:
host: reviews
subset: v3
weight: 100

基于请求内容的路由(A/B Test)

任务:

  1. 将特定用户的请求发送到reviews v2版本(5个黑色五角星),其他用户则不受影响(v3)
  2. 这个实例是根据请求的用户做区分
  3. jason登录的 都是v2版本
1
kubectl apply -f networking/virtual-service-reviews-jason-v2-v3.yaml -n bookinfo

Istio 实现灰度发布流程

可视化监控

  1. 监控指标(Grafana)
  2. 网格可视化(Kiali)
  3. 调用链跟踪(Jaeger)
1
2
3
4
5
6
7
8
9
10
11
12
13
14
15
16
17
# 通过 istio-ingressgateway 暴露应用
[root@k8s-master1 istio-1.4.2]# ls -l monitor-gateway.yaml
-rw-r--r-- 1 root root 1529 Jan 17 18:24 monitor-gateway.yaml

[root@k8s-master1 istio-1.4.2]# kubectl apply -f monitor-gateway.yaml -n istio-system
gateway.networking.istio.io/grafana-gateway created
virtualservice.networking.istio.io/grafana created
gateway.networking.istio.io/kiali-gateway created
virtualservice.networking.istio.io/kiali created
gateway.networking.istio.io/tracing-gateway created
virtualservice.networking.istio.io/tracing created

# web访问
grafana.ctnrs.com
[root@k8s-master1 istio-1.4.2]# for i in {1..100};do curl -I http://172.31.228.70 -H "Host: http://bookinfo.ctnrs.com/productpage";sleep 1;done
kiali.ctnrs.com admin/admin
tracing.ctnrs.com 链路跟踪 jaeger
1
2
3
4
5
6
7
8
9
10
11
12
13
14
15
16
17
grafana
1、请求错误率
2、请求时延(响应时间)

kiali
3、链路调用拓扑图
4、RPS(每秒请求),也有请求错误率
5、请求/响应数据包大小
6、查看Pod日志
7、istio配置资源在线编辑

jeager
8、一个服务涉及的调用情况
9、分析数据包中具体请求/响应信息
10、也有响应时间

主要针对流量获取。

小总结

1
2
3
用户 -> LB搭理多套ingress -> ingress -> pod 
用户 -> LVS -> dep1 -> svc1 Pod
-> dep2 -> svc1 Pod